Learning how to change colors in crochet is one of the best ways to add creativity and excitement to your projects! Each color change can feel like starting something new, keeping you motivated and inspired to finish. Whether you’re creating stripes, bold patterns, or playful designs, mastering this skill is a must for any crocheter. In this guide, I’ll walk you through exactly how to change colors in crochet step by step.
UPDATED: JANUARY 22, 2024 BY BRITTANY
This post may contain affiliate links. See our Disclosure Policy for more information.

In the next sections, I’ll show you several ways to change colors in your crochet projects, along with a few handy tricks you’ll love. By the end of this guide, you’ll feel confident about changing colors in crochet and ready to add that extra pop to your projects!
Here’s a quick overview of the topics we’ll cover in this article:
- When to Change Colors in Crochet
- Three Simple Steps to Change Colors in Crochet
- How to Change Colors at the End of a Row
- How to Change Colors in the Middle of a Row
- How to Change Colors in Crochet Rounds
- Changing Colors in Crochet Granny Squares
- What is the Easiest Way to Change Colors?
- What are the Best Projects for Changing Colors in Crochet?
When to Change Colors in Crochet
When it comes to changing colors in crochet, two big questions usually pop into your mind: when/where and how. Maybe you already know where you want to switch colors—whether it’s following a pattern or an idea you’re working out as you go. But figuring out how to do it? That’s where I’ve got you covered.
Even though the process itself is simple (trust me, it really is!), there are quite a few options for where to change colors in crochet, and I want to show you as many as possible. First, I’ll walk you through how to change colors in different spots and with common stitches. Then, we’ll dive into the big question about those pesky ends—should you cut them, carry them, or work over them?
No matter where you decide to change colors in your crochet project, the process for adding that new color stays the same—whether it’s at the end of a row, in the middle of a stitch, or anywhere else. There’s just one small exception, but don’t worry—I’ll cover that in a bit!
Three Simple Steps to Change Colors in Crochet
Ready to learn the simple process for changing to a new color? No matter where it happens in your project, or which stitch you’re crocheting, these three steps will never change:
Step 1: When you reach the last stitch in the old color, work the stitch as usual, but stop before the final “yarn over and pull through two” step. This will leave two loops on your hook like this

Step 2: Grab your new color, make a slip knot with the new color leaving a tail, or loop the new yarn over your hook. Pull it through the two loops on your hook to finish the stitch.
Step 3: What you do next depends on a few things—but don’t worry, we’ll cover all of that in the next section!
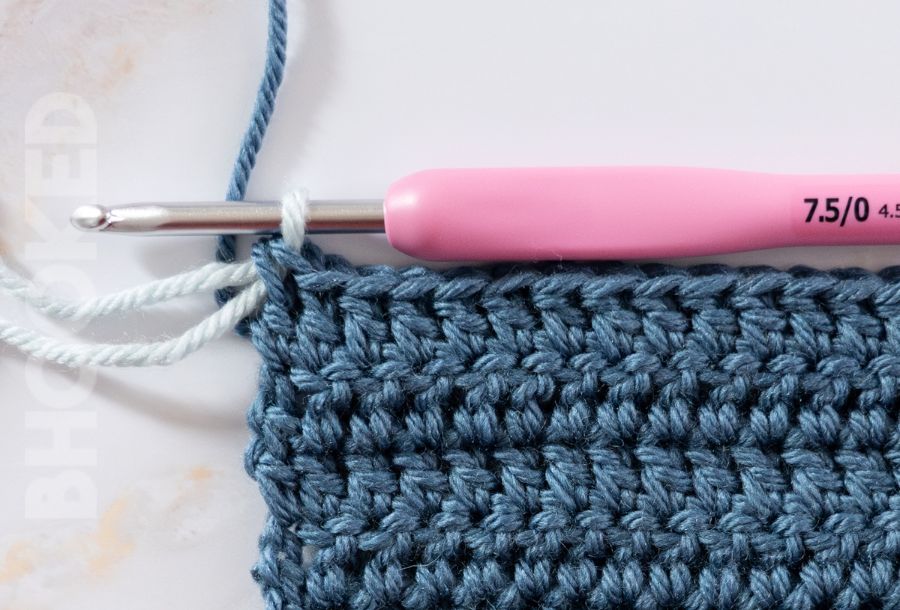
How to change colors in crochet projects at the End of a Row
When you want to add stripes or color blocks to your project, creating a clean transition between colors is key. The easiest way to do this is by changing colors at the end of a row.
For stripes, it’s best to break the old color yarn and continue with the new one. Here’s how to do it:

In this example, I’m using single crochet stitches, but don’t worry—the process works the same for other stitches like half double and double crochet. Just remember to leave those last two loops on the hook, as we discussed earlier.
- At the end of the row before your color change, work the last stitch almost to completion. Stop just before the final “yarn over and pull through two” step.
- Grab your new color and either make a slip knot or leave a tail and loop the new yarn over your hook.
- Pull the new color loop through the two loops on your hook to complete the stitch.
And that’s it! Your new color is ready to work with. From here, simply follow the pattern instructions for the next row.
What should you do with the tail ends?
When you change colors in crochet, you’re left with some tail ends that need to be dealt with. There are a couple of options for hiding and securing these tails:
- Weaving them in at the end of your project. This is the most common method and is pretty straightforward. This article goes over the best tips for weaving in your tails so they stay hidden and secure.
- Crocheting the tails into the next row. This is a popular option because it saves you the step of weaving them in later. But, there are a couple of things to keep in mind: if your next row has any skipped stitches or gaps, the tails could show through. Plus, if your project stretches when worn or used, the tails might work their way out over time.
For years, I stuck with the first option—just weaving in the ends—because it felt like the most secure, even if it did take a little extra time.
Lately, though, I’ve been using something called “the magic knot” whenever I need to change colors or add new yarn to my projects. It’s a small change to the steps for color changes, but it might be a game-changer if you want to skip both the weaving-in and crocheting-over-the-tails steps!
Here’s a quick video to show you how it’s done:
How to Change Colors in Crochet Projects in the Middle of a Row
Once you master changing colors at the end of a row for creating stripes or color blocks in your projects, you might wonder if and how you can change colors somewhere in the middle of the row. When you want to change colors for the purpose of creating visual interest or if you’re using a color graph, changing colors in the middle of the row is the way to go.
Fortunately, this is not only possible, but just as easy as changing colors at the end of a row! Here’s what it looks like with half double crochet stitches (since this stitch technically has three loops on the hook before the last motion of the stitch):

- At the end of the row before your color change, work the last stitch almost to completion. Stop just before the final “yarn over and pull through two” step (or “three” in the case of a half double crochet).
- Grab your new color and either make a slip knot or leave a tail and loop the new yarn over your hook.
- Pull the new color loop through the two loops on your hook to complete the stitch.
And that’s it! Your new color is ready to work with. From here, simply follow the pattern instructions for the next row.
What Should You Do with the Tail Ends in the Middle of Your Project?
What you do with the tail ends really depends on the project and pattern you’re working with.
Some patterns might have you crochet over the old color for a few stitches, which allows you to pick it up and use it again later. This technique is often called “fair isle crochet” or “tapestry crochet” and is perfect for adding colorful designs within a project—like this snowflake cup cozy.
Other patterns might suggest leaving the old color hanging (without cutting it) so you can easily pick it back up in the next row. This is known as “intarsia crochet.”
If you’re unsure about what to do with the tail ends in the middle of your project, check your pattern notes. A tapestry, fair isle, or intarsia pattern should provide instructions on how to handle the ends. If there’s nothing specific mentioned, trimming them and weaving them in is usually a safe bet!
How to Change Colors in Crochet Rounds
So far, we’ve looked at changing colors in rows, where you crochet back and forth in a flat piece. But what if your project is worked in rounds instead?
The good news is that the process is exactly the same! Let’s go through what it looks like to change colors at the end of a round, using double crochet stitches as an example.

- At the end of the row before your color change, work the last stitch almost to completion. Stop just before the final “yarn over and pull through two” step.
- Grab your new color and either make a slip knot or leave a tail and loop the new yarn over your hook.
- Pull the new color loop through the two loops on your hook to complete the stitch.
Now, if you want to change colors in the middle of a round, you’ll follow the same steps. Here’s what it looks like, using a single crochet stitch as an example:

You might notice that I’m crocheting in a round tube rather than a flat circle, but don’t worry—it doesn’t change the process! Changing colors in crochet rounds, whether they’re tubes or flat circles, follows the exact same steps.
Changing Colors in Crochet Granny Squares
Granny squares are one of my absolute favorite things to crochet, and if you love them too, I have plenty of helpful articles here for you to explore!
While solid granny squares are always beautiful, there’s something about a colorful granny square that really stands out. The only catch? All those ends to weave in! For years, I spent a lot of time weaving in all those ends because the finished project was just too pretty to resist.
But then, I discovered a little hack that changed everything. Remember that magic knot I mentioned earlier? It’s a game-changer for changing colors without the hassle of ends to weave in or crochet over. In this article, I’ll show you exactly how it works for granny squares—and if you’d prefer, here’s a video to guide you through it too!
What is the Easiest Way to Change Colors When Crocheting?
The easiest way to change colors in crochet is with this simple trick: When you get to the last part of your stitch, use the old color for everything except the final “yarn over and pull through.” Then, place the new color on your hook and pull it through to complete the stitch. This method ensures a clean, smooth transition from one color to the next, making your color changes look neat and professional.
What are the Best Projects for Changing Colors in Crochet?
Adding color to your crochet projects is always a great idea! It’s a fun way to stay motivated, especially since each new color feels like starting a fresh new project so I find it really helpful to use a lot of colors in bigger projects like blankets and scarves.
While you can incorporate color into any project, here are some of my favorites to inspire your next colorful creation:
- Colorful Granny Square Tote Bag
- Modern Granny Square Blanket with Yarn Scraps
- EASY Striped Baby Blanket
- Classic Granny Square Throw
- Breezy Beginner Crochet Shawl
- Charming Color Block Crochet Baskets
- Striped Chevron Kitchen Towel
- Two-Toned Crochet Infinity Scarf
- GORGEOUS Feather Stitch Blanket
- Cozy Crochet Snood Scarf
- The Everyday Crochet Bag
- Snowflake Coffee Cup Cozy
- Easy Striped Blanket for Beginners
These projects are perfect for trying out your new color-changing skills, with plenty of room for creativity.


