Have you always wanted to make a classic granny square blanket? You’re in the right place! In this post, I’ll show you how to get started and finish crocheting your granny square blanket. I’ve included three different sizes for you to choose from: baby, lap blanket and a couch throw. You can view the pattern here or get the ad-free, printable PDF in our shop.
UPDATED: OCTOBER 8, 2023 BY BRITTANY
This post may contain affiliate links. See our Disclosure Policy for more information.

Skill Level | Easy
Available Sizes | Baby, Lap, Couch Throw
A granny square blanket is a timeless crochet project every crocheter should try at least once. They’re perfect to start in the warmer months and finish as the weather cools down.
No matter if you’ve made a granny square before or not, I’ll guide you through each step to make a blanket in any size you choose.
Here is a quick overview of the topics we’ll cover in this article:
- About this Classic Granny Square Blanket Pattern
- Buy the ad-free, printable pattern
- Supplies
- Yarn Requirements
- Pattern Notes
- Granny Square Blanket Pattern Instructions
- How Many Squares Do You Need?
- How to Crochet a Granny Square (Video)
- Finishing the Granny Squares
- How to Join the Squares Together
- Granny Square Blanket Joining Method (Video)
- Crocheting the Border
- More Granny Square Project Ideas
About this Granny Square Blanket Pattern
Everytime I crochet a granny square blanket, I have so much fun. I love how you can crochet each square in just a few spare minutes whenever your schedule allows.
You don’t have to stick with the classic granny square either. Feel free to use any crochet square pattern you prefer! I’ve included plenty of resources on this page so you can recreate the granny square blanket you see here or design one that’s even better suited to your taste.
While you can crochet a granny square blanket in any size you want, I have included three different sizes for the blanket you see here: Baby, Lap Blanket, and Couch Throw. You’ll find these pattern details first, and near the end of this post, I’ll share tips for making a granny square blanket in any size you want.
You can view the pattern completely free on this page. But, if you prefer having a digital copy that you can save or print, we’ve got you covered with that option as well.
If you’d like to support our work here at B.Hooked, purchasing the digital pattern is a wonderful way to do so!
Recommended Supplies
If you want to make a granny square blanket that looks exactly like the pictures, here’s what you’ll need to get:
- Medium-Weight (#4) Yarn; Bernat Super Value (see yardage requirements below)
- Color A: Natural
- Color B: Oatmeal
- Color C: Cornflower
- Color D: Colonial Blue
- 4 mm Crochet Hook
- Yarn Needle
- Scissors
Yarn Requirements by Size
| Baby (34″ x 42″) | Lap (42″ x 42″) | Throw (50″ x 66″) | |
| Color A | 400 yds | 500 yds | 960 yds |
| Color B | 500 yds | 400 yds | 768 yds |
| Color C | 400 yds | 500 yds | 960 yds |
| Color D | 260 yds | 325 yds | 624 yds |
| Total Yardage | 1,580 yds | 1,745 yds | 3,332 yds |
I’ve made granny squares out of just about any yarn you can think of, and they always turn out great. I went with Bernat Super Value yarn for this project because the colors were exactly what I wanted. But feel free to experiment with different medium-weight yarns when planning out your blanket. The granny square pattern is really flexible, and so far, I haven’t found a yarn that didn’t work or that I didn’t love.
You can also choose as many or as few colors as you’d like! You’ll need about 70 yds per square, but if you use more or less than four colors, you’ll have to experiment to figure out how much yarn of each color you’ll need.
If you want to use more than one color, try this nifty trick so you don’t have so many ends to weave in!
Abbreviations
This pattern is written using standard US crochet terminology.
- Bet | Between
- Bsc | Braided Single Crochet**
- Ch | Chain
- Dc | Double Crochet
- Pc | Popcorn Stitch**
- Rem | Remaining
- Slst | Slip Stitch
- Sp | Space
- St(s) | Stitch(es)
- Yds | Yards
- YO | Yarn Over Hook
Special Stitches:
** Braided Single Crochet (Bsc): Insert hook in the designated st, YO and pull up a loop. Pull this new loop through the loop on the hook. Ch 1.
** Popcorn Stitch (pc): 6 dc in designated stitch. Pull up on the active loop after completing 6th dc and remove your hook. Insert the hook through the first dc, place the active loop on your hook, and pull the active loop through the first dc stitch. Ch 1.
Pattern Notes
- Each double crochet cluster is worked in the space between two clusters of the previous round. So you won’t be crocheting directly into stitches for this pattern.
- The side facing you as you crochet is considered the right side of the granny square.
- This crochet pattern is written in US terms.
If you’ve never crocheted a granny square before, no worries. You can still make this blanket! If you need more guidance than the pattern below, check out my granny square guide for beginners here.
Gauge: To check your gauge, crochet the first four rounds of the granny square. It should measure about 4.75″.
Finished Size: Each square will measure about 8″, and the border measures about 1″. Here are the finished sizes for each of the blankets included in this pattern:
- Baby Blanket: 34″ x 42″
- Lap Blanket: 42″ x 42″
- Couch Throw: 50″ x 66″
If you need to adjust your hook size so that your first 4 rounds measure about 4.75″, it’s best if you do so that way the hat will turn out the size you expect.
Not sure what gauge is? Check out our comprehensive guide to learn all about it here.
Classic Granny Square Blanket Pattern Instructions
Granny Squares
Make 20 for the baby blanket, 25 for the lap blanket, or 48 for the throw
Round 1: Ch 3. Join with a slst to the first ch. Ch 5 (counts as dc and ch 2 throughout). In the center of the ring [3 dc, ch 2] 3 times. 2 more dc in the center of the ring. Slst to the ch-5 sp.
Round 2: Ch 5. In the ch-2 sp, make 3 dc. [In the next ch-2 sp (3 dc, ch 2, 3 dc)] 3 times. In the first ch-2 sp, make 2 dc. Slst to the ch-5 sp.
Round 3: Ch 5. In the ch-2 sp, make 3 dc. *In the sp bet the next 2 dc clusters, make 3 dc. In the next ch-2 sp (3 dc, ch 2, 3 dc). Rep from * two more times. In the sp bet the next 2 dc clusters, make 3 dc. In the first ch-2 sp, make 2 dc. Slst to the ch-5 sp.
A digital pattern is available in our shop so you can print out the pattern
Round 4: Ch 5. In the ch-2 sp, make 3 dc. *[In the sp bet the next 2 dc clusters, make 3 dc] twice. In the next ch-2 sp (3 dc, ch 2, 3 dc). Rep from * two more times. [In the sp bet the next 2 dc clusters, make 3 dc] twice. In the first ch-2 sp, make 2 dc. Slst to the ch-5 sp.
Round 5: Ch 5. In the ch-2 sp, make 3 dc. *[In the sp bet the next 2 dc clusters, make 3 dc] three times. In the next ch-2 sp (3 dc, ch 2, 3 dc). Rep from * two more times. [In the sp bet the next 2 dc clusters, make 3 dc] three times. In the first ch-2 sp, make 2 dc. Slst to the ch-5 sp.
Round 6: Ch 5. In the ch-2 sp, make 3 dc. *[In the sp bet the next 2 dc clusters, make 3 dc] four times. In the next ch-2 sp (3 dc, ch 2, 3 dc). Rep from * two more times. [In the sp bet the next 2 dc clusters, make 3 dc] four times. In the first ch-2 sp, make 2 dc. Slst to the ch-5 sp.
Round 7: Ch 5. In the ch-2 sp, make 3 dc. *[In the sp bet the next 2 dc clusters, make 3 dc] five times. In the next ch-2 sp (3 dc, ch 2, 3 dc). Rep from * two more times. [In the sp bet the next 2 dc clusters, make 3 dc] five times. In the first ch-2 sp, make 2 dc. Slst to the ch-5 sp.
Round 8: Ch 5. In the ch-2 sp, make 3 dc. *[In the sp bet the next 2 dc clusters, make 3 dc] six times. In the next ch-2 sp (3 dc, ch 2, 3 dc). Rep from * two more times. [In the sp bet the next 2 dc clusters, make 3 dc] six times. In the first ch-2 sp, make 2 dc. Slst to the ch-5 sp.
If you notice that your granny squares are twisting, here’s a really easy way to make sure they stay perfectly square!
How to Crochet a Granny Square Step-by-Step Video
Video not displaying? Watch this tutorial on YouTube instead.
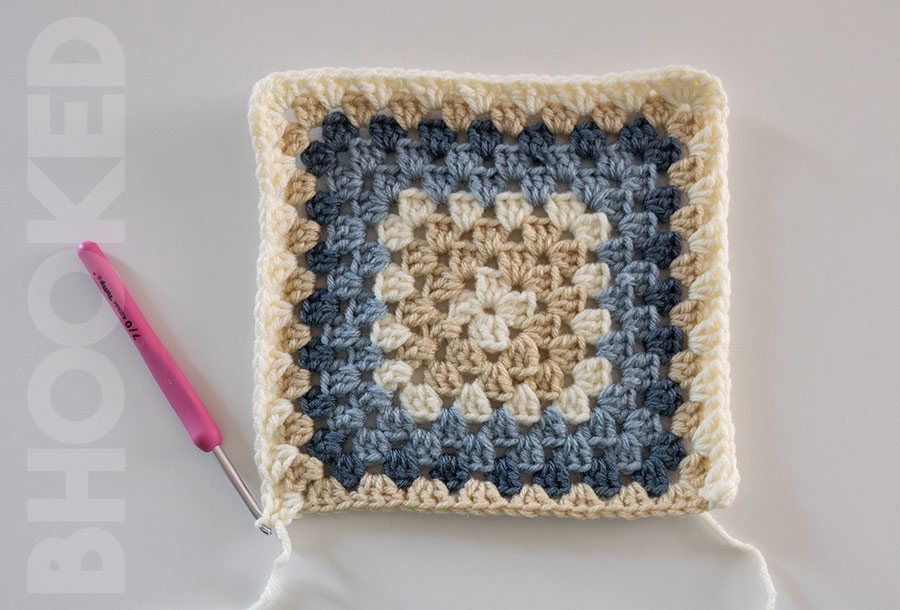
Finishing the Granny Squares
After finishing the last round, cut the working yarn (leaving a long enough tail to weave in). Pull the tail through the last stitch to secure it. Then use a yarn needle to weave in the loose ends along the back side of the granny square.
If your granny squares look less than perfect, no worries! It’s pretty common for the corners to be a little rounded and the sides to be a little wavy. That’s why I recommend blocking them before you start joining them together.
This process will “set” the stitches into a perfectly square position so your bag will look more polished and professional.

If you have more questions about crocheting granny squares, check out my complete granny square guide here!
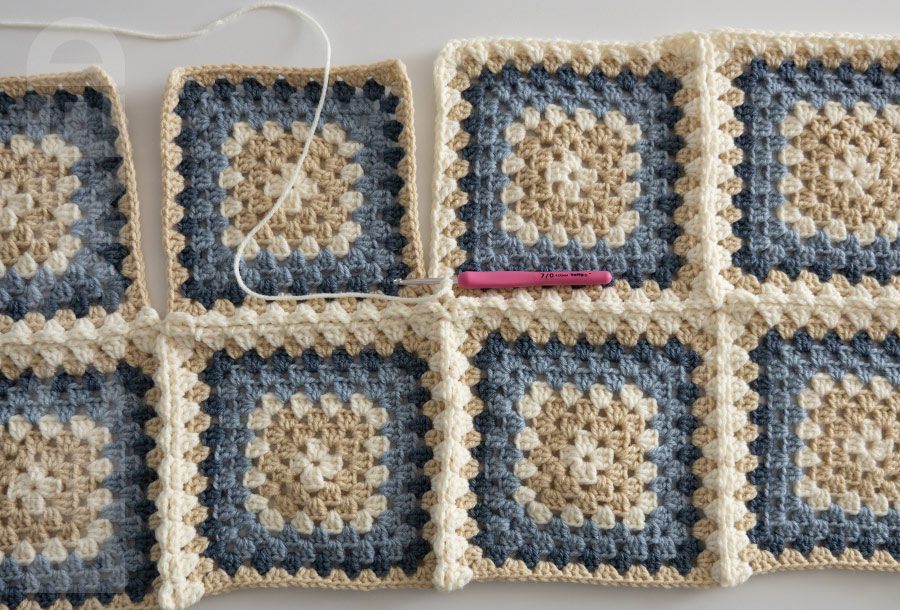
Granny Square Blanket Joining Method
There are all sorts of ways to join granny squares together, but my favorite method is the join as you go. With this technique, you crochet the last round of each square while joining them together, and it makes the process a lot more fun.
If you want to explore other joining methods, check out these five easy ways to join granny squares. Any of them would work for your blanket if you want a slightly different look!
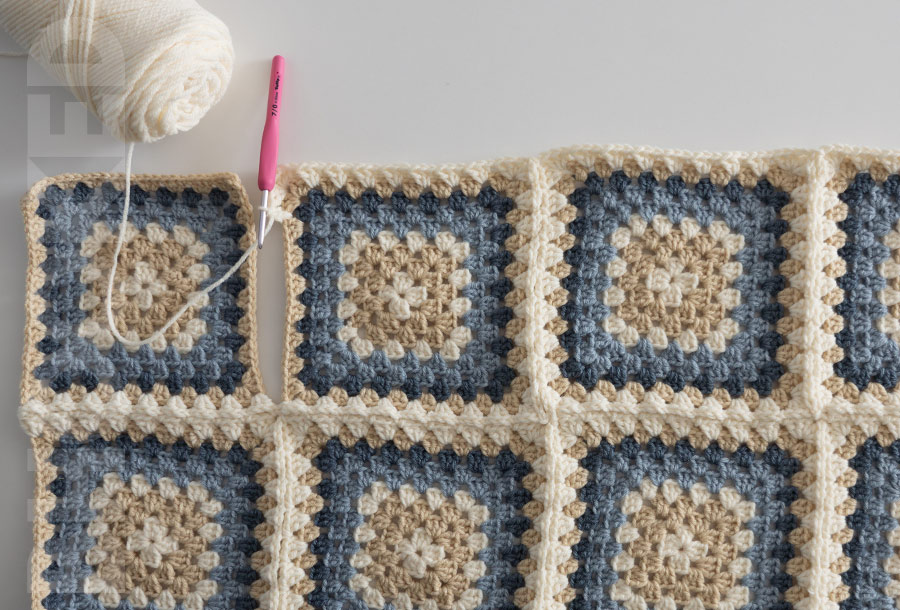
Join as You Go Granny Squares Step 1:
First, decide how you want your granny squares to be arranged in your project. If the colors match on all squares, it doesn’t matter how you arrange them. Start with the bottom right square (or bottom left if you’re left-handed).

Step 2:
Attach the yarn in any corner of the first granny square. Instead of making 3 ch, make one to attach the new yarn. Then make three double crochets in the same corner.


Step 3:
Crochet three sides of this first granny square as usual.
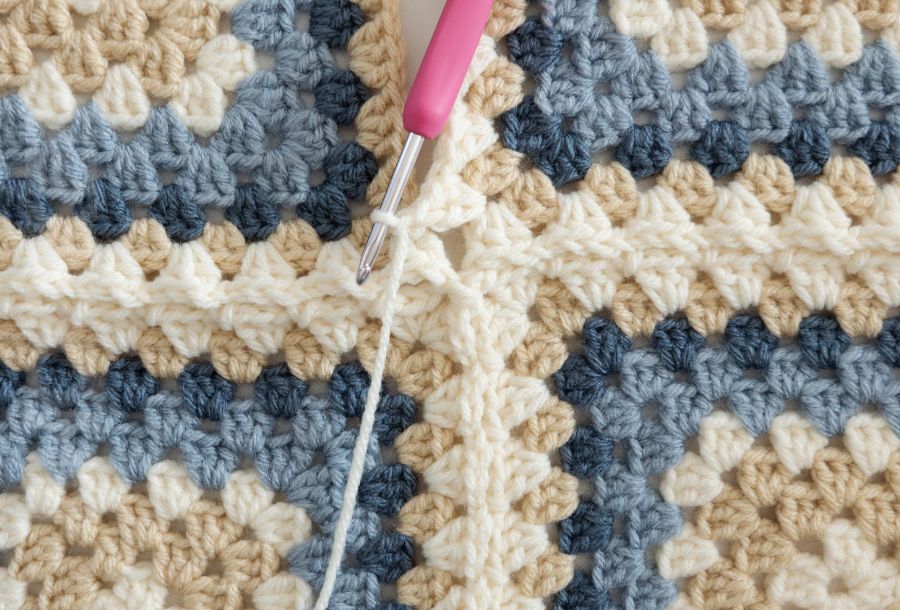
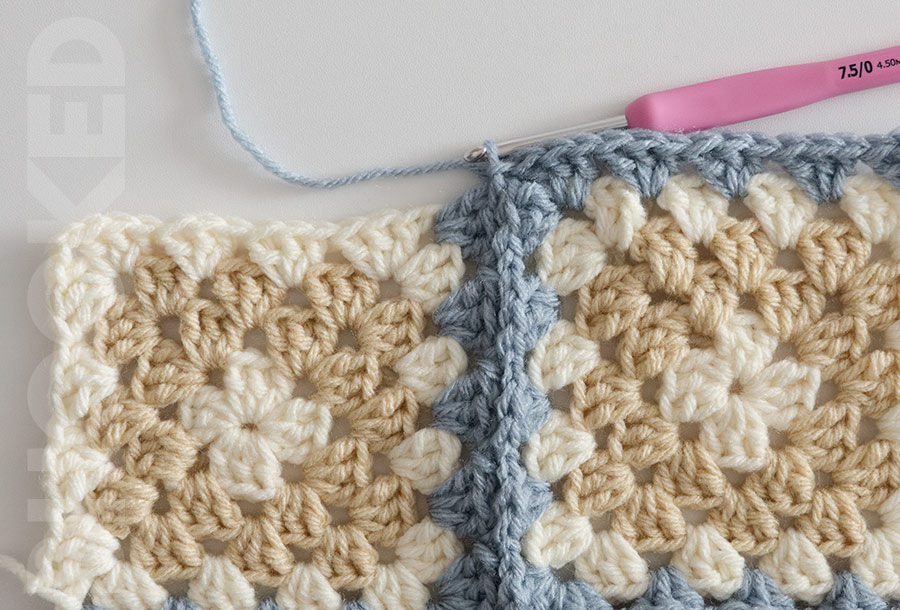
Step 4:
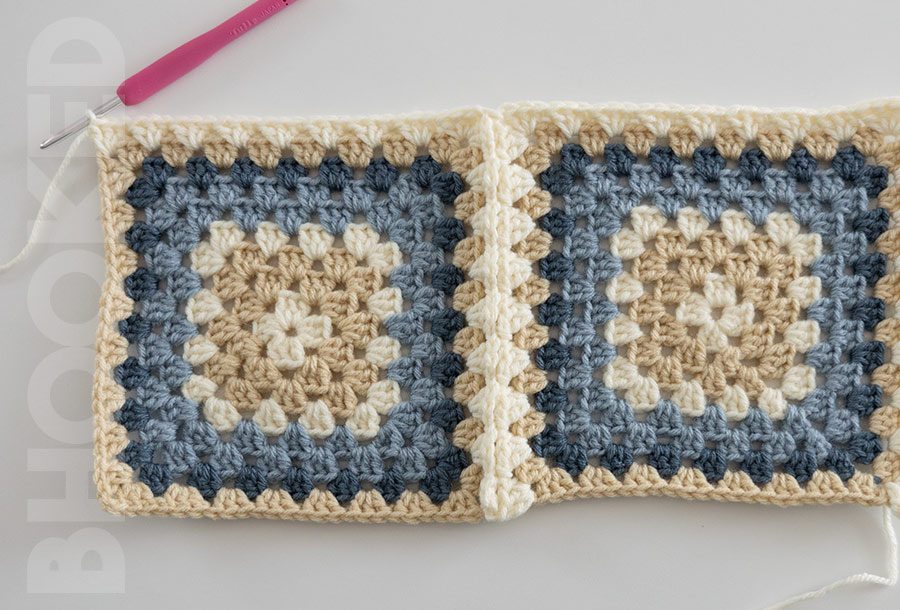
When you get to the third corner, make only three double crochets. Ch 2. In any ch-2 sp of the next granny square, make three double crochets.

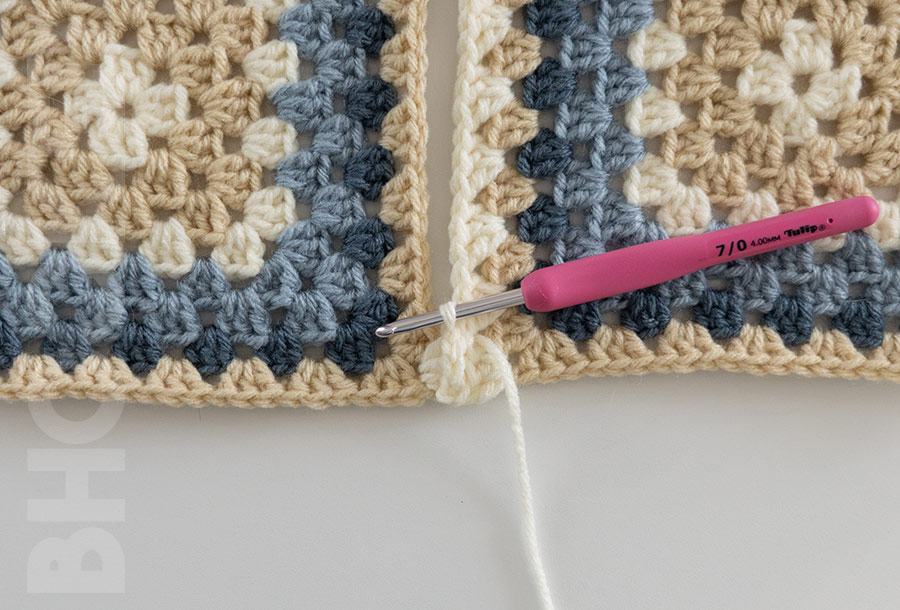
Step 5:
Next, slip stitch in the space between double crochet clusters on the first granny square. This starts the first join row.

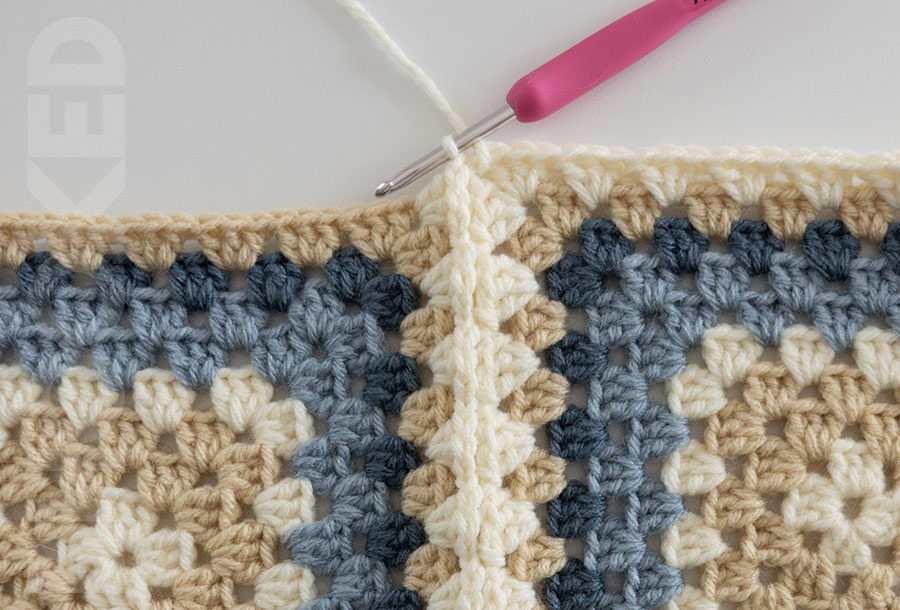
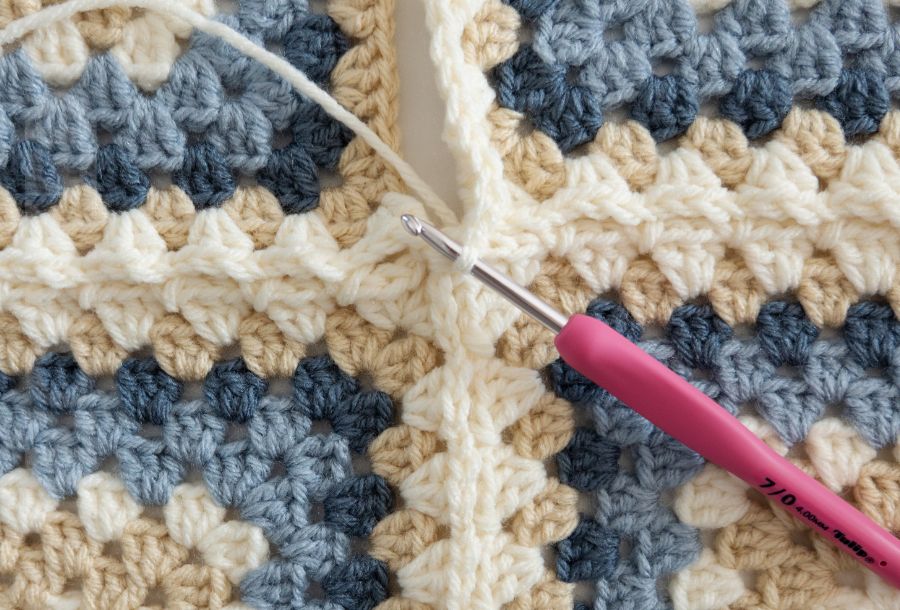
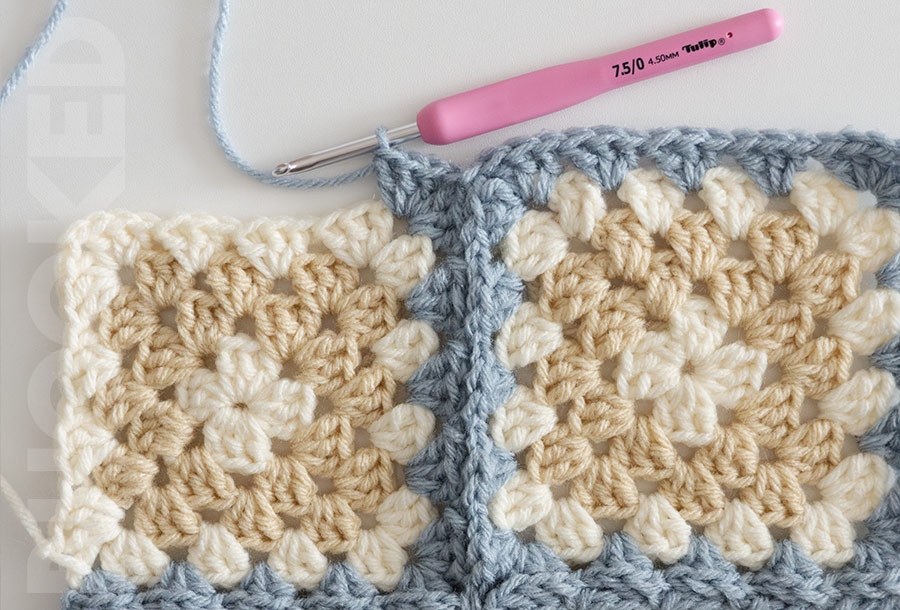
Step 6:
After the slip stitch, make your next cluster of double crochets as usual on the second granny square. Then slip stitch in the next space on the first granny square. Repeat this until you reach the corner of the second granny square. Slst in the corner of the first granny square, and ch 1.
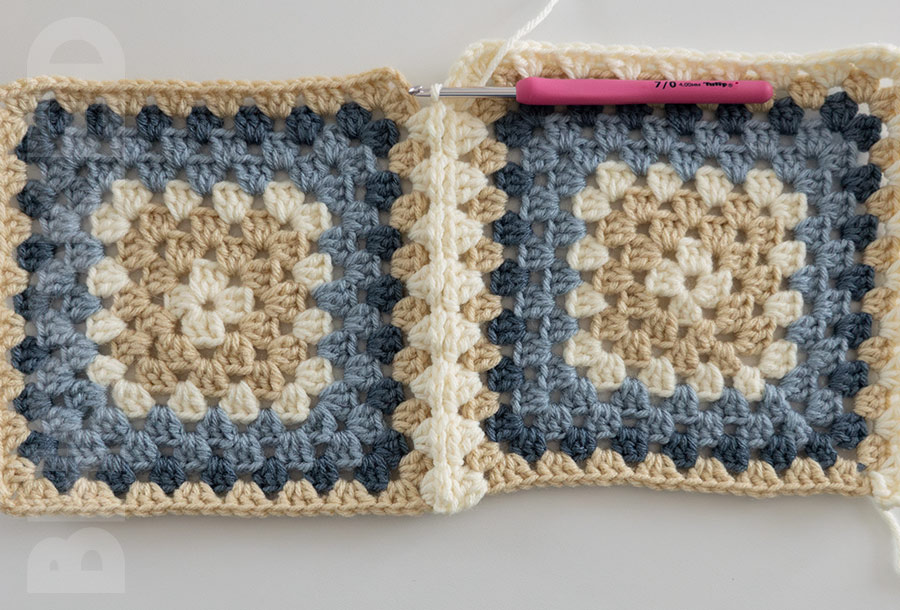
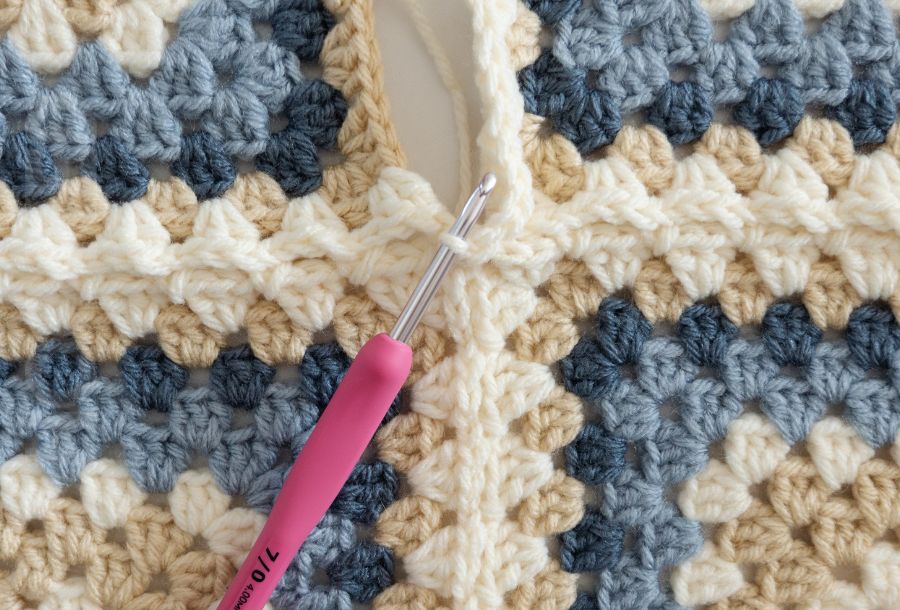
Step 7:
Crochet along the top edge and down the side of the second square as you normally would.

Step 8:
Repeat steps 4 through 6 to add more granny squares in the first row (4 squares for the baby blanket, 5 squares for the lap blanket, and 6 squares for the throw). On the last square, crochet the join side and along the top, but don’t crochet down the side.
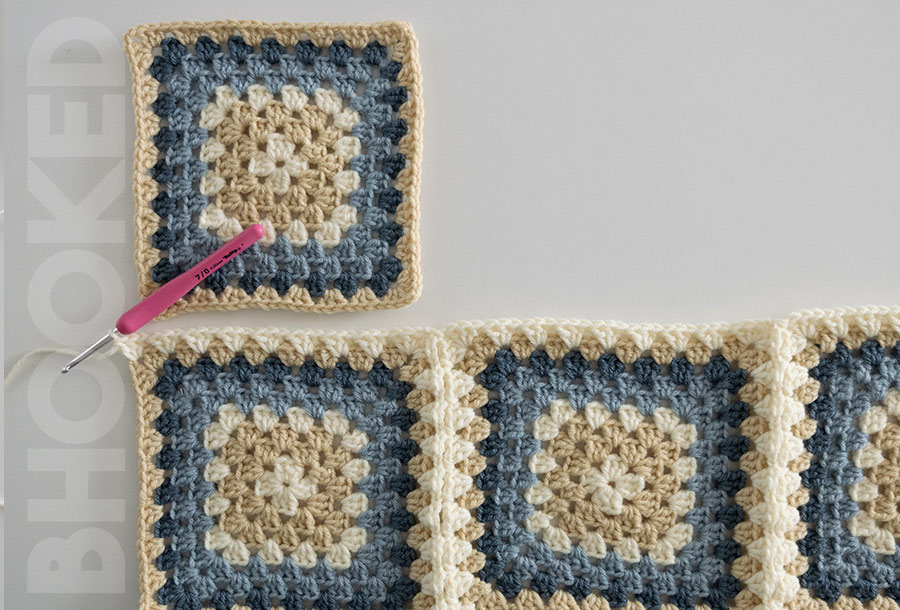
Step 9:
The next square to join is the first square in the second row of squares. This should be the leftmost square (right if you’re left-handed). Make 3 dc in the new ch-2 sp, and work the join row as before.
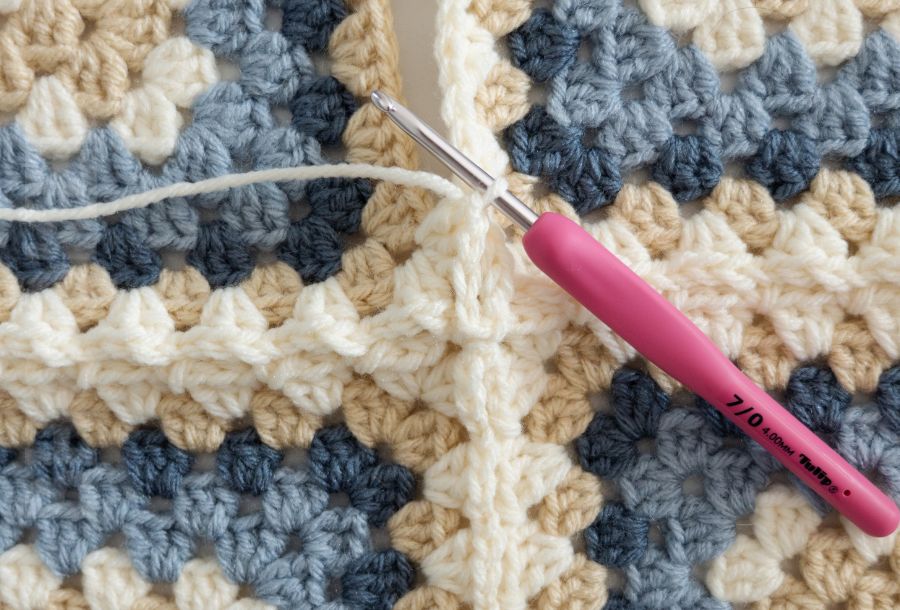
Step 10:
When you reach the second corner of the new square, slst to the ch-2 sp of the adjacent square in the first row. Then work the join row with the new square.

Step 11:
Repeat the last two steps for as many squares as you need to finish the second row.

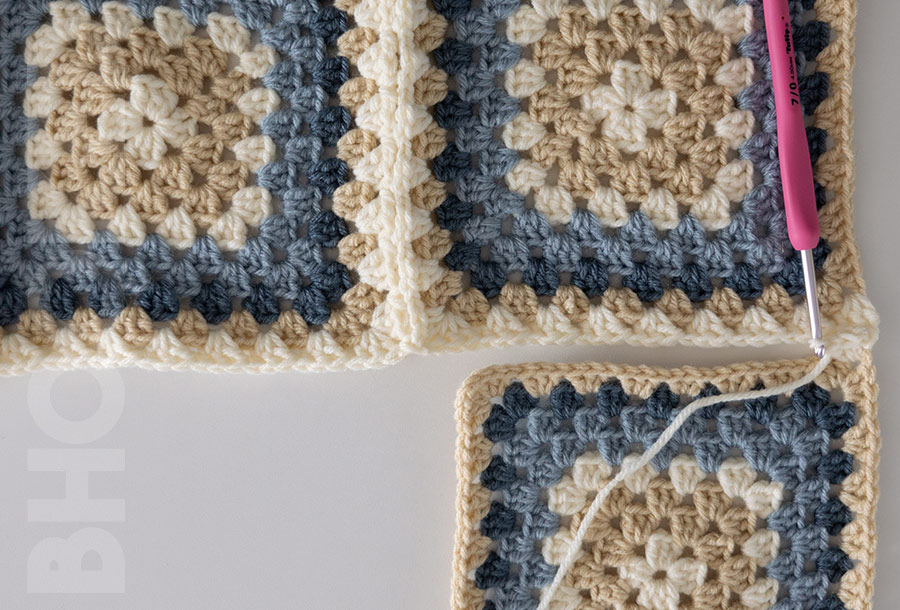
Step 12:
After adding the last square, crochet normally along the three remaining sides. When you get to the last corner, make three double crochets, chain one, and slst to the corner of the adjacent granny square (the one right next to your hook.
Step 13:
Slip stitch to the corner of the adjacent square (the one right next to your hook), rotate the work, chain one, and crochet a regular join row.
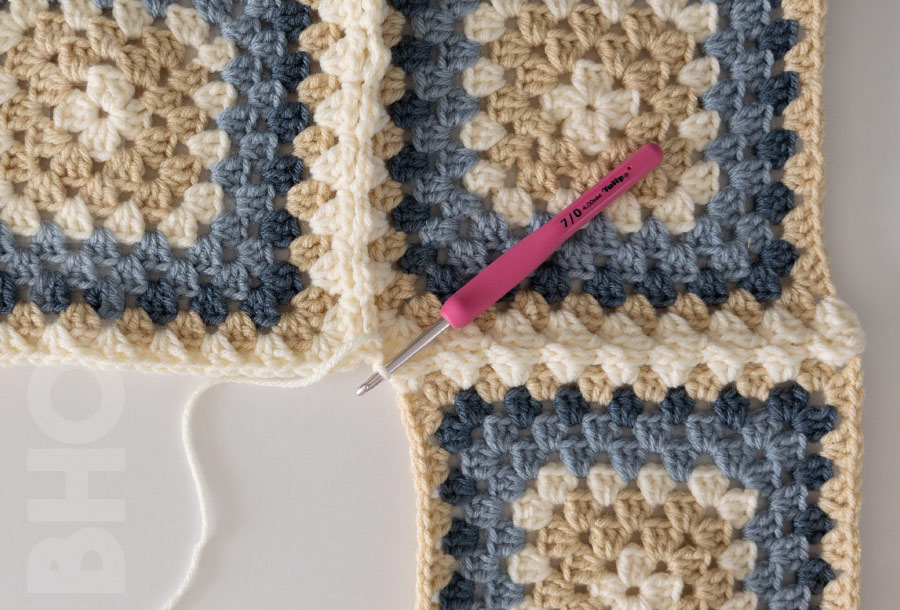
Step 14:
Crochet along the top edge and down the side of this square as usual.
Step 15:
Continue with the next squares just as you joined the previous one – one join side, two regular sides.
Repeat
For subsequent rows of squares, follow the same process as the second row.

Finishing Join as You Go Granny Squares
When you have all of your squares joined, you’ll need to finish by crocheting down the side and along the bottom of your project. Just crochet these sides as you normally would for a granny square. But when you get the half-worked corners, here’s how you can handle them:
Make three double crochets in the first corner. Then slst to the ch-2 sp.
And make 3 dc in the next ch-2 sp.
Fasten off, and weave in any remaining ends.
Granny Square Blanket Join as You Go Step-by-Step Video
If you prefer learning by watching, I recommend checking out this video. In it, I’ll guide you through joining six granny squares using the continuous join as you go technique.
Video not displaying? Watch this tutorial on YouTube instead.
Crocheting the Border
This simple, yet textured border is one of my favorites for blankets. It’s quick, and easy, and shouldn’t take you long to crochet.
Round 1: Join color A in the ch 2-sp of any of the four corners. Ch 1 (doesn’t count as st here and throughout border) and sc in the same ch-2 sp. Then ch 2, and sc in the same ch-2 sp. [Make 1 sc in each st to the next ch-2 sp. In the ch-2 sp, (sc, ch 2, sc)] three times. Make 1 sc in each st to the end of the round. Slst to the first sc of this round. Break color A, and join color C.
Round 2: With color C, ch 1 and sc in the same st. Then ch 2 and sc in the same ch-2 sp. [Make 1 sc in each st to the next ch-2 sp. In the ch-2 sp, (sc, ch 2, sc)] three times. Make 1 sc in each st to the end of the round. Slst to the first sc of this round. Break color C, and join color D.
Round 3: With color D, ch 1 and sc in the same st. Then ch 2 and sc in the same ch-2 sp. [Make 1 sc in each st to the next ch-2 sp. In the ch-2 sp, (sc, ch 2, sc)] three times. Make 1 sc in each st to the end of the round. Slst to the first sc of this round.
Round 4: Continuing with color D, slst in the next ch-2 sp. Ch 3 (counts as first dc of pc), and make 5 dc in the same ch-2 sp, and finish the popcorn stitch using the third ch as the first st. [Make a Bsc in each st to the next ch 2-sp. In the ch-2 sp, pc] three times. Make a Bsc in each st to the end of the round. Slst to first pc to finish the round.
Fasten off and weave in the ends.
By using this pattern, you agree to our terms of use:
This pattern is for personal use only.
You agree not to modify, publish, share, sell, or create derivative works from the content on this page, in whole or in part. If you’d like to share this pattern, please share the link to this webpage only. You may sell finished items made from this pattern.


