This modern granny square blanket is a great way to turn your medium-weight yarn into a stunning blanket your family will love for years. It’s so fun and exciting to crochet! You can follow the free pattern here on this page, or you can buy the ad-free, printable PDF from our shop.
UPDATED: DECEMBER 11, 2024 BY BRITTANY
This post may contain affiliate links. See our Disclosure Policy for more information.

Skill Level | Intermediate
Finished Size | 45″ wide; 59″ long
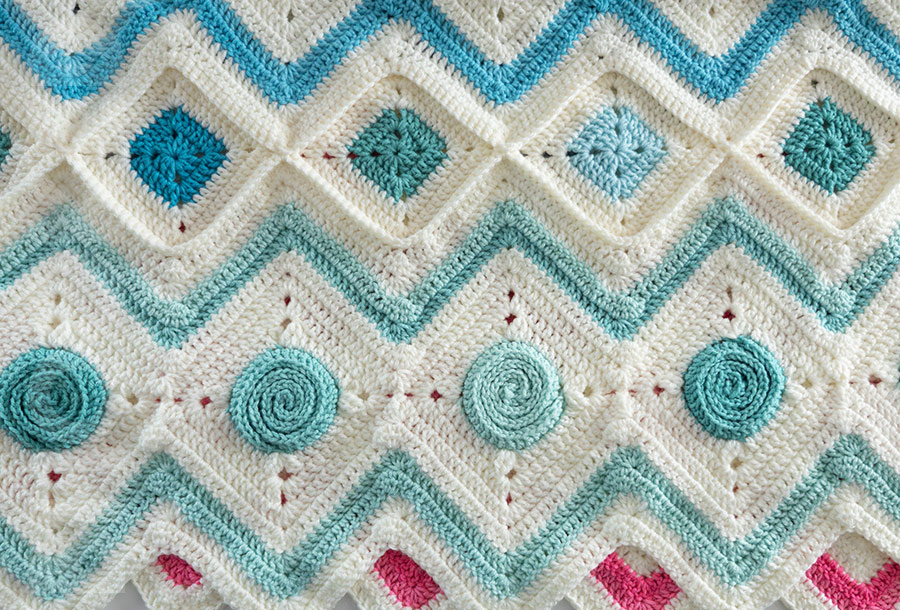
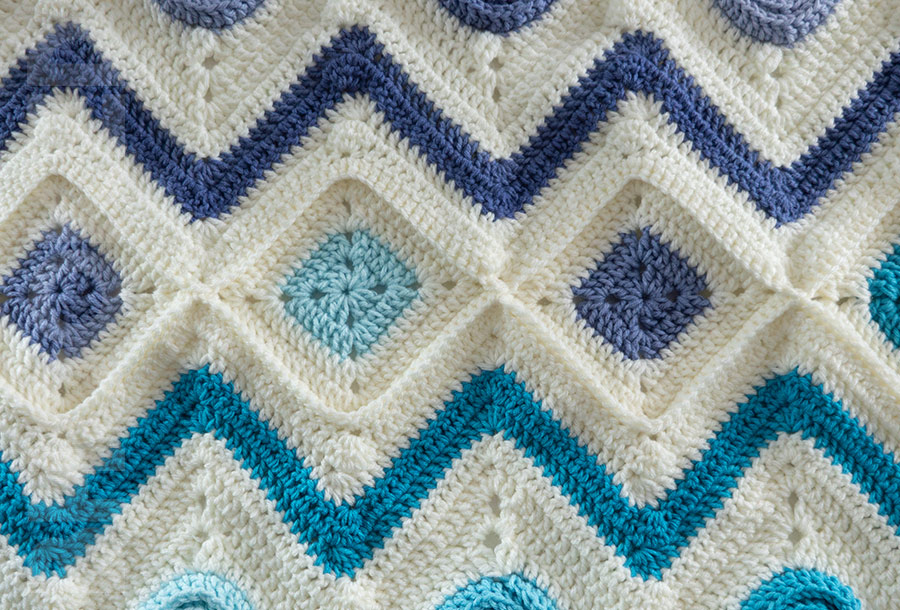
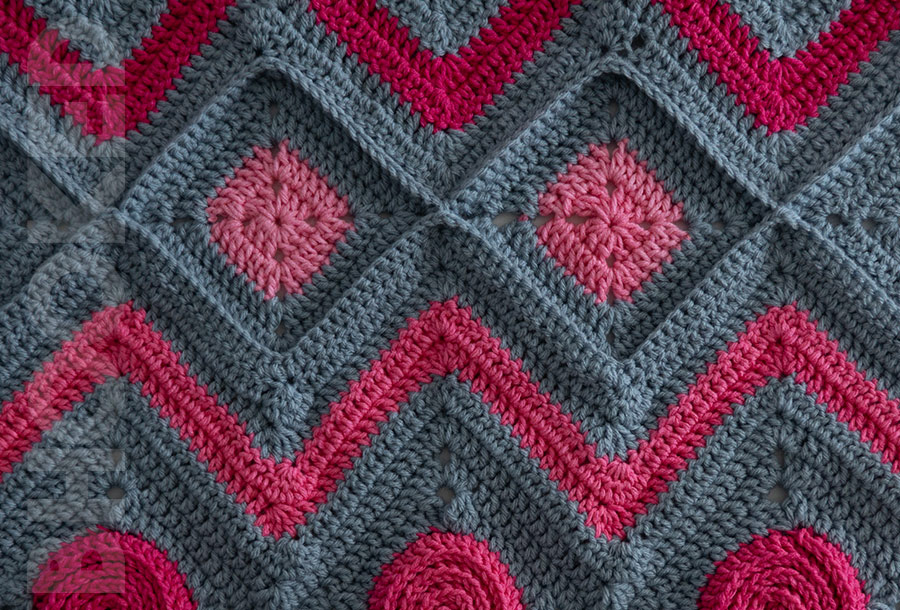
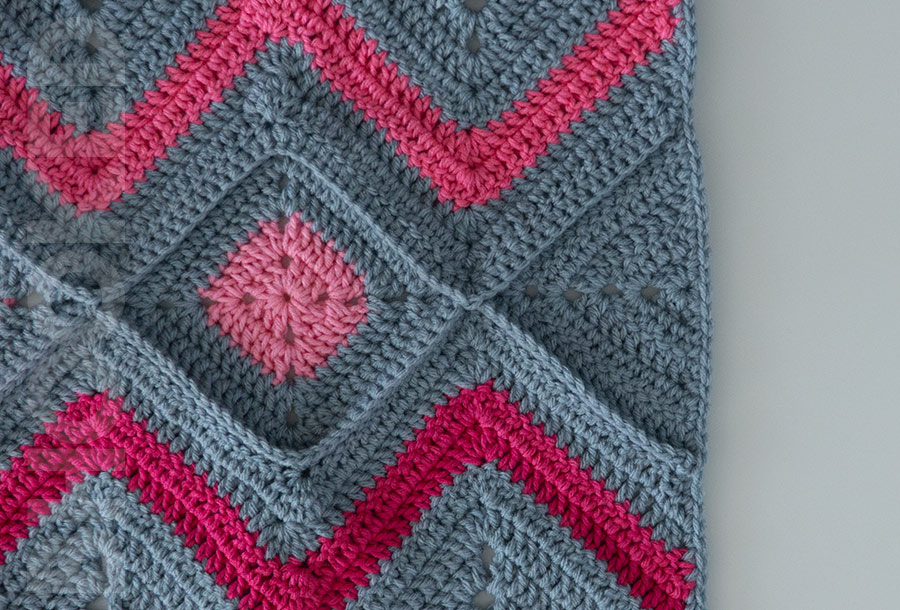
If you’re a fan of granny squares but prefer a modern look, this blanket is a perfect pick! It combines two unique types of modern granny squares with a simple chevron stitch that works up quickly using everyday medium-weight yarn. You’ll have it done in weeks, not months!
This blanket was our featured project for the time-based crochet challenge in early 2024. Hundreds of participants finished their blankets in less than a month—proof that it’s not only beautiful but also quick to make.
About this Modern Granny Square Crochet Blanket Pattern
Putting this blanket together is so much fun! You’ll make squares and chevron rows that form four panels, which are then joined to complete the blanket. Projects like this are perfect for a challenge because they use different techniques, keeping things exciting from start to finish.
This blanket gives you plenty of practice with different stitches and skills. You can use as many colors as you want, and the final result will be absolutely stunning. Keep reading to check out the FAQs and pattern details, or scroll down to jump straight to the free pattern!
Prefer a more modern granny square blanket? Check our my classic granny square blanket here!
Pattern Overview:
- Supplies
- Buy the ad-free, printable pattern
- Abbreviations
- Pattern Notes
- Gauge and Finished Size
- Modern Granny Square Crochet Blanket Pattern
- How to Crochet this Modern Granny Square Blanket – Tutorial
- More Free Crochet Blanket Patterns
You can view the pattern completely free on this page. But, if you prefer having a digital copy that you can save or print, we’ve got you covered with that option as well.
If you’d like to support our work here at B.Hooked, purchasing the digital pattern is a wonderful way to do so!
Recommended Supplies
- About 2,630 yds Medium-Weight (#4) Yarn ; 1,670 yds Main Color; 960 yds Total Contrast Colors
- 4.5 mm Crochet Hook (or size needed to obtain gauge)
- Stitch Markers
- Yarn Needle
- Scissors
This blanket requires 1,670 yards of main color yarn and 960 yards of contrast color yarn. So, you’ll require 5 skeins of Red Heart With Love and at least two skeins of Red Heart Super Saver Ombre if you want to use the same yarn that I used.
It’s a pretty precise amount of yarn, but keep in mind that it might be a little more or less if you use a different yarn. Variations in yarn weight and thickness, and even subtle differences in tension can cause you to need more or less yarn.
If you want to replicate my color pattern you will need the following:
- Color A (main color) = Red Heart With Love Eggshell = 1,670 yds (5 skeins)
- Color B = Super Saver Ombre Spearmint = 240 yds (1 skein)
- Color C = Super Saver Ombre Baja Blue = 240 yds (1 skein)
- Color D = Super Saver Ombre Jazzy = 240 yds (1 skein)
- Color E = Super Saver Ombre Scuba = 240 yds (1 skein)
Please note that yardage requirements are dependent on you matching the pattern gauge. Yarn substitutions may also result in using more or less yarn.
Abbreviations
This pattern is written using standard US crochet terminology.
- BLO Back Loop Only
- Ch Chain
- CL Cluster
- Cont Continue
- Dc Double Crochet
- Dc2tog Double Crochet Two Together**
- Dc3tog Double Crochet Three Together**
- Hdc Half Double Crochet
- Hk Hook
- Rem Remaining
- Rep Repeat
- Sc Single Crochet
- Sk Skip
- Slst Slip Stitch
- Sp Space
- St(s) Stitch(es)
- Tc Treble Crochet
- YO Yarn Over
**Double Crochet Two Together (Dc2tog): YO and insert hook in the first designated stitch. YO and pull up a loop. YO and pull through two loops. YO and insert hook in next designated stitch. YO and pull up a loop. YO and pull through two loops. YO and pull through rem 3 loops on hook.
**Double Crochet Three Together (Dc3tog): YO and insert hook in the first designated stitch. YO and pull up a loop. YO and pull through two loops. [YO and insert hook in next designated stitch. YO and pull up a loop. YO and pull through two loops] twice. YO and pull through rem 4 loops on hook.
**Double Crochet Five Together (Dc5tog): YO and insert hook in the first designated stitch. YO and pull up a loop. YO and pull through two loops. [YO and insert hook into the next designated stitch. YO and pull up a loop. YO and pull through two loops] four times. YO and pull through rem 6 loops on hook.
**Treble Crochet Cluster (Tc CL): YO twice and insert the hook in the first designated stitch. YO and pull up a loop. [YO and pull through two loops] twice. YO twice and insert the hook in the same stitch. YO and pull up a loop. [YO and pull through two loops] twice. YO and pull through rem 3 loops on hook.
Pattern Notes
This blanket is worked in several square motifs that are joined to form four panels. These panels are then joined using granny squares to complete the blanket.
It’s important to check your gauge so your blanket doesn’t end up too big or too small. Adjust the hook size if you need, to obtain gauge.
Finished Size: 45″ wide by 59″ long
Gauge:
Spiral: First 4 rounds diameter measures = 3.25”
Chevron: 12 stitches and 6.5 rows = 3” worked in chevron stitch pattern.

Modern Granny Square Blanket Pattern
Spiral Motif (Make 28)
Round 1: Using any contrast color, make a magic ring with 8 hdc. Don’t join. Cont working in a spiral. (If you prefer not to use the magic ring, start by making 2 chains and create 8 hdc in the first chain).
Round 2: 2 Hdc in the BLO of the next st. 2 hdc in the BLO of rem 7 sts. (16 sts)
Round 3: 2 Hdc in the BLO of the first st. *Hdc in the BLO of the next st. 2 hdc in the BLO of the next st. Rep from * to the last st. Hdc in the BLO of the last st. (24 sts)
Round 4: 2 Hdc in the BLO of the first st. *Hdc in the BLO of the next 2 sts. 2 hdc in the BLO of the next st. Rep from * to last 2 sts. Hdc in the BLO of the last 2 sts. (32 sts)
Double-check to make sure you have 32 stitches.
Don’t fasten off. Ch 1 (doesn’t count as stitch). Rotate the circle so you can crochet in the opposite
direction in the remaining loops of the spiral stitches.
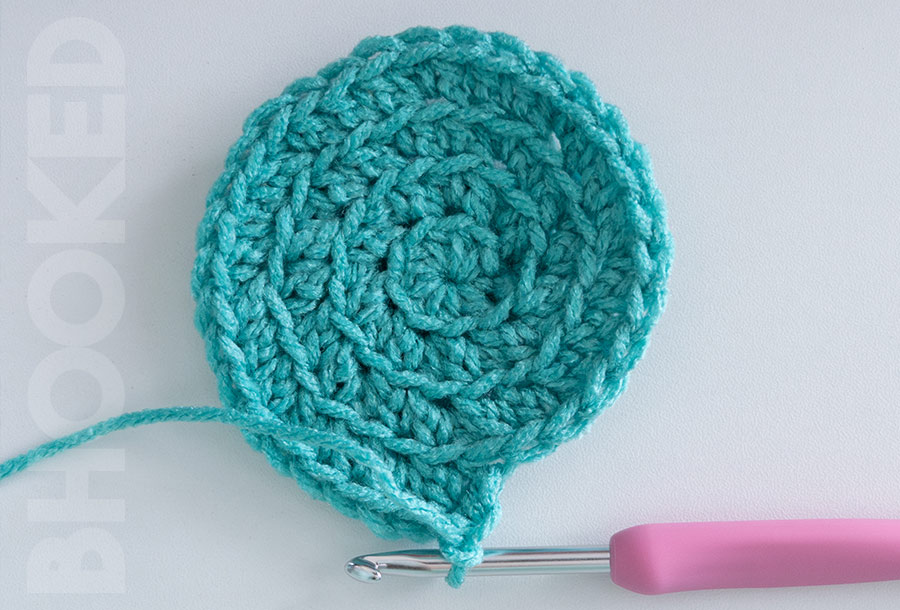
Skip the first st (next to the ch 1), but mark the front loop of that stitch with a stitch marker.
Sc in the BLO of the next st. Dc in the BLO of the next 30 sts.
Cont with a dc in the remaining loop of each st, spiraling to the
center of the circle.
Fasten off with a tail that’s about 4” long.
Run the tail through the center of the circle, and weave in the ends on the backside.
Turning the Spiral into a Square
Insert the hook through the marked loop, and through the loop that’s right next to it on the previous round. Join main color with these two loops, and chain 3.
The stitches of round one are worked in the remaining loops of the outer rounds of the spiral.

Round 1: Tc in same 2 loops as join. Ch 2. Tc CL using same 2 loops. *Dc in the next 7 sts. In next st, (Tc CL, ch 2, Tc CL). Rep from * to the last 6 sts. Dc in the last 6 sts. Dc in the same loops as the starting chain 3. Join with a slst to first tc. Slst in next ch 2-sp.
A digital pattern is available in our shop so you can print out the pattern
Round 2: Ch 5 (counts as a dc and ch 2). 3 dc in same ch 2-sp. Dc in next Tc CL. *Dc in the next 7 dc. Dc in the next Tc CL. In next ch 2-sp (3 dc, ch 2, 3 dc). Dc in the next Tc CL. Rep from * to the last 8 sts. Dc in the next 7 dc. Dc in the last TcCL. 2 dc in the ch 2-sp of the prev round. Join with a slst in the ch 5-sp.
Make sure you have 15 dc per side of the square.

You need 28 spiral squares to make your blanket. You can make them all at once, or break them up for each panel.
At any point, you can crochet the filler squares (pattern on the next page), or if you need a break from squares, you can move on to the chevron section of the panels on page 8 once you have 7 completed spiral squares.
Filler Square (Make 18)
Round 1: With a contrast color, ch 3. Join with a slst to the first ch to form a ring. Ch 5. In the center of the ring, [3 dc. Ch 2] three times. 2 dc in the center of the ring. Join with a slst in ch-5 sp. Cont with contrast color. (12 dc)
Round 2: Ch 5. 2 dc in the ch-2 sp. [1 dc in each st to the next ch-2 sp. In the next ch-2 sp, (2 dc, ch 2, 2 dc)] three times. Dc in the last 3 sts. Dc in the ch-2 sp. Join with a slst in ch 5-sp. (28 dc)
In the last st of this round, break the contrast color and join the main color to complete the last two rounds.
Round 3: Ch 5. 2 dc in the ch-2 sp. [1 dc in each st to the next ch 2-sp. In the next ch 2-sp, (2 dc, ch 2, 2 dc)] three times. Dc in the last 7 sts. Dc in the ch 2-sp. Join with a slst in ch 5-sp. (44 dc)
Round 4: Ch 5. 2 dc in the ch 2-sp. [1 dc in each st to the next ch 2-sp. In the next ch 2-sp, (2 dc, ch 2, 2 dc)] three times. Dc in the last 11 sts. Dc in the ch 2-sp. Join with a slst in the ch 5-sp. (60 dc)
Fasten off and weave in the ends.
You will use 6 filler squares and 2 half squares to join two chevron panels. If you want to break up the time you spend crocheting squares, make 6 filler squares and 2 half squares. Then you can join two chevron
panels.
Half Square (Make 6)
Row 1: With the main color, ch 3. Join with a slst to the first ch. Ch 3 (counts as a dc). In the center of the ring, (3 dc, ch 2, 4 dc). Ch 3 and turn. (8 dc)
Row 2: Dc in the same st as the ch 3. Dc in the next 3 sts. In the ch 2-sp, (2 dc, ch 2, 2 dc). Dc in the next 3 sts. 2 dc in the third ch. Ch 3 and turn. (14 dc)
Row 3: Dc in the same st as ch 3. Dc in the next 6 sts. In the ch 2-sp, (2 dc, ch 2, 2 dc). Dc in the next 6 sts. 2 dc in the third ch. Ch 3 and turn. (20 dc)
Row 4: Dc in the same st as ch 3. Dc in the next 9 sts. In the ch 2-sp, (2 dc, ch 2, 2 dc). Dc in the next 9 sts. 2 dc in the third ch. Ch 3 and turn. (26 dc)
Row 5: Dc in the same st as ch 3. Dc in the next 12 sts. In the ch 2-sp, (2 dc, ch 2, 2 dc). Dc in the next 12 sts. 2 dc in the third ch. (32 dc)
Fasten off and weave in the ends.
Chevron Panels (Make 4)
Each chevron panel is made up of 7 spiral squares, and a chevron stitch pattern on the top and bottom, framing the squares.
Choose the seven spiral squares you want to use in the first panel. For example, in our blanket, the first panel consists of all spearmint-colored spiral squares. Then proceed with the chevron pattern.
Chevron Stitch Pattern
Row 1: With your main color, fasten on in any ch 2-sp of a spiral square. Ch 2 and dc2tog next two sts. *Dc in the next 13 sts. In the next ch 2-sp, make 5 dc. Dc in the next 13 sts. Dc5tog using the next 2 dc, the ch 2-sp of the current square and next spiral square, and the next 2 dc of the new spiral square.


Rep from *, adding new spiral squares until you have 7 joined. When you finish the dc5tog to join the 7th spiral square, cont with a dc in the next 13 sts. In the next ch 2-sp, make 5 dc. Dc in the next 13 sts. Dc3tog using the last 2 dc and the ch 2-sp. Ch 2 and turn.
Cont with the main color for the next row.
Row 2: Dc2tog next two sts. Dc in the next 13 sts. *5 dc in the next st. Dc in the next 13 sts. Dc5tog. Dc in the next 13 sts.
Rep from * to the last 17 sts. 5 dc in the next st. Dc in the next 13 sts. Dc3tog. Break the main color and join the contrast
color. Ch 2 and turn.
Repeat: Rep row 2, two more times with contrast color. Then break the contrast color and join the main color. Ch 2 and turn.
Rep row 2, two more times with the main color.
Fasten off and weave in the ends.
Rotate the panel 180 degrees so you can continue to work along the opposite edge of the chevron rows you just made.
Row 1: With your main color, fasten on in the ch 2-sp of the first spiral square.
Ch 2 and dc2tog next two sts. *Dc in the next 13 sts. In the next ch 2-sp, make 5 dc. Dc in the next 13 sts.
Dc5tog using the next 2 dc, the ch 2-sp of the current square and next spiral square, and the next 2 dc of the new spiral square.
Rep from * adding new spiral squares until you have worked through all 7 squares.
When you finish the dc5tog of the 7th spiral square, cont with a dc in the next 13 sts. In the next ch 2-sp, make 5 dc. Dc in the next 13 sts. Dc3tog using the last 2 dc and the ch 2-sp. Ch 2 and turn.
Repeat: Rep row 2, once more with the main color.
Break the main color and crochet row 2, two more times with the contrast color.
Then break the contrast color and crochet row 2, two more times with the main color.
Fasten off and weave in the ends.
Adding Filler Squares to the Chevron Panels
Step 1: Lay out all four panels, filler squares, and half squares on a flat surface in the arrangement that you want to join them. Use the color diagram for reference.
Step 2: Insert hook through both loops of the first stitch in your bottom panel (the dc3tog), and through the first dc of the half square.
Join main color yarn, and ch 1 (doesn’t count as a st). Sc in the same place. Using both loops of the panel stitches and half square, sc in every stitch until you reach the ch 2-sp of the half square. The next sc placement will be the middle stitch of your group of 5 dc, and the ch 2-sp of the half square.
Step 3: Insert your hook through the same middle stitch of the group of 5 dc, and through any ch 2-sp of a filler square. Then sc.
Using both loops of the panel stitches and filler square, sc in every stitch until you reach the dc5tog. The next sc placement is the dc5tog and the next ch 2-sp of the filler square.
Cont with a sc using both loops of each of the panel stitches and filler square stitches until you reach the ch 2-sp of the filler square. The next stitch placement will be the middle stitch of your group of 5 dc, and the ch 2-sp of the filler square.
Repeat step 3 for the remaining 6 filler squares.
Step 4: Insert your hook through the same middle stitch of the group of 5 dc, and through the ch 2-sp of a half square, and sc.
Using both loops of the panel stitches and half square, sc in every stitch until you reach the last st of the panel and half square. Sc in those stitches as well.
Fasten off and weave in the ends.
Adding the Border
The top and bottom edges in the chevron pattern are clean and don’t require a border to tidy it up. The sides, however, need a simple clean-up row.
Step 1: Lay the blanket out with the right side facing up.
Step 2: With your main color, fasten on in furthest corner of the long side of the blanket.
Step 3: Single crochet along the edge of the blanket.
You don’t have to crochet a specific number of single crochets for this side border row.
Instead, focus on spacing them in such a way that the sides don’t pull in (spacing them too far apart), or bubble up (putting them too close together).
Repeat these border steps on both long edges of the blanket.
Fasten off and weave in the ends.

By using this pattern, you agree to our terms of use:
This pattern is for personal use only. You agree not to modify, publish, transmit, sell, create derivative works or in any way exploit any of the content within this page, in whole or in part. If you wish to share this pattern, share a link to this webpage only. You may sell finished items made from this pattern.
Copyright, B.Hooked Crochet, LLC
Modern Granny Square Blanket Step-by-Step Tutorial
Modern Granny Square Blanket Tutorial Time Stamps
- Spiral: 2:02
- Turning Spiral into Square: 11:00
- Chevron Panels Stitch Pattern: 19:18
- Filler Square: 32:09
- Half Square: 42:16
- Adding Filler Squares: 47:45
- Border: 55:46


