Do you want to learn how to crochet a circle granny square? In this guide, I’ll show you the simplest way to crochet this classic crochet motif. I’ll give you tips to make sure yours look great, and I’ve included several pictures to help you along.
UPDATED: APRIL 28, 2025 BY BRITTANY
This post may contain affiliate links. See our Disclosure Policy for more information.
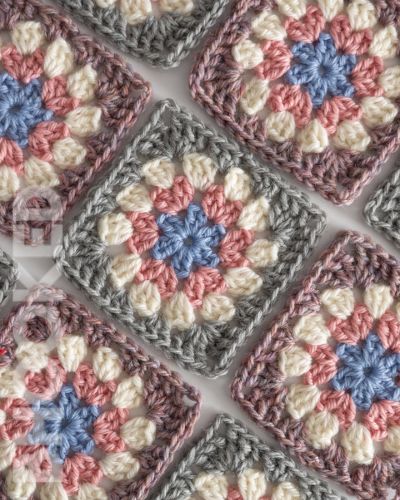
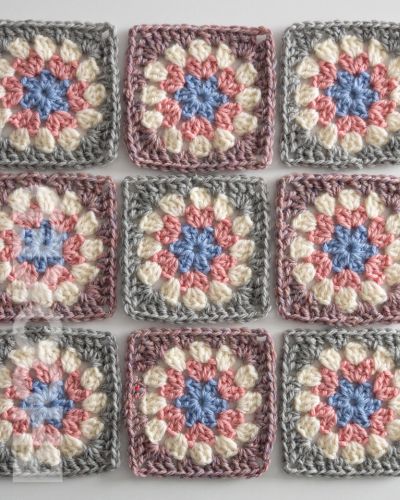
The circle granny square is a fun twist on the classic granny square and shares a lot in common with the hexagon version—so if you’ve made one of those before, you’re already halfway there! This style is still super popular, whether you’re making wearables or decorating your home.
You can turn these unique squares into blankets, scarves, pillows, or even bags. And my personal favorite? A cozy, colorful cardigan!
All you need is your favorite yarn and a crochet hook. With a little practice, you’ll have a stack of circle granny squares ready for your next project.
Here is a quick overview of the topics we’ll cover in this article:
- Basic Circle Granny Square Construction
- Circle Granny Square Pattern
- Finishing the Circle Granny Square
- Step-by-Step Video
- Granny Square Variations
- How Many Rounds Should a Circle Granny Square Have?
- How to Add More Rounds to a Circle Granny Square
- Changing Colors in Circle Granny Squares
- Why Crochet Circle Granny Squares?
- What Crochet Hook Is Best for Circle Granny Squares?
- What Yarn is Best for Circle Granny Squares?
- Tips for Neater Squares
- Should You Block Circle Granny Squares?
- The Easiest Way to Join Circle Granny Squares
Basic Circle Granny Square Construction
To make a circle granny square, you’ll crochet in rounds starting from the center and working outward. Each round consists of clusters of double crochets, but there’s one less stitch in the cluster on some rounds than what usual granny squares have. This keeps the circle flat, and less wavy. More on that later!
“Clusters” in the circle granny square are made up of two double crochets as well as three double crochets. Traditionally, in the classic granny square pattern, they have a chain in between them. However, many modern patterns skip this chain to make it look neater, and in the case of a circle granny square, some of the chains are left out to improve the shape.

Circle Granny Square Pattern
The hexagon granny square pattern has changed a bit over time. After trying out different ways, the pattern below is the one that makes the circle granny square look the neatest.
Supplies
- Yarn: For practice, use medium-weight yarn. You’ll only need a small amount to practice a few rounds.
- Crochet Hook: 4.5 mm crochet hook.
Using a slightly smaller hook size than usual for a medium-weight yarn is on purpose, but I’ll explain why later. You can use any medium-weight yarn you have, but picking a smooth yarn is best so you can see the stitches easily.
Pattern Notes
- The circle granny square doesn’t always use the traditional three double crochet cluster that’s found in other granny square patterns. Instead, a cluster is made up of two double crochets and three double crochets depending on which round you’re working.
- Each double crochet cluster is worked in the space between two clusters of the previous round. So you won’t be crocheting directly into stitches for this pattern.
- The side facing you as you crochet is considered the right side of the hexagon granny square.
- This crochet pattern is written in US terms.
Three Ways to Start a Circle Granny Square
There are three ways to start the first round: starting in a single chain, starting in a center ring, or using the magic loop. While each option is perfectly acceptable, I prefer to start my granny squares with simple chain loop. This loop provides enough space to fit all the stitches of the first round, and it’s much more approachable for a beginner than a magic ring.
Stitch Abbreviations
Before you start crocheting, get familiar with the abbreviations below. These are the abbreviations you’ll see in the pattern. For reference, this pattern is written in US terms.
- Bet | Between
- Ch | Chain
- Dc | Double Crochet
- Rem | Remaining
- Slst | Slip Stitch
- Sp | Space
- St(s) | Stitch(es)
- Tc | Treble Crochet
Round 1: Ch 3. Slst to the first ch to form a ring. Ch 3 (counts as a dc), then make 1 dc in the center of the ring. [Ch 1, and 2 more dc in the center of the ring] five more times. Ch 1, and slst to the 3rd ch to join the round. (6 groups of 2 dc)
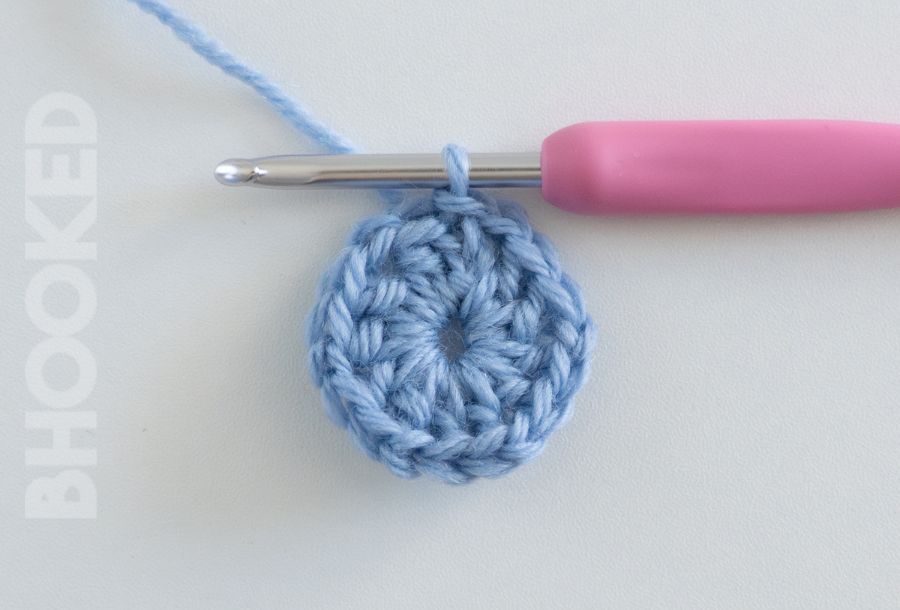
If you want to change colors for the next round, fasten off the first color, and join the new color in any ch 1-sp. If you’re not changing colors, make a slst in the next dc, and in the next ch 1-sp. Then continue to round 2.
Round 2: Ch 3 (counts as a dc) and make 1 dc, ch 1 and 2 dc in the same ch 1-sp. [In the next ch 1-sp make 2 dc, ch 1 and 2 dc] five more times. Slst to the 3rd ch to join the round. (12 groups of 2 dc)

If you want to change colors for the next round, fasten off the current color, and join the new color in any ch 1-sp. If you’re not changing colors, make a slst in the next dc, and in the next ch 1-sp. Then continue to round 3.
Round 3: Ch 3 (counts as a dc) and make 2 more dc in the same ch 1-sp, and ch 1. *In the space between the next 2 groups of 2 dc, make 3 dc. Ch 1, and in the next ch 1-sp, make 3 dc. Ch 1, and rep from * to the end of the round. Ch 1 and slst to the 3rd ch to join the round. (12 groups of 3 dc)
If you want to change colors for the next round, fasten off the current color, and join the new color in any ch 1-sp. If you’re not changing colors, make a slst in the next 2 dc, and in the next ch 1-sp. Then continue to round 4.
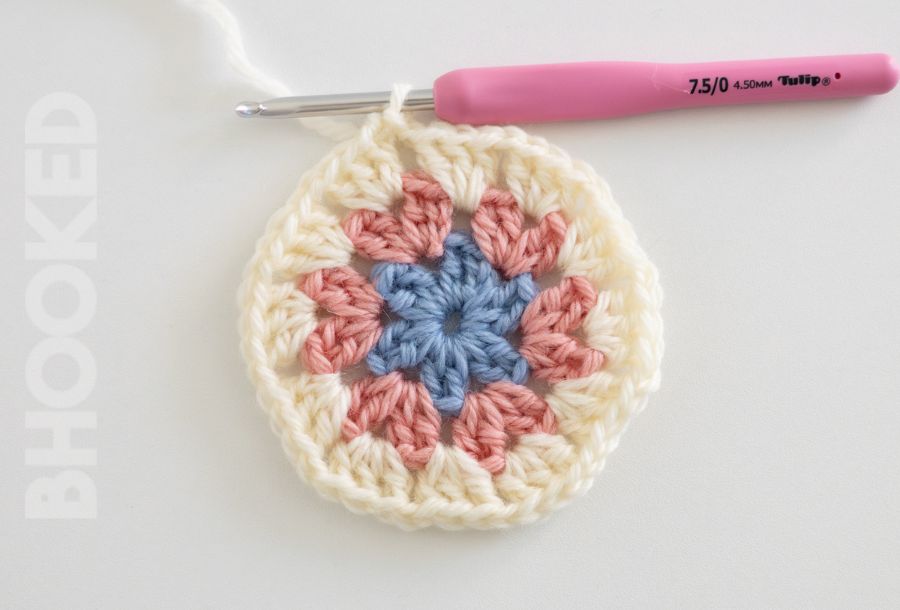
Round 4: Ch 3 (counts as a dc) and make 2 more dc in the same ch 1-sp. [In the next ch 1-sp make 3 tc, ch 2 and 3 tc (corner made). Then make 3 dc in the next two ch 1-sp] three times. In the next ch 1-sp make 3 tc, ch 2, 3 tc (last corner made). And in the last ch 1-sp, make 3 dc. Slst to the 3rd ch to join the round.

Finishing the Circle Granny Square
After finishing the last round, cut the working yarn (leaving a long enough tail to weave in). Pull the tail through the last stitch to secure it. Then use a yarn needle to weave in the loose ends along the back side of the granny square.
If your circle granny squares look less than perfect, no worries! It’s pretty common for the corners to be a little rounded and the sides to be a little wavy. That’s why I think blocking is well worth the time before you start joining them together.
This process will “set” the stitches into a perfectly square position so your bag will look more polished and professional.
The difference may be subtle, but I always think it’s worth it to spend a little extra time blocking my projects. If you’re unfamiliar with the blocking process, check out my beginner-friendly guide and video here.
Step-by-Step Video
Granny Square Variations
The term “granny square” has expanded to include many variations. It’s often used for crochet shapes like hexagons, triangles, circles, and more.
A common variation is the hexagon granny square, which has a lot of similarities with the circle granny square! You can find a full guide on how to crochet a hexagon granny square here.
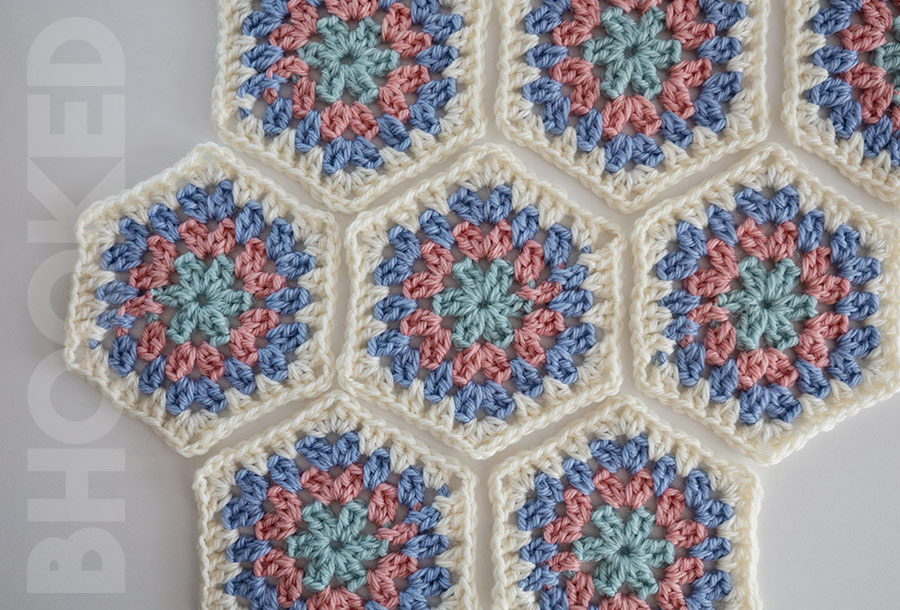
What’s cool about granny squares and crochet shapes is that you can be super creative with them. You can mix different shapes in one project to fill spaces. For instance, you can put squares next to hexagons for a balanced look.
Here are a few granny square variations that I absolutely love:
How Many Rounds Should a Circle Granny Square Have?
Most circle granny square patterns have four or five rounds, but sometimes you might want a bigger one, even a giant one.
So, how do you figure out how many rounds your granny squares should be?
First, think about how wide and long you want your project to be and have a clear idea in mind. For instance, if you’re making a blanket that’s 40 inches wide, and you have circle granny squares that measures 4 inches from one point to the other, you need 10 squares for the width of the blanket.

If you want to make this blanket 52 inches long, you’ll need 13 squares for the length of the blanket. So that’s 130 squares total to complete a blanket this size.
But how do you make sure your granny square ends up that size?
You’ll need to try out different yarn thicknesses, hook sizes, and numbers of rounds. Through trial and error, you’ll discover the best combination to make a square with the size you want.
If you can’t find a combination that makes the exact size you need, use the one that’s closest but smaller. Then, wet block the granny squares to get them to the exact size you want.
How to Add More Rounds to Your Squares
Now, let’s talk about adding more rounds to the initial four we’ve shown earlier. As you go on to later rounds, you’ll need to make slight changes in the pattern instructions. But don’t worry, it’s easy to remember!
See that each round of the square has four corners and spaces between clusters.
In round 4, you used treble crochet stitches to form the corners instead of the usual double crochet. This is necessary when turning a circle into a square because these stitches are a little taller than a double crochet. But that’s not necessary in later rounds. You can use the same corner pattern with double crochet stitches instead (3 dc, ch 2, 3 dc).
As you move from one round to the next, the stitch combination for each corner stays the same. What changes from one round to another is the number of double crochet clusters between each corner. As your square gets bigger, the number of double crochet clusters between corners goes up by one.
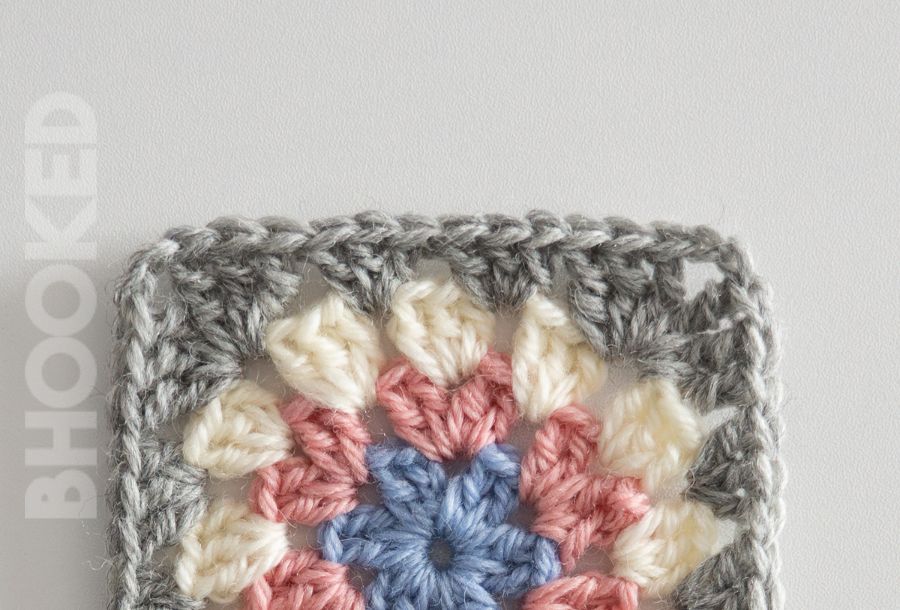
Look at the fourth round. Here, you have two clusters (2 groups of 3 double crochets) between the corners. Then, in round five, you’ll have three clusters between the corners. And in round six, you’ll have four clusters between the corners. That’s the pattern. For every round you add, you’ll have one more cluster between corners. Everything else in the pattern stays the same.
Changing Colors in Granny Squares
When you feel comfortable crocheting circle granny squares in a single color, try experimenting with more than one color. This is where it really gets fun!
To make the color changes, you’ll fasten off after slip stitching to the third chain at the end of the round. However, this will create additional ends for you to weave in. To change colors without creating additional ends to weave in, check out my nifty trick in this article. It’ll save you HOURS!
For more information about changing yarn in your crochet projects, check out my complete guide to changing colors in crochet.
Why Crochet Circle Granny Squares?
The charm of this classic motif goes beyond being a timeless crochet pattern. These little buddies can go with you wherever you go, and you don’t even need a specific project in mind when you start making them.
Another awesome thing about crocheting granny squares is how versatile they are. They can turn into all sorts of things, like baby blankets, afghans, cool tops, warm sweaters, pretty pillows, and even stylish purses. Your imagination is the only limit.
If you love colors, you’ll have a blast working with them. circle granny squares let you explore the colorful world freely, whether you like bold and bright colors, classy solids, or soft pastels. Mix and match colors however you want, whether in random ways or planned patterns—it’s all up to you.
And here’s another great thing: they’re quick to make, so you get that satisfying feeling of finishing something real in just a few minutes instead of hours. Each square feels like a little victory!
What Crochet Hook Is Best For Circle Granny Squares?

You might think any hook size that matches your yarn will do the trick. But after a lot of testing, I discovered something important: using a smaller crochet hook makes your hexagon look tidier.
That’s why the best crochet hook for granny squares is one that’s one or two sizes smaller than what’s recommended for your yarn.
For example, if your yarn label suggests a 5.5mm crochet hook, you should go for a 5mm or 4.5mm hook for the neatest results.
What Yarn Is Best to Crochet a Circle Granny Square?
Usually, granny squares are made with medium-weight yarns that feel smooth, so you can really see the pattern and colors. But the great thing about them is they can work with lots of different types of yarn. Even though medium-weight yarns are the classic pick, it’s fun to try out different ones too.
Tips for Neater Circle Granny Squares
It’s pretty common for circle granny squares not to look perfect right when you finish crocheting them. You might see rounded corners, slightly wavy sides, or even a spiral shape. But don’t worry, it’s not something you did!
Over the years, crocheters have shared lots of tips to make the neatest squares possible. But do these tricks really work? I decided to find out. In my special post here, I tested them to see which ones actually make a difference.
Let’s talk about the things that make this circle granny squares pattern perfect. First up, using a smaller crochet hook. Just by using a smaller hook, you’ll be surprised at how much better they will look. It helps fix that lean that granny squares often have and makes the shape a lot neater.

Next, we use a single chain or skip the chain stitch that usually goes between the groups of double crochets altogether. This makes the gaps between the stitches smaller, so your squares look nicer. You can still see the gaps, but this little trick makes the whole thing look more polished.
Each of these tricks helps improve the look of the square on its own. But when you use them all together, you get what I think is the perfect circle granny square.
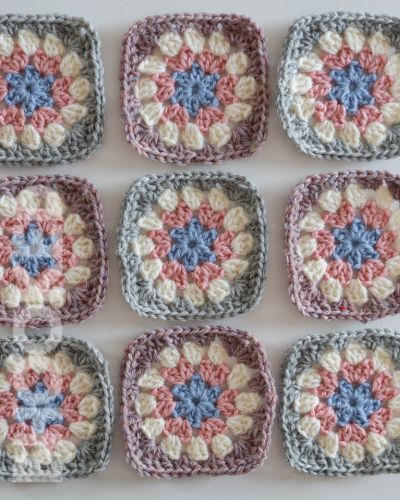
Should You Block Circle Granny Squares?
Blocking is a simple but important step in making your crochet (or knitting) project look its best. It can really change the shape and appearance. So why do you block circle granny squares? It’s to give them that perfect square shape they don’t naturally have right after you finish making them (no matter how much practice you have). So if you’ve ever wondered why your granny squares and other shapes aren’t flat or perfectly square, it’s probably because they weren’t blocked.
The squares at the top of this picture haven’t been blocked. You can see the corners are a bit rounded, and the edges aren’t totally straight.
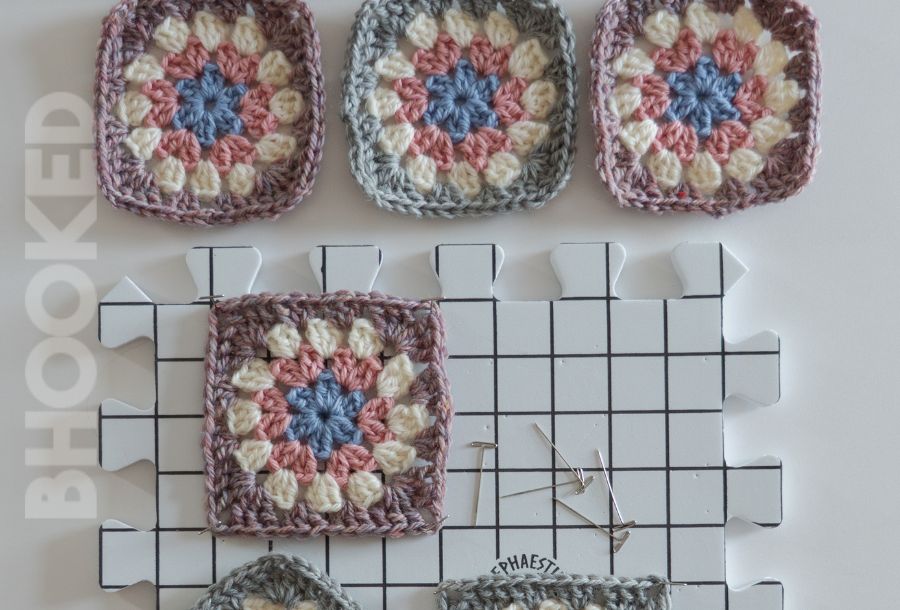
I really suggest taking the time to block your circle granny squares (or any granny square really!) It’ll make them look way better and more professional, especially when you put them together in a project.
So how do you block them?
Blocking is pretty simple. First, get your squares wet by dunking them in water or spraying them with a spray bottle. Then gently squeeze out the extra water and pin the square onto a blocking mat so it’s perfectly square. While you do this, gently stretch it a bit to make the stitches settle into place. As it dries, it’ll keep that nicer shape. If you want more info on blocking, check out my guide here.
What is the Easiest Way to Join Circle Granny Squares?
There are lots of ways to join circle granny squares, and each one has its own use. But when you want a fast and simple way to join them, the single crochet join is a great choice. It’s a little raised from the squares which gives them a beautiful frame and lots of extra texture.

If you’d rather have an invisible seam that makes your squares look fused at the edges, check out this quick and easy join in this helpful guide here. There’s a video tutorial and written instructions as well.
For more simple ways to join your circle granny squares, check out this article here.
Love Granny Squares?
So do I! Learn how to crochet granny squares, find tips for making them perfectly square, find project inspiration, and more in our complete granny square guide.


