Are you looking for a simple crochet flower granny square pattern? In this article, I’ll show you the easiest way to crochet a textured 3D flower granny square using the popcorn stitch flower. I’ve included lots of photos to walk you through it all.
A crochet flower granny square is a must-try pattern for any crocheter who loves working with granny squares and joining them together to make bigger projects.
UPDATED: AUGUST 10, 2023 BY BRITTANY
This post may contain affiliate links. See our Disclosure Policy for more information.
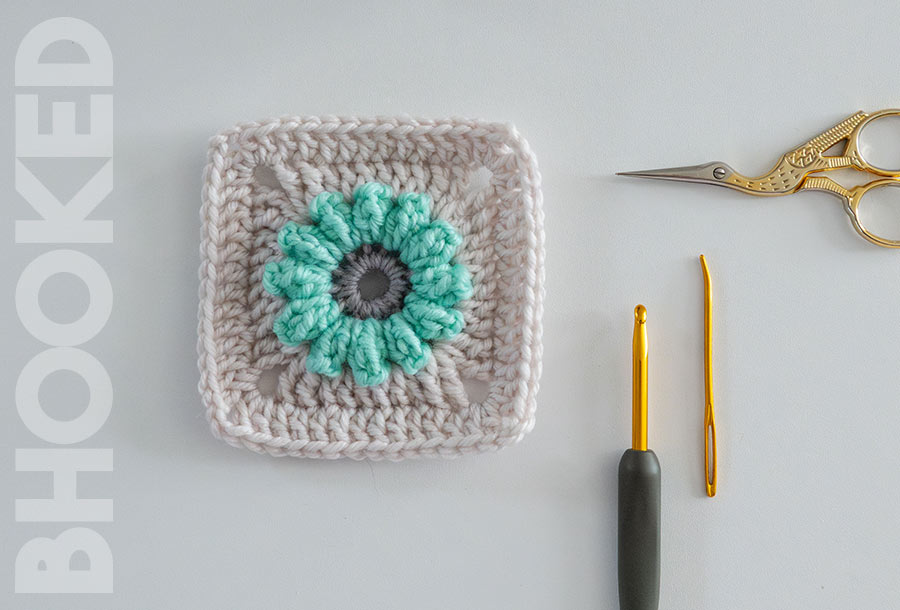
In this tutorial, I’ll show you how to crochet a simple yet elegant flower granny square, a great square for making blankets, pillows, and even sweaters.
You really only need basic crochet skills to crochet this flower granny square. Knowing how to make the double crochet is a big plus as well as being comfortable crocheting in the round. By the way, if you want to learn more about crocheting in the round, check out our guide here.
Here is a quick overview of the topics we will cover in this article:
- Flower Granny Square Pattern Instructions
- Special Stitches
- Finishing the Flower Granny Squares
- How to Join Crochet Flower Granny Squares
- Is it better to sew or Crochet the squares?
- How Many Rounds Should They Have?
- How to Add More Rounds
- More Crochet Flower Tutorials + Free Patterns
- More Granny Square Inspiration
Crochet Flower Granny Square Pattern

There are several creative ways to crochet flower granny squares. I’ve tried many of them yet this one is still my favorite because of the extra texture and 3D effect you get as a result of crocheting a flower with popcorn stitches.
The flower in this granny square was derived from our popcorn stitch flower, another flower favorite you should check out if you haven’t seen it already! Popcorn stitches are great for this flower because they are raised more than a puff stitch for example.
Supplies
- Yarn: For practice, use medium-weight yarn. You’ll only need a small amount of each color to practice making one square
- Crochet Hook: 4.5 mm crochet hook
- Scissors & a yarn needle to weave in the ends.
I’m using Chic Sheep Yarn for this tutorial, an affordable everyday wool yarn I absolutely love. Wool yarn works exceptionally well because it has some inherent stretch to it, but you can use other fibers like acrylic and cotton for this flower granny square.
To make your crochet flower granny square really stand out, I suggest using three contrasting colors. One color for round one (the center of the flower), another color for round two (the flower petals), and a third color for rounds 3, 4 and 5 (the granny square rounds). We’ll label these color A, B and C in the pattern instructions below.
By choosing colors that are high contrast (very different from one another), you can really accentuate the look of your flower granny square.
Crochet Flower Granny Square Pattern Notes
- The side facing you as you crochet is considered the right side of the square.
- This crochet pattern is written in US terms.

Stitch Abbreviations
- Ch Chain
- Dc Double Crochet
- Pc Popcorn Stitch**
- Slst Slip Stitch
- Sp Space
- Slst Slip Stitch
- St(s) Stitch(es)
- Tc Treble Crochet
Special Stitches:
** Popcorn Stitch (pc): 5 dc in designated stitch. Pull up on the active loop after completing 5th dc and remove your hook. Insert the hook through the first stitch, place the active loop on your hook, and pull through the stitch. Ch 1.
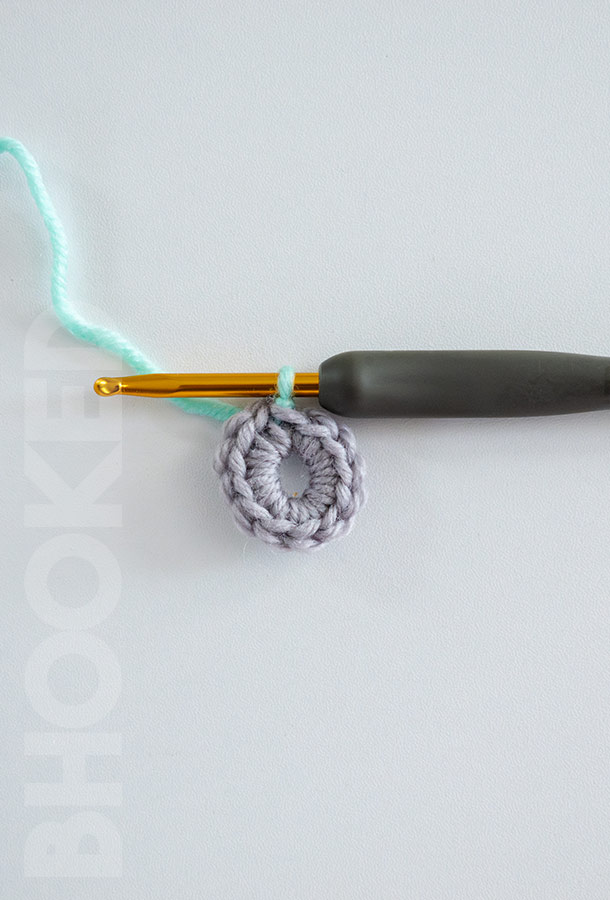
Round 1:
With color A, make 4 chains and join with a slst to the first chain to form a ring.
Ch 1 (does not count as a st) and make 12 sc in the center of the ring. Join with a slst to first sc.
Break color A and join the new color, color B.
Round 2:
Ch 3 (counts as first dc of Pc). Make 4 more dc in the same st, and finish the popcorn stitch using the third ch as the first st. Make a Pc in each of the remaining 11 sts for a total of 12 pc. Join with a slst to the first pc. Break color B and join color C.
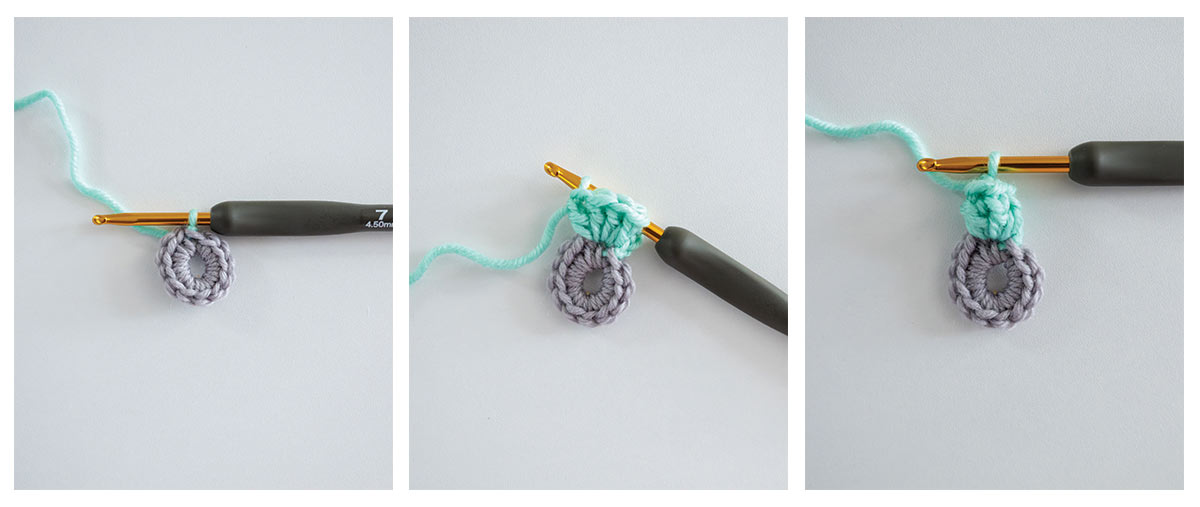
At this point, your hook is situated between two flower petals. All of the stitches in the next round will take place in the space between flower petals so we can turn this round flower into a granny square.

Round 3:
Ch 6 (counts as a tc, and ch-2 space). 2 tc in same space. This creates the start of the first corner. Make 3 dc in the space between the next two petals. These double crochet clusters will help to shape the four sides of the square.
Make three more double crochets in the space between the next two petals so it looks like this:

In the space between the next two petals, you’ll create the next corner of the granny square. Do that by making 2 tc, 2 c, and 2 tc in the same space.
Then continue with the second side of the granny square. Remember, each side is made up of two groups of three double crochets between petals.
And work the next corner stitch pattern between the next two petals (2tc, ch 2, 2 tc).
And finish the last side and corner using the same steps.
This leaves one more side and the first corner to finish. So make 3 dc in the space between the next two petals.

Since the first corner has two treble crochets, and the starting chain (which counts as a treble crochet and chain two space), the only thing we’re missing is one more treble crochet. Then join with a slst to the chain space.
Round 4:
Ch 5 (counts as a double crochet and chain 2). Make 2 more dc in the same space.
Make a dc in each of the next 10 sts. In the next ch-2 space, make 2 dc, ch 2 and 2 dc.
The repeat for the round is to make a double crochet in every stitch until you reach the ch-2 space.
Then work your corner pattern (2 tc, ch 2, 2tc).
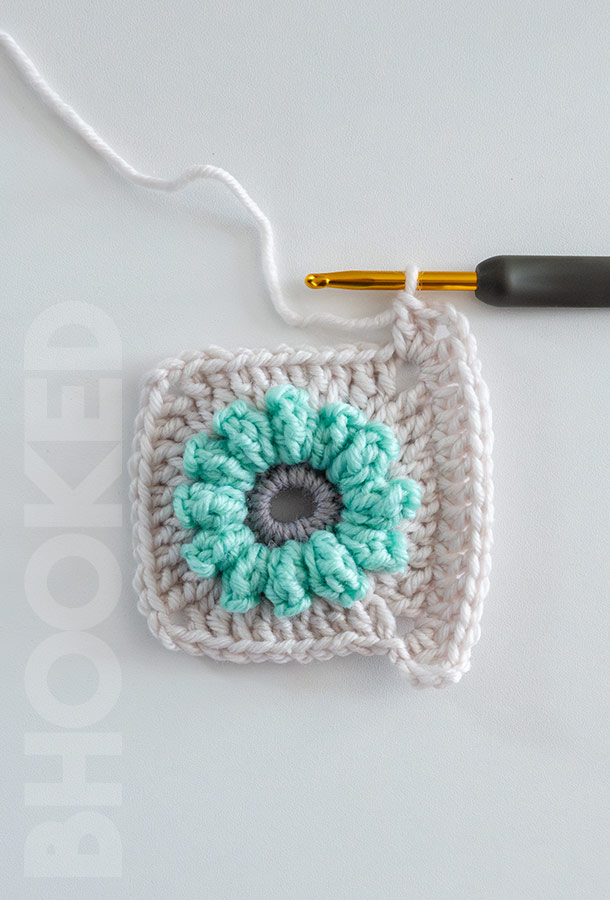
Then in the first corner, make a dc and join with a slst to the chain to finish it off.
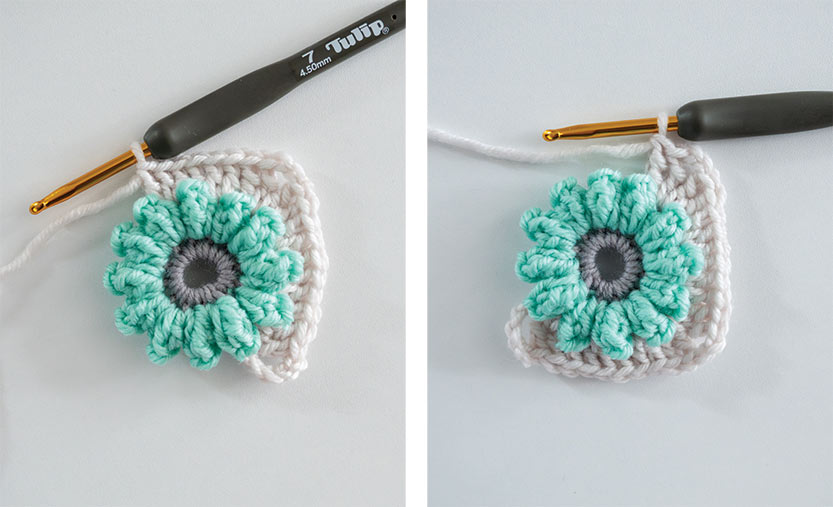
Finishing Your Crochet Flower Granny Square
Your flower granny squares may not look perfectly square right off the hook, and that’s completely normal. That’s why I recommend wet blocking them before you start joining them together. This way your flower motif will look nice and tidy in the finished project.
Wet blocking will “set” the stitches into a perfectly square position so your finished project will look more polished and professional. If you’re unfamiliar with the blocking process, check out our beginner-friendly guide and video here.
How to Join Crochet Flower Granny Squares
Joining your flower granny squares can be just as creative and fun as crocheting them. You can change the entire look of a project just by changing the way you join them.
While there are countless ways to connect these crochet flower granny squares, there are two joining methods that suit these squares really well.
Single Crochet Join for Crochet Flower Granny Squares
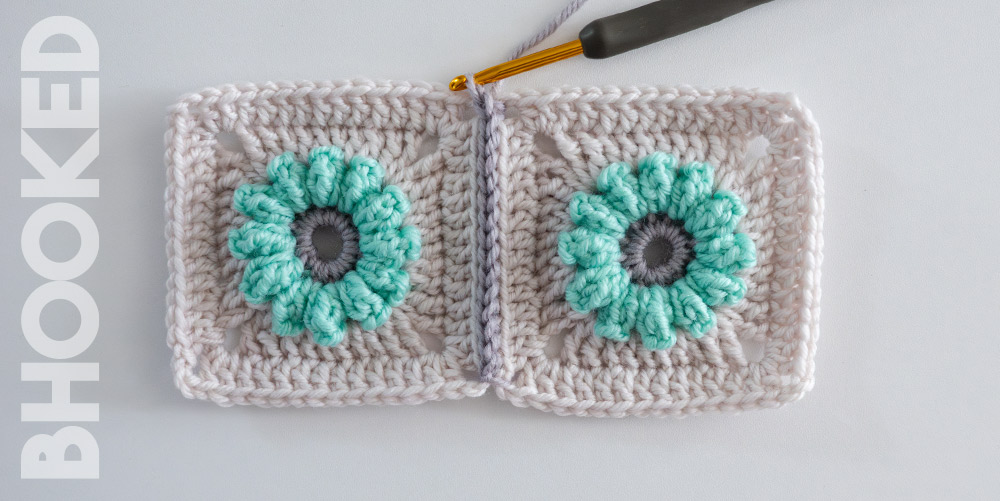
Joining your flower granny squares with a single crochet join will frame the flowers with a 3D border that complements the height and texture of the flowers.
This way of joining is quick and easy too!
Invisible Seam for Crochet Flower Granny Squares

If you prefer a “fused at the edges” look for your join so the flowers can be the star of the show, the invisible seam is the way to go. It comes together quickly with a yarn needle so you can get to the fun part of enjoying your project sooner.
Plus I have a step-by-step tutorial with a video to walk you through it all.
Don’t feel limited by these two joins. You can get as creative as you’d like! For more joining techniques and inspiration, here are 5 simple yet beautiful ways to join granny squares.
Is it Better to Sew or Crochet Flower Granny Squares Together?
When it comes to joining your square flower motifs, you can’t go wrong with sewing or crocheting them together. Choose the crochet method if you want the join to be more of a decorative aspect of your project. By crocheting them together you can add a contrasting color and texture for more visual interest.
If you want the join to be more invisible so the flowers can be the focal point, it’s best to seam them together. While you can use a whip stitch to seam them together, using the invisible seam will give them a “fused at the edges” appearance. This will make your join completely invisible and the flowers will stand out the most.
How Many Rounds Should Your Crochet Flower Granny Square Have?
Four or five rounds are common in most granny square patterns so the four in this tutorial are really all you need. But occasionally you may want a larger or even a giant flower granny square.
So how do you know how many rounds your granny square should have?
First, establish the desired width and length of your project, making sure you have a clear vision in mind. Since granny squares are perfectly square, you’ll need to identify a number that can be divided into both dimensions evenly.
For example, if you want to make a blanket that’s 40″ wide and 50″ long, a granny square that’s 5″ is one possible option. Because 5 divides into 40 and 50 evenly.
So how do you make sure your granny square turns out that size?
You’ll have to experiment with different yarn weights, hook sizes, and the number of rounds. In doing so, you’ll find the ideal combination to create granny squares of the dimensions you need.
If you can’t find a combination that makes the exact size you need, use the combination that’s closest but smaller. Then wet block the granny squares to the exact dimensions you need.
How to Add More Rounds to Your Crochet Flower Granny Square
Now, let’s dive into adding more rounds to the initial four in our crochet flower granny square pattern above. As you progress to later rounds, you’ll need to make slight adjustments in the pattern instructions. But it’s really easy to memorize!
Notice that each round of the flower granny square is made of four corners and double crochets in between.
From one round to the next, the stitch combination for each corner (dc, ch 2, dc) remains the same. So what makes one round different from the next is the number of double crochets between each corner. As your flower granny square grows, the number of double crochets between the corner chains increases by four.

Notice the third and fourth rounds of stitches (in the cream yarn). In the third round, there are ten stitches (8 dc, and 4 tc) between the corner chains. And on the fourth round, there are fourteen double crochets between the corner chains.
This is the general pattern. For every round you add, you’ll have four more double crochets between each corner chain. Everything else with the pattern stays the same.
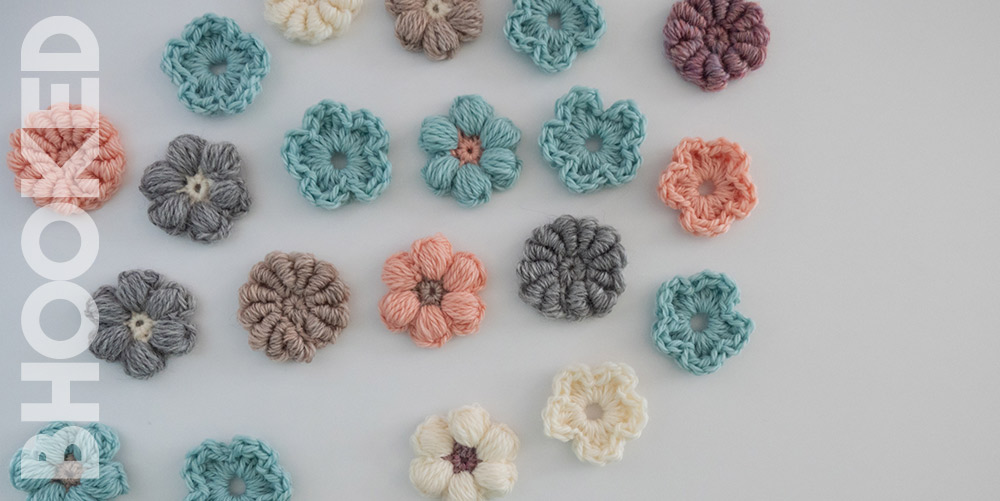
More Crochet Flower Tutorials + Free Patterns
Crocheting flowers is one of the best ways to use up scrap yarn, and have a quick win in the process. If you’re wondering how to crochet cute little flowers, check out our collection of free crochet flower patterns here. We’ve written up each flower pattern so they’re easy to follow plus most of them have a step-by-step video too!
Love Granny Squares?
So do I! Learn how to crochet granny squares, find tips for making them perfectly square, find project inspiration, and more in our complete granny square guide.


