Want a quick and festive winter project? This simple crochet snowflake pattern is perfect for decorating your home, gifts, or tree. It’s beginner-friendly and works up in just a few rounds. You can view the pattern completely free on this page, or you can buy the ad-free, printable PDF from our shop.
UPDATED: JANUARY 27, 2026 BY BRITTANY
This post may contain affiliate links. See our Disclosure Policy for more information.

Skill Level | Easy
Finished Size | Small, Medium, Large
Making a crochet snowflake is a quick, fun project that doesn’t require much yarn. You can experiment with different yarn weights and colors to make each one unique.
I love using these snowflakes to add a homemade touch around the house during winter. They’re also perfect for the holidays—hang them on your Christmas tree, use them as gift toppers, or scatter them as festive decorations!
About This Simple Crochet Snowflake Pattern
This easy crochet snowflake just takes four rounds to complete, and it’s simple, even for someone new to crocheting. I’ve written the pattern for three sizes, using light, medium, and bulky yarn, but you can easily use different yarn weights by changing the hook size. Check out the pattern notes for guidance on that.
If you want more info, keep reading for commonly asked questions and pattern details, or you can skip down to the free pattern.

You can view the pattern completely free on this page. But, if you prefer having a digital copy that you can save or print, we’ve got you covered with that option as well.
If you’d like to support our work here at B.Hooked, purchasing the digital pattern is a wonderful way to do so!
Recommended Supplies
- Approx 15 yds per snowflake; lightweight, medium weight, or bulky.
- 3 mm Crochet Hook – lightweight yarn (#3)
- 4 mm Crochet Hook – medium-weight yarn (#4)
- 6.5 mm Crochet Hook – bulky yarn (#5)
- Yarn Needle
- Scissors
Abbreviations
This pattern is written using standard US crochet terminology.
- Ch Chain
- Dc Double Crochet
- Hdc Half Double Crochet
- Rep Repeat
- Slst Slip Stitch
- Sc Single Crochet
- Sk Skip
- Sp Space
- St(s) Stitch(es)

Pattern Notes
You can make various-sized snowflakes by following the same pattern with different yarn weights and hook sizes. The instructions stay the same for all three sizes.
Sizing Details:
- Lightweight yarn (#3) + 3 mm hook = 3.75″
- Medium-weight yarn (#4) + 4 mm hook = 4.75″
- Bulky-weight yarn (#5) + 6.5 mm hook = 7.5″

If you decide to try a different yarn weight, no worries! Just use a hook that’s one or two sizes smaller than the one you’d typically use for that yarn. Then, stick to the same pattern, and you’re good to go.
Gauge: Use the finished size to check your gauge, but don’t stress if yours aren’t exactly the same size. They’ll still work perfectly fine!
Not sure what gauge is? Check out our comprehensive guide to learn all about it here.
Simple Crochet Snowflake Pattern Instructions
Round 1: Ch 4. Join with a slst to the first ch to form a ring. Ch 4 (counts as a dc and 1 ch). [1 dc in center of ring. Ch 1] 11 times. Join with a slst to the 3rd chain. (12 dc, 12 ch)

Round 2: Slst in first ch 1-sp. *Ch 4. sk next ch-1 sp. Slst in next ch 1-sp. Rep from * to end of round. Join with a slst to the first ch 1-sp of the round. (6 ch 4-spaces made)

Round 3: Slst in first ch 4-sp. (Ch 1 (doesn’t count as a st), hdc, dc, tc, ch 2, tc, dc, hdc) in the same ch 4-sp. *Slst in next ch 4-sp. (Ch 1 (doesn’t count as a st), hdc, dc, tc, ch 2, tc, dc, hdc) in same ch 4-sp. Rep from * to the end of the round. Join with a slst to the first slst of the round.

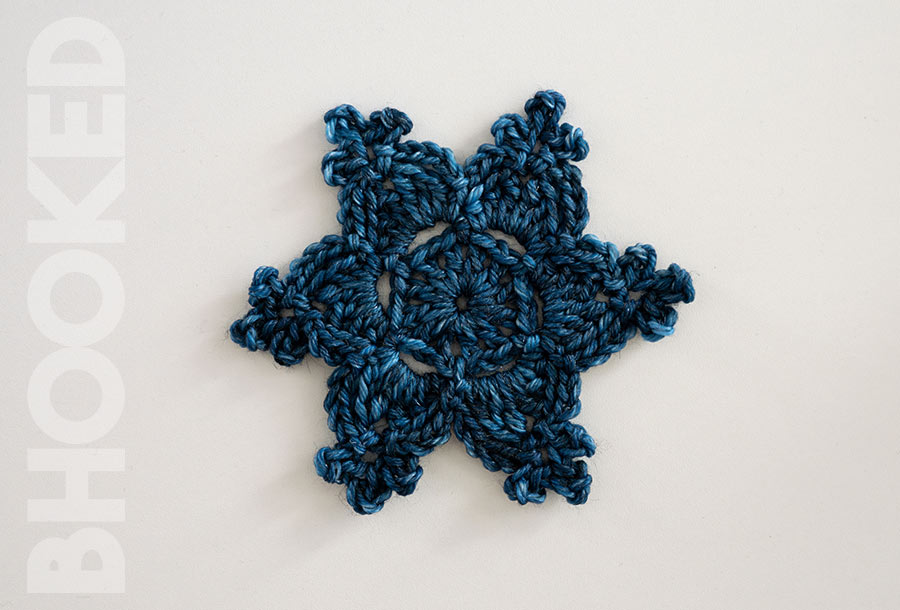
At this point, it looks a lot like a flower. You can always fasten off here and use it as that! Otherwise, the final round will be the snowflake transformation it needs.
Round 4: *Ch 5. Slst in next ch 2-sp. [Ch 4. Slst in the 1st ch you just made] 3 times. Ch 4. Slst to the next slst of the prev round. Rep from * for each of the six points of the snowflake. Join with a slst to the first slst of the round.
A digital pattern is available in our shop so you can print out the pattern

Finishing the Crochet Snowflake
Once you’re done with the fourth round, fasten off and weave in those loose ends. If your snowflake doesn’t seem perfect right away, no worries. It might look a bit scrunched up from being held while you crochet. Just use your hands to flatten it out and do some finger blocking.

If it’s not quite what you want, wet blocking is another option! If you’re not sure about blocking, check out this article I have that explains everything you need to know about it!
TERMS OF USE:
This pattern is for personal use only. You agree not to modify, publish, transmit, sell, create derivative works or in any way exploit any of the content within this page, in whole or in part. If you wish to share this pattern, share a link to this webpage only. You may sell finished items made from this pattern.
Copyright, B.Hooked Crochet, LLC
How to Make a Crochet Snowflake Step-by-Step Tutorial
Video not displaying? Watch this tutorial on YouTube instead.
Frequently Asked Questions About Our Crochet Snowflake
More Quick & Easy Crochet Tutorials + Free Patterns
- Simple Crochet Bag
- Crochet Butterfly
- Crochet Rose
- Crochet Easter Eggs
- 3D Crochet Flower
- Easy Crochet Four Leaf Clover
- Simple Crochet Mug Cozy
- Simple Round Crochet Placemats
- Small Crochet Heart


)