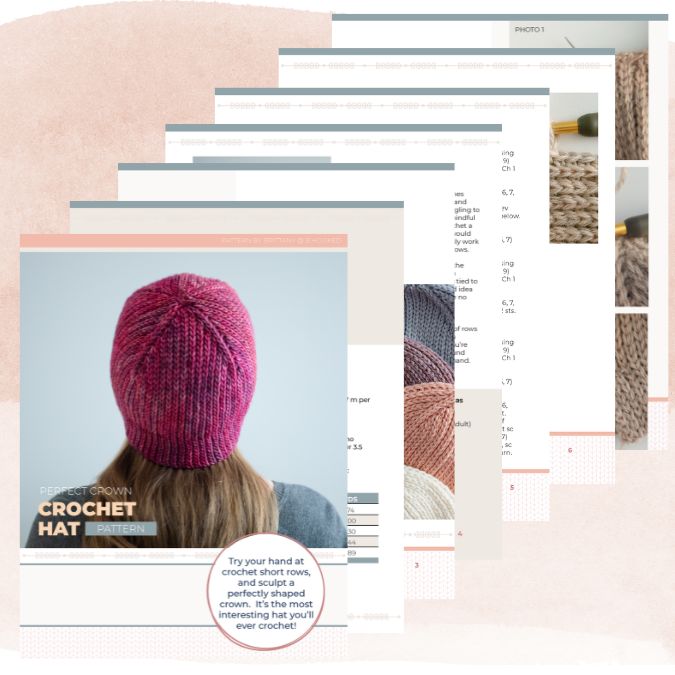
Learn how to make the most unique crochet hat with this free pattern and step-by-step tutorial. When you make a crochet hat in rows instead of rounds, it has an excellent fit and totally unique look. You can view the pattern completely free on this page, or you can buy the ad-free, printable PDF from our shop.
UPDATED: AUGUST 9, 2023 BY BRITTANY
This post may contain affiliate links. See our Disclosure Policy for more information.

Skill Level | Intermediate
Finished Size | Newborn, Baby, Toddler, Child, Adult
If you hate crocheting in the round, you’re absolutely going to LOVE this crochet hat. It is crocheted entirely in rows, yet it has a perfectly sculpted crown.
A technique called “short rows” is the secret sauce behind this clever shaping, and it’s one of the neatest tricks you can have up your sleeve.
About Our Unique Crochet Hat Pattern
This totally unique crochet hat is a great way to expand your skills with short rows. This technique can be applied to a variety of projects that need shaping but have to be crocheted in rows.
Try either of the yarns we recommend or choose your favorite medium weight to substitute. This one is flexible enough to use just about any medium-weight yarn you want. Just be sure to check the gauge first!
Keep reading for more frequently asked questions, and pattern details, or jump down to the free pattern.
Pattern Overview:
- Supplies
- Yarn Requirements
- Buy the ad-free, printable pattern
- Abbreviations
- Pattern Notes
- Gauge & Finished Size
- Crochet Hat Sizing Chart
- Our Unique Crochet Hat Pattern Instructions
- Finishing Techniques
- Unique Crochet Hat Step-by-Step Tutorial
- More Crochet Hats and Beanies

You can view the pattern completely free on this page. But, if you prefer having a digital copy that you can save or print, we’ve got you covered with that option as well.
If you’d like to support our work here at B.Hooked, purchasing the digital pattern is a wonderful way to do so!
Recommended Supplies
- Patons Classic Wool Worsted, or Other #4 Yarn (Pictured: Malabrigo Washted, English Rose)
- 6 mm Crochet Hook
- Yarn Needle
- Scissors
Yarn Requirements
| Size | Yardage Required |
| Newborn | 74 yds |
| Baby | 100 yds |
| Toddler | 130 yds |
| Child | 144 yds |
| Adult | 189 yds |
Abbreviations
This pattern is written using standard US crochet terminology.
- BLO Back Loop Only
- Ch Chain
- Cont Continue
- Hk Hook
- Prev Previous
- Rem Remaining
- Rep Repeat
- RS Right Side
- Sc Single Crochet
- Sk Skip
- Slst Slip Stitch
- St(s) Stitch(es)
- WS Wrong Side
Pattern Notes
This unique crochet hat uses many slip stitches to create a wonderful texture and stretch. If you find yourself struggling to work into your slip stitches, be mindful of your tension. It’s better to crochet a slip stitch more loosely than you would normally crochet so you can easily work into each stitch on subsequent rows.
Since this hat is worked in rows the overall length is tied to the stitch gauge, and the circumference is tied to the row gauge. It’s always a good idea to check your gauge so there are no sizing surprises, especially if you substitute yarn.
The chain one at the beginning of rows does not count as a stitch. When working odd-numbered rows, you’re looking at the inside of the hat, and working from the crown to the band.
Instructions for sizes are given as follows:
Newborn (Baby, Toddler, Child, Adult)
Gauge: 18 sts x 30 rows = 4″ worked in stitch pattern
Available Sizes: Newborn, Baby, Toddler, Child, and Adult
To determine which size to make: measure the circumference of your head with a tape measure resting in the center of your forehead. Then use the sizing chart below to determine which size to make.
For more details on hat sizing, and making a hat that fits perfectly, check out our hat sizing guide here.
Unique Crochet Hat Sizing Chart
| Size | To Fit Circumference | Length |
| Newborn | 13-15″ | 5.75″ |
| Baby | 15-16″ | 6.5″ |
| Toddler | 16-17″ | 7.5″ |
| Child | 18-19″ | 8″ |
| Adult | 19-22″ | 8.5″ |
Unique Crochet Hat Pattern Instructions
Ch 28(30, 32, 37, 40)
Row 1: Slst in 2nd ch from hk and in each rem ch. Ch 1 and turn.
Row 2 (RS): Slst BLO first 5(6, 7, 8, 9) sts. Sc BLO each st to last 2 sts. Ch 1 and turn. (Leave last 2 sts unworked)
Row 3 (WS): Slst each st (using both loops of st) to the last 5(6, 7, 8, 9) sts. Slst BLO last 5(6, 7, 8, 9) sts. Ch 1 and turn.
Repeat: Rep the last 2 rows 3(4, 5, 6, 7) more times.
After this repeat you should have 8(10, 12, 14, 16) total unworked sts.
A digital pattern is available in our shop so you can print out the pattern
Next Row (RS): Slst BLO first 5(6, 7, 8, 9) sts. Sc BLO each st to last. [Insert hk through chain loop of prev row. Then sc in BLO of next sc below. Sc BLO next st] 3(4, 5, 6, 7) more times, ending with last st, sc through both loops. Ch 1 and turn.
Next Row (WS): Slst each st (using both loops of st) to last 5(6, 7, 8, 9) sts. Slst BLO last 5(6, 7, 8, 9) sts. Ch 1 and turn.
Crown Segment
Next Row (RS): Slst BLO first 5(6, 7, 8, 9) sts. Sc BLO each st to last 8(10, 12, 14, 16) sts remain. Ch 1 and turn. Leave remaining 8(10, 12, 14, 16) sts
Next Row (WS): Slst each st (using both loops of st) to last 5(6, 7, 8, 9) sts. Slst BLO last 5(6, 7, 8, 9) sts. Ch 1 and turn.
Next Row (RS): Slst BLO first 5(6, 7, 8, 9) sts. Sc BLO each st to last. Insert hk through ch loop of prev row. Then sc in BLO of next sc below. Sc BLO next st. Ch 1 and turn.

Repeat: Rep last 2 rows 3(4, 5, 6, 7) more times.
Next Row (WS): Slst each st (using both loops of st) to last 5(6, 7, 8, 9) sts. Slst BLO last 5(6, 7, 8, 9) sts. Ch 1 and turn.
Next Row (RS): Slst BLO first 5(6, 7, 8, 9) sts. Sc BLO each st to last 2 sts. Ch 1 and turn. (Leave last 2 sts
unworked)
Next Row (WS): Slst each st (using both loops of st) to last 5(6, 7, 8, 9) sts. Slst BLO last 5(6, 7, 8, 9) sts. Ch 1 and turn.
Repeat: Rep last 2 rows 3(4, 5, 6, 7) more times.
Next Row (RS): Slst BLO first 5(6, 7, 8, 9) sts. Sc BLO each st to last. [Insert hk through chain loop of prev row. Then sc in BLO of next sc below. Sc BLO next st] 3(4, 5, 6, 7) more times, ending with last st, sc through both loops. Ch 1 and turn.
Next Row (WS): Slst each st (using both loops of st) to last 5(6, 7, 8, 9) sts. Slst BLO last 5(6, 7, 8, 9) sts. Ch 1 and turn.
Hat Repeat
Rep instructions within the “crown segment” heading, 2 more times (for all sizes).
Next Row (RS): Slst BLO first 5(6, 7, 8, 9) sts. Sc BLO each st to last 8(10, 12, 14, 16) sts remain. Ch 1 and turn. Leave remaining 8(10, 12, 14, 16) sts
unworked.
Next Row (WS): Slst each st (using both loops of st) to last 5(6, 7, 8, 9) sts. Slst BLO last 5(6, 7, 8, 9) sts. Ch 1 and turn.
Next Row (RS): Slst BLO first 5(6, 7, 8, 9) sts. Sc BLO each st to last.
Insert hk through ch loop of prev row. Then sc in BLO of next sc
below. Sc BLO next st. Ch 1 and turn.
Repeat: Rep last 2 rows 3(4, 5, 6, 7) more times.
Don’t fasten off. Cont to finishing instructions.
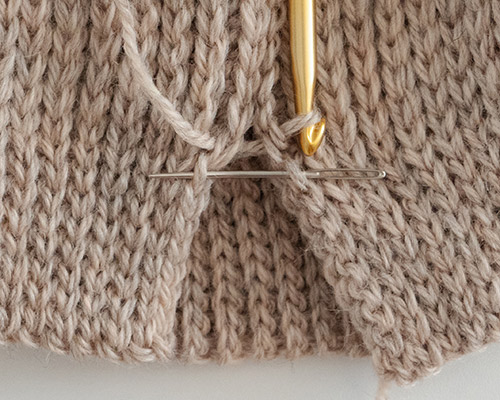
Finishing Techniques
For the least visible seam follow the steps, using the pictures as a reference for hook placement.
Step 1: On the opposite side of the hat from hk, locate the loop using photo 1 for reference. Insert hk through the loop. Then insert hk through the stitch on the opposite side, catching both loops of edge stitch (as seen in photo 2). Slip stitch.
Slst through these specific loops until you reach the last 5(6, 7, 8, 9) band sts.
Step 2: For band stitches, insert hk through the same loop from photo 1, and insert hk through BLO of the stitch on the opposite side. Use photo 3 for hk placement reference.
Slst through these specific loops for all band sts.
Fasten off, and weave in ends.
Crown Closure
Cut a piece of yarn that’s about 12” long, and thread on a yarn needle. Sew the hole closed.
Tie a knot with the tail on the inside, and trim.


By using this pattern, you agree to our terms of use:
This pattern is for personal use only. You agree not to modify, publish, transmit, sell, create derivative works or in any way exploit any of the content within this page, in whole or in part. If you wish to share this pattern, share a link to this webpage only. You may sell finished items made from this pattern.
Copyright, B.Hooked Crochet, LLC
Unique Crochet Hat Step-by-Step Tutorial
Video not displaying? Watch this tutorial on YouTube instead.
Right-Handed Tutorial on YouTube
SUBSCRIBE TO B.HOOKED ON YOUTUBE
*Disclosure: Some of the links in this post are affiliate links, which means as an Amazon Associate, I earn from qualifying purchases made through these links. Please note that prices and availability of products are subject to change. This comes at no additional cost to you and helps support the content on this site. I only recommend products that I have personally used and genuinely believe in. Thank you for your support!
More Crochet Hats and Beanies
Hats are one of the most satisfying things to crochet! Here at B.Hooked we love designing them too. Here are some of our favorite free hat patterns with tutorials if you need a little help along the way.