Picking the right border for your blanket can feel tough with so many choices out there. But in my experience, simple crochet borders that let your blanket’s stitch work stand out are always a good idea. If you’re wondering how to add a border to your blanket, you’re in the right place! In this post, I’ll show you five easy crochet borders that will work with just about any blanket pattern.
UPDATED: OCTOBER 15, 2024 BY BRITTANY
This post may contain affiliate links. See our Disclosure Policy for more information.
You can completely change the look of a blanket just by switching up the crochet border. While there are tons of ways to add a border, I want to share five of the easiest and most versatile crochet borders that every crocheter should know.
These are my go-to borders because they work with all kinds of blankets—whether they’re textured, colorful, or simple—and the best part is, you don’t need to worry about stitch multiples. You can easily adjust these crochet borders to fit your blanket, no matter the size.
Here is a quick overview of the topics we will cover in this article:
- Crochet Borders: Important First Step
- The Modern Crochet Braided Border
- The Crochet Ribbing Border
- Picot Dots Crochet Border
- Classic Granny Stitch Crochet Border
- Crocheted Beaded Tassel Border
- Must-Know Crochet Borders Video
- What is the Easiest Border for a Blanket?
- Which Crochet Border Uses the Least Amount of Yarn?
- What is the Best Crochet Stitch for Edging?
- How Big Should a Border Be on a Blanket?
Crochet Borders: Important First Step
Before we dive into the borders, there’s one important tip I need to share because it will make a huge difference in how your blanket looks.
No matter which border you choose, or how careful you are with your stitches, if you skip this step, your blanket border won’t look as neat. The best advice I wish I had gotten when I crocheted my first blanket was this: always add a round of single crochet stitches before starting your border.
This extra step creates a smooth, clean line between your blanket and its border—a result that’s almost impossible to get without it. It’s especially helpful if your blanket wasn’t crocheted in the round or if it’s made from motifs like granny squares. The sides of your blanket will benefit most from this little trick!
Take this swatch, for example. It’s worked in the alpine stitch, which is a great choice for blankets. The top and bottom edges look nice and tidy because you can easily crochet into the stitches there. But that’s not the case for the sides. If you look closely, the left side has a round of single crochet stitches, while the right side doesn’t—and the stitches don’t look as neat and tidy because of the contrast between the blanket yarn and border yarn.
And if your blanket has color stripes, it’s worth taking the time to switch yarn colors in this single crochet round to match each stripe. It may take a bit more effort, but it’s totally worth it!
Adding this simple round of single crochet in the same yarn as your blanket gives you a perfect foundation to start your border—and makes the whole process easier. So, whatever border pattern you choose, don’t skip this step. Your border will be a lot cleaner and more polished!
Easy Crochet Borders for Blankets
One of the hardest parts of choosing a border for the blanket you’ve spent hours crocheting is finding one that fits the exact number of stitches on each side. It’s not impossible, but there’s definitely an easier way!
Instead of searching for a border that matches a specific stitch multiple, it’s much simpler to pick a border that can easily be adjusted to fit the number of stitches you already have.
That’s what makes all the borders on this page so great! They’re super flexible, so they’ll work perfectly with your blanket—no special skills or tricky math required!
1. Crochet Borders for Blankets: Braided Border
The braided crochet border is a timeless favorite. It’s simple enough for modern blanket designs but still elegant enough for a classic granny square blanket.
You can keep it to a single color, or add some stripes with a few rounds of single crochet before creating the braid. The outer braid is crocheted in a really fun and interesting way, and it’s easy enough for beginners to pick up.
I like adding a solid round of stitches before starting the braid. In this example, I’ve done two rounds of single crochet—one in the same color as the blanket, and the other in the border color.
The best part? The braided stitch doesn’t need a special stitch multiple, so you can easily adapt it to fit any size blanket!
How to crochet the braided border:
- If you haven’t already, start by crocheting a single crochet border in the same color as your blanket. For the top and bottom edges, make one single crochet in every stitch. In each corner, make three single crochets. Along the sides, space your single crochets evenly, working through the edge stitches. This will make your border look neat and tidy—it’s definitely worth the extra time!
- If you’d like to switch colors for the braid, now’s the time. Add at least one more round of single crochets in the new color (or the color of the braid). To do this, simply make one single crochet in each stitch, and when you reach the corners, place three single crochets in the middle stitch of the previous round’s corner.
- To crochet the braided stitch: insert your hook into the first single crochet, yarn over, and pull up a loop (you should have two loops on your hook). Then pull the new loop through the first loop and chain one.
- Keep crocheting a braided stitch in each stitch around the blanket, and you’re done!
2. Crochet Borders for Blankets: Ribbing Border
The ribbing border has become really popular in recent years—and for good reason! It’s a unique, non-traditional way to finish off your blankets that adds lots of texture and interest.
I love using this border for blankets with fun stitch patterns, like my corner-to-corner baby blanket. The ribbing is worked differently than any other border on this page, making it a great option for all kinds of blankets.
In this example, I used single crochet stitches through the back loop to create a slightly more textured ribbing. But you can also use slip stitches for a more knit-like look, or even half double crochets for a looser ribbing.
Like the braided border, the ribbing border can be worked with any number of stitches, so it’s easy to adapt to your blanket!
How to Crochet the Ribbing Border:
- If you haven’t done so already, start by crocheting a single crochet border in the same color as your blanket. For the top and bottom edges, make one single crochet in every stitch. In each corner, make three single crochets. Along the sides, space your single crochets evenly, working through the edge stitches. This extra step really makes your border look cleaner!
- You can begin the ribbing at any point around the blanket. I usually start right where I finished my single crochet round.
- To begin, make a chain as long as you want the ribbing to be wide, then add one more chain. Single crochet into the second chain from the hook, and in each chain across. (If you prefer, you can use slip stitches or half double crochets instead of single crochets.)
- Slip stitch into the next single crochet on the blanket, then chain one and turn your work (you’ll be crocheting the border in rows, not rounds). Single crochet through the back loop only of each stitch in the ribbing, chain one, and turn.
- Then make a single crochet through the back loop only off every stitch, and slip stitch to the next single crochet on the blanket.
- Repeat the last two steps around the entire blanket, including the corners. The ribbing is usually stretchy enough to curve around the corners without needing any special adjustments.
- You might need to occasionally skip a single crochet on the blanket, depending on the stitch you use for the ribbing. If you notice the ribbing stitches aren’t lining up perfectly with the next single crochet on the blanket, simply skip one stitch and slip stitch into the next single crochet instead. This will help keep the ribbing even and smooth.
3. Crochet Borders for Blankets: Picot Dots Border
If you’re looking to add a subtle decorative touch to your blanket, the picot dots border is a perfect choice. It’s just as easy to crochet as the other borders, but it adds a more intricate, fancy look.
What makes this border fun is its versatility. You can space the picot dots out for a simple dotted edge or place them closer together for a more ruffled effect. It works well with any blanket, whether it’s textured, plain, Tunisian crochet, or made of motifs.
In this example, I’ve paired the picot dots with the alpine stitch—one of my favorite stitches for blankets.
Since you can decide how many or how few picot dots to include, this border is easily adaptable for blankets of any size or stitch count.
How to Crochet the Picot Dots Crochet Border:
- If you haven’t already, begin by crocheting a single crochet border in the same color as your blanket. For the top and bottom edges, make one single crochet in every stitch. In each corner, crochet three single crochets. Along the sides, space your single crochets evenly, working into the edge stitches. This will make your border look cleaner and more polished.
- If you want to change colors for the picot dots, now is the time. You can either add an extra round of single crochets in the new color or jump right into the picot edging.
- To create the picot stitches, first, make a single crochet where you want the picot to be. Then, chain three and slip stitch into the first of those three chains to form a small loop. Afterward, continue by making a single crochet in the next stitch and adding however many stitches you want between each picot dot. In the example above, I placed one single crochet between each picot, but you can adjust the spacing to your liking.
- You can change the size of the picot stitches by adjusting the number of chains. Try as few as two chains for a smaller picot or up to five for a larger one—experiment to see what looks best for your blanket!
- I typically carry this border around the entire blanket, including the corners. If you’re adding more than one or two single crochets between the picots, be sure to check your stitch count to make sure it divides evenly around the blanket. Count the stitches between each picot and the picot stitch itself to ensure it all works out smoothly.
4. Crochet Borders for Blankets: Granny Stitch Border
Nothing says classic like the granny square or the granny stitch, making this border a perfect, timeless choice for your blanket.
Since this border uses double crochet stitches, it works up incredibly fast, making it a great option if you’re short on time. For an added touch, you can even finish it off with a round of picot dots for extra interest!
In this example, I added the granny stitch border to a granny square, but it works just as well on solid stitch patterns. You’ll just need to leave a few stitches between the clusters so that the granny stitch pattern stands out.
How to Crochet a Traditional Granny Stitch Border:
- While most of the borders on this list start with a solid round of single crochets in the same color as your blanket, the granny stitch border is an exception. You don’t need a single crochet border first—unless you’re adding this to a blanket that’s worked in rows rather than motifs. If your blanket has rows, finishing the edges with a single crochet border will definitely give it a cleaner look.
- I prefer to start this border in one of the corner stitches. Begin by crocheting three double crochets into the first corner stitch (you’ll come back and finish the corner at the end).
- If your blanket already has granny stitches, like my example, the repeat is super simple—just make three double crochets between the clusters of the previous row.
- If you’re adding this border to a solid stitch pattern, you’ll need to skip a couple of stitches between each cluster of three double crochets to create that signature granny stitch look.
- When you reach a corner, follow this pattern: make three double crochets, chain two, and then make three more double crochets in the same corner stitch.
- When you get back around to the first corner you started with, finish it by making three more double crochets, then chain one and slip stitch to the first double crochet to complete the round.
- You can add as many rounds of this border as you like—I find that at least two rounds give it a nice, finished look.
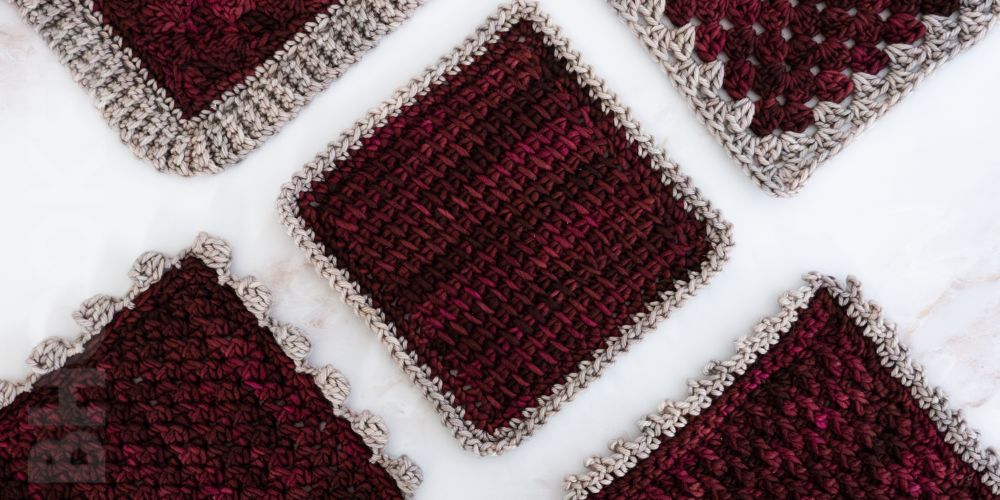
5. Crochet Borders for Blankets: Beaded Tassel Border
Another border that has surged in popularity recently is the beaded tassel border—and for good reason! It’s such a fun way to add a pop of texture and playful detail to your blankets.
The beaded tassel border is created using popcorn stitches and chains. The best part? You can adjust the spacing to suit your blanket, making it incredibly versatile.
In this example, I paired the border with the woven stitch to show off how beautifully it complements textured stitch patterns. Honestly, I haven’t found a stitch pattern that this border doesn’t look great with!
How to Crochet the Beaded Tassel Crochet Border:
- Like the other borders, you’ll begin by crocheting a single crochet border in the same color as your blanket. Along the top and bottom edges, make one single crochet in every stitch, and in each corner, crochet three single crochets. On the sides, space your single crochets evenly by working into the edge stitches—this step really gives your border a polished look.
- If you want to switch to a new color for the beaded tassels, do so now. You can add an extra round of single crochets in the new color, or dive straight into the beaded edging.
- To crochet the beaded tassel stitches, follow these steps: Start by chaining two (this forms part of the chain where the bead will hang). Then, chain three more stitches (these count as the first double crochet in the popcorn stitch). In the fourth chain from the hook, make 4 double crochets. To finish the popcorn stitch, pull up on the working loop (be careful not to undo any stitches!) and remove your hook. Insert your hook through the first double crochet, reattach the active loop to your hook, and pull the active loop through the first double crochet stitch. Chain one to secure it (remember, the first double crochet was your chain three), and then chain one more.
- In my example, I skipped three stitches and slip stitched to the next single crochet in the blanket. But you can play around with the spacing and customize it however you like!
- If you’d like the beaded tassels to hang lower, you can add more chains on either side of the popcorn stitches. Don’t be afraid to experiment—find the look that suits your blanket best!
Choosing the border for your blanket is nothing to stress over. Whether you love one of these crochet borders, or you find something else, go with your gut. It’s not usually wrong!
Must-Know Crochet Borders Video
Video not displaying? Watch this tutorial on YouTube instead.
Frequently Asked Questions About Crochet Borders for Blankets
What is the easiest border for a crochet blanket?
One of the easiest borders for a crochet blanket is the braided border you read about on this page. It doesn’t require a specific number of stitches, and can be used for blankets of all sizes!
Which crochet border uses the least amount of yarn?
The picot dots border in this article uses the least amount of yarn (and time) to crochet. It’s quick and easy and easily adaptable to blankets of all sizes.
What is the best crochet stitch for crochet edgng?
The best crochet stitch for edging is the stitch you like the look of best! Is your blanket vibrant and visually interesting? Do you want it to be the focus? Go with a simple border that’ll just clean up the edges and let the blanket be the focus. Is your blanket more minimalist and simple? Do you need something to draw the eye? Go with an interesting border in a great contrast color – or variety of colors.
How big should crochet borders be on a blanket?
I usually make my borders 2 or 3 inches wide. I find this is a good balance, but there are no wrong answers here. Make your border as big as you want!


