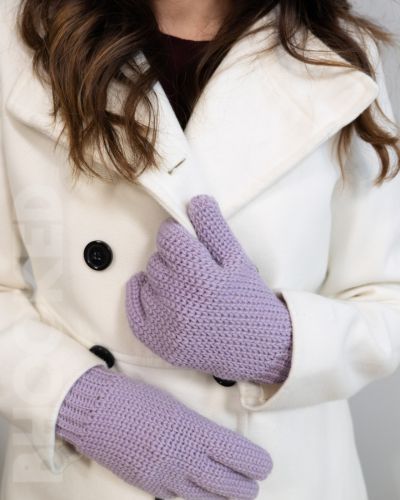
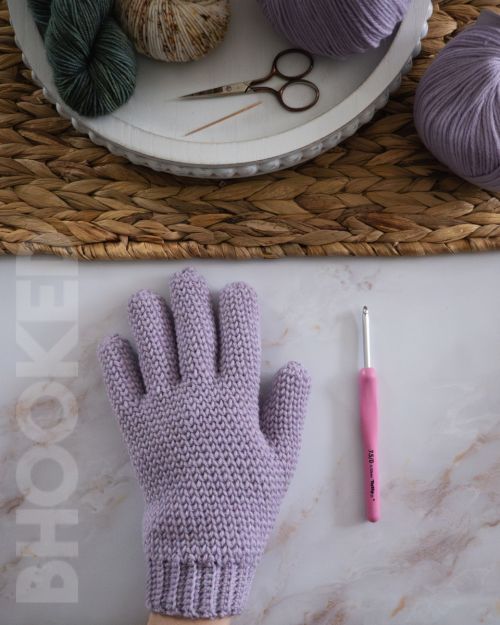
Learn how to crochet the perfect pair of crochet gloves (that you’ll actually enjoy wearing!) with this free pattern and step-by-step tutorial. You can view the pattern completely free on this page, or you can buy the ad-free, printable PDF from our shop.
UPDATED: NOVEMBER 22, 2024 BY BRITTANY
This post may contain affiliate links. See our Disclosure Policy for more information.
Skill Level | Complex
Available Sizes | Three Adult Sizes
Have you tried crocheting gloves before, only to end up with a pair that doesn’t quite fit or feel right? It’s likely not your fault! Finding the right yarn and pattern combo is key—without it, crochet gloves can end up too thick, uncomfortable, or just not stay on well. But that’s not a problem with these gloves!
These crochet gloves are thin enough to let you use your fingers, snug enough to stay in place, and warm enough for even the coldest winter days. Plus, they look just like those knitted gloves you’ve been eyeing for years!
About This Crochet Gloves Pattern
With this crochet glove pattern, you’ll be making a glove that fits just right using a perfect fine-weight yarn. These gloves are comfortable for everyday wear, and unlike crochet mittens, they leave your fingers free! No need to skip out on handmade gloves just because you don’t knit.
Keep reading for FAQs, pattern details, or scroll down to jump straight to the free pattern.
Pattern Overview:
- Supplies
- Buy the ad-free, printable pattern
- Abbreviations
- Pattern Notes
- Gauge & Finished Size
- How to Determine Which Size to Make
- Crochet Gloves Pattern Instructions
- Crochet Gloves Step-by-Step Video Tutorial

You can view the pattern completely free on this page. But, if you prefer having a digital copy that you can save or print, we’ve got you covered with that option as well.
If you’d like to support our work here at B.Hooked, purchasing the digital pattern is a wonderful way to do so!
Recommended Supplies
- Approx 240-285 yds; La Mia Merino Yarn (Colorway pictured: L140)
- 4.5 mm Crochet Hook
- 3 mm Crochet Hook (cuff)
- Yarn Needle
- Scissors
It might be tempting to use any yarn from your stash, but a good yarn like La Mia Merino makes a big difference in how well your gloves fit and last. You don’t have to use this exact brand, but try to find a #2 fine weight yarn that’s 100% wool or a wool/nylon blend—just like you’d use for socks.
Pure wool and sock yarns have the perfect mix of stretch, breathability, and strength for gloves that can handle daily wear. Acrylic or acrylic blends might seem like good choices, and some may work, but because acrylic is synthetic, it doesn’t breathe as well, which can make your hands sweat in 100% acrylic gloves.
Most sock yarns are super fine (#1) weight, which will be too thin for this pattern. If you can’t find La Mia Merino or prefer to use something you already have, make sure it’s a Fine (#2) weight yarn. This helps you get the gauge and a comfortable fitting glove. If you’re unfamiliar with standard yarn weights, this article will really help!
Abbreviations
This pattern is written using standard US crochet terminology.
- Ch(s) Chain(s)
- Cont Continue
- Hk Hook
- Prev Previous
- PM Place Marker
- Rem Remaining
- Rep Repeat
- Sc Single Crochet
- Sc2tog Single Crochet Two Together
- Sk Skip
- Slst Slip Stitch
- St(s) Stitch(es)
Crochet Gloves Pattern Notes
This pattern is available in three adult sizes. Not including baby and kids’ sizes was intentional—tiny fingers are tricky to crochet, and they often end up too thick to be comfortable. I do plan to offer a similar mitten pattern for kids soon! Use the size chart and instructions below to find the right fit.
Some instructions are labeled “right glove only” and “left glove only.” Follow only the steps for the glove you’re currently working on. If there’s no “right” or “left” label, the instructions apply to both gloves.
Additionally, some instructions are marked for specific sizes. Only follow the instructions for the size you’re making. If there’s no size label, work that step for all sizes.
Always mark the first stitch of each round with a stitch marker, ideally in a different color than any other markers you’re using for the gloves.
To Determine Which Size To Make:
To find your size, use a tape measure to check the circumference of your hand at the knuckles, keeping your fingers together as you measure.
Then, refer to the sizing chart below to see which size matches your hand measurement, and use that size when following the pattern instructions.
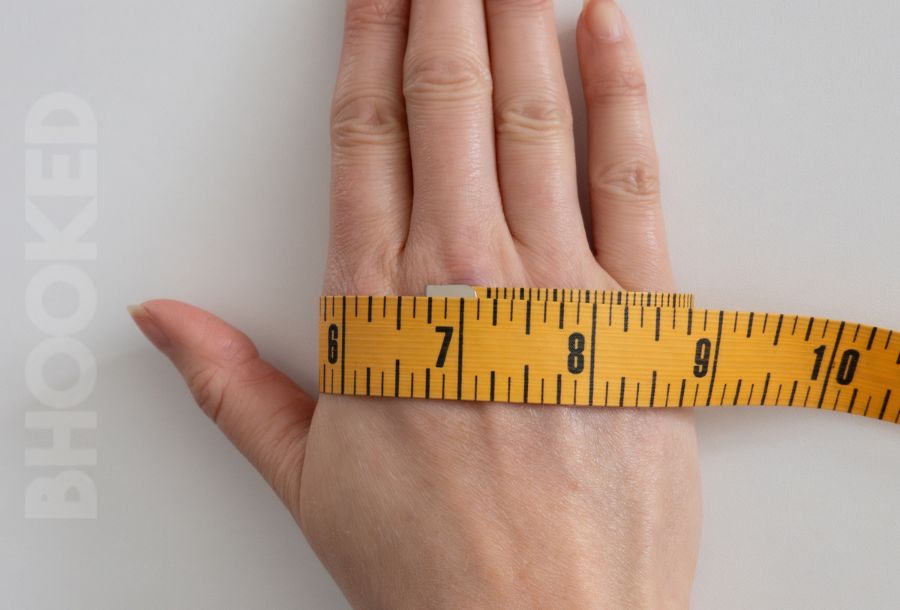
Crochet Gloves Sizing Chart
| HAND CIRCUMFERENCE | HAND LENGTH | |
| ADULT SIZE A | 7″ – 7.5″ | 6.5″ |
| ADULT SIZE B | 7.5″ – 8″ | 7.5″ |
| ADULT SIZE C | 8.5″ – 9″ | 8″ |
You will see the sizes given in the pattern as follows:
Size A (Size B, Size C)
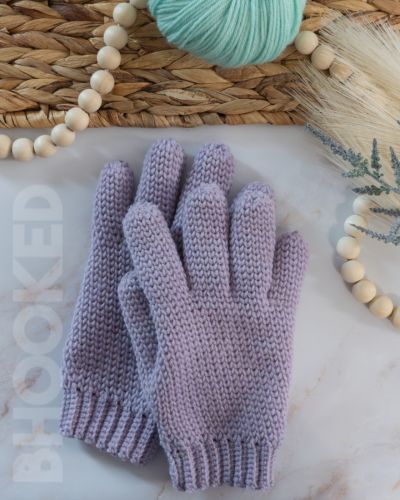
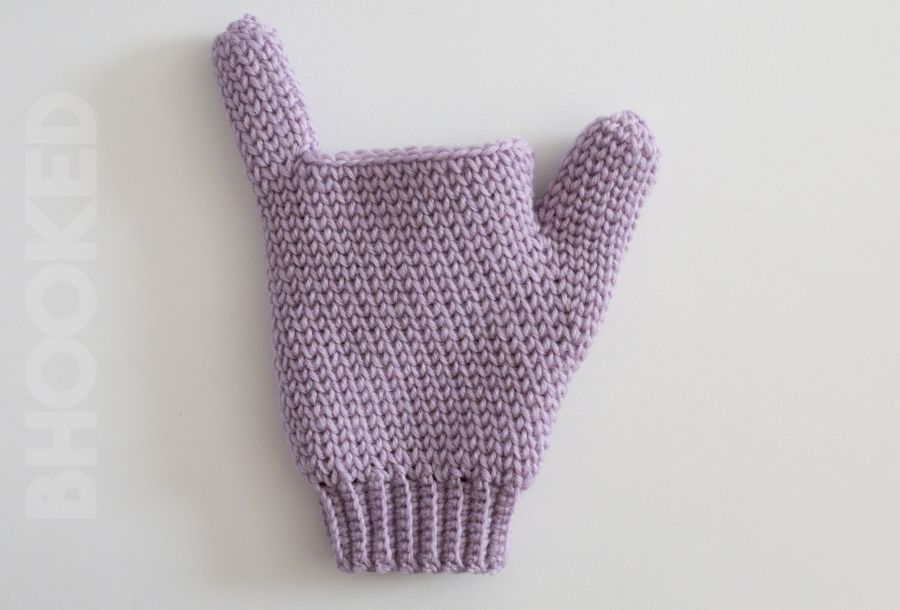
Shown in pictures: Left Glove, Size A.
Additional Notes to Consider for these Crochet Gloves
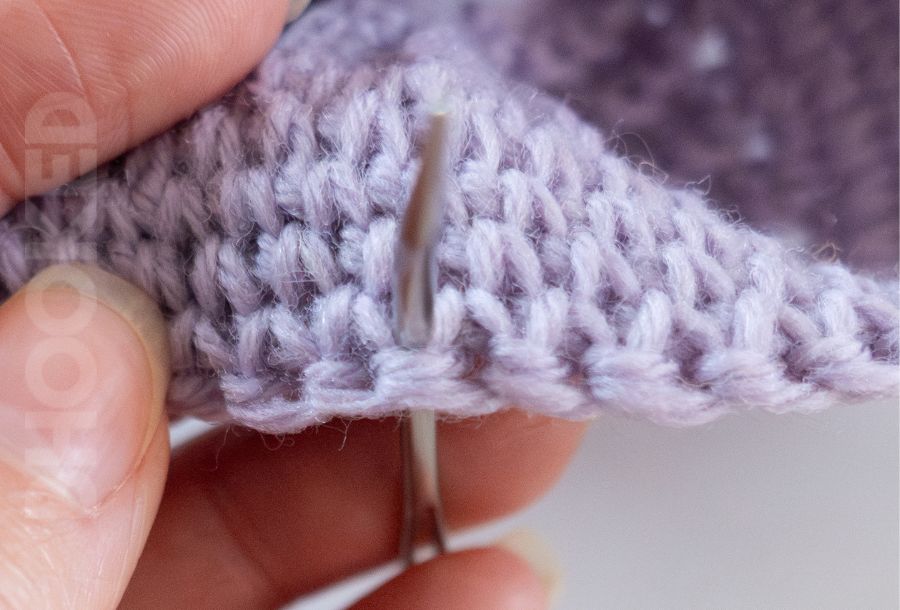
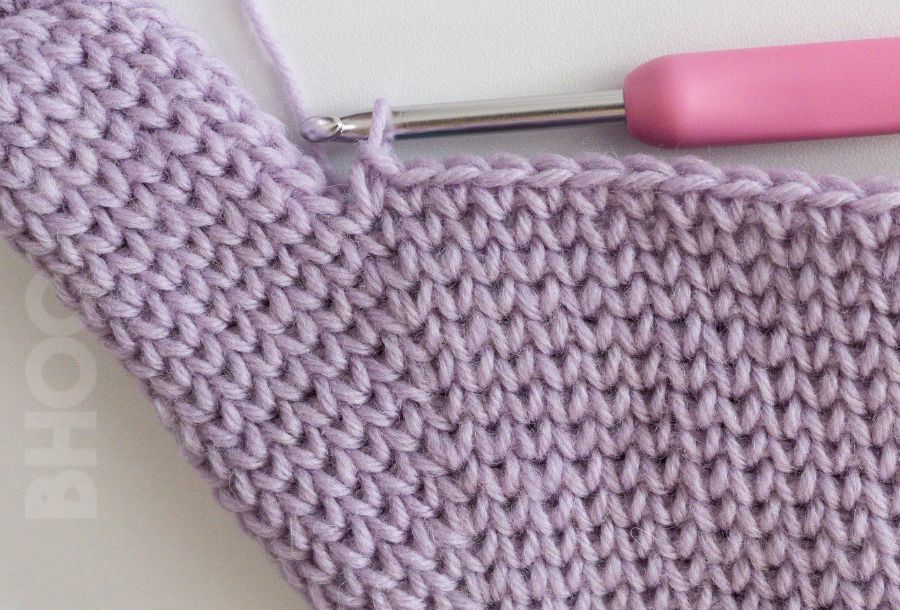
After you finish the cuff, you’ll be told to make your single crochets through the front of the stitch instead of the usual place. Here’s what that looks like:

Gauge
10 stitches and 12 rounds = 2″ worked in the waistcoat stitch pattern.
Before you start, it’s a good idea to check your gauge to ensure your gloves turn out the right size. Even if you’re using the recommended yarn, checking your gauge will let you know if you need to adjust your hook size.
To Make a Gauge Swatch:
Since the waistcoat stitch is worked in the round, you’ll need to crochet a small tube to check your gauge. Your swatch only needs to be about 2.5 inches wide (when lying flat) to take an accurate measurement.
- Start with a chain of 28 or 30 stitches, then slip stitch to the first chain to form a ring.
- Make a single crochet in each chain around. When you reach the end of the round, don’t join.
- For the next round, continue with single crochets, working into the front of each stitch as shown for the waistcoat stitch.
Keep going until your swatch is a couple of inches tall, then take your measurement.
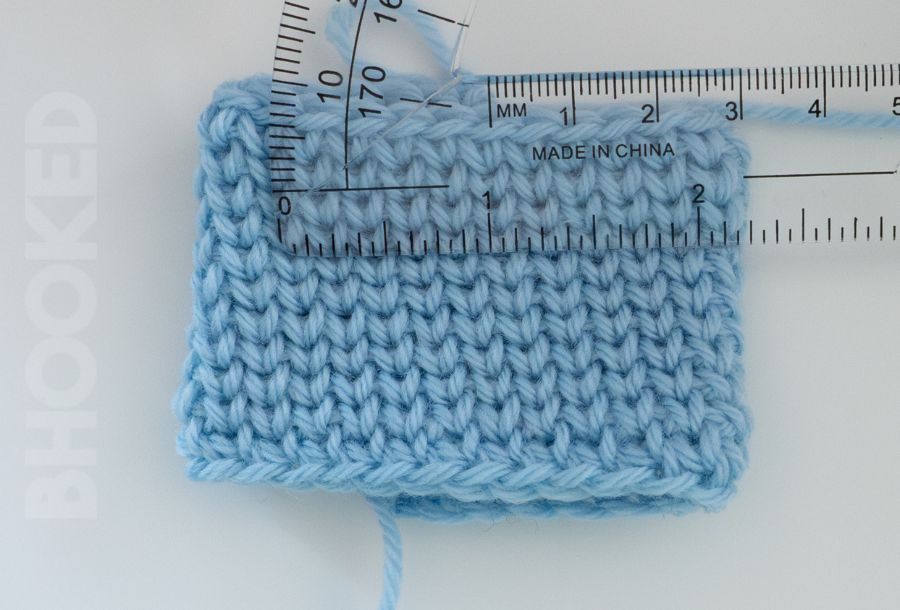
If you count more stitches per inch, go up a hook size and try again.
If you count fewer stitches per inch, drop down a hook size and try again.
Crochet Gloves Pattern Instructions
Band
Row 1: With the smaller of the two hook sizes, Ch 10(12, 14). Sc in the 2nd ch from the hk, and in each rem ch. Ch 1 and turn.
Stitch Count: 9(11, 13)
Row 2: Sc in the BLO of each st. Ch 1 and turn.
Using row 2 as the stitch repeat, continue with the cuff for 32(36, 40) rows.

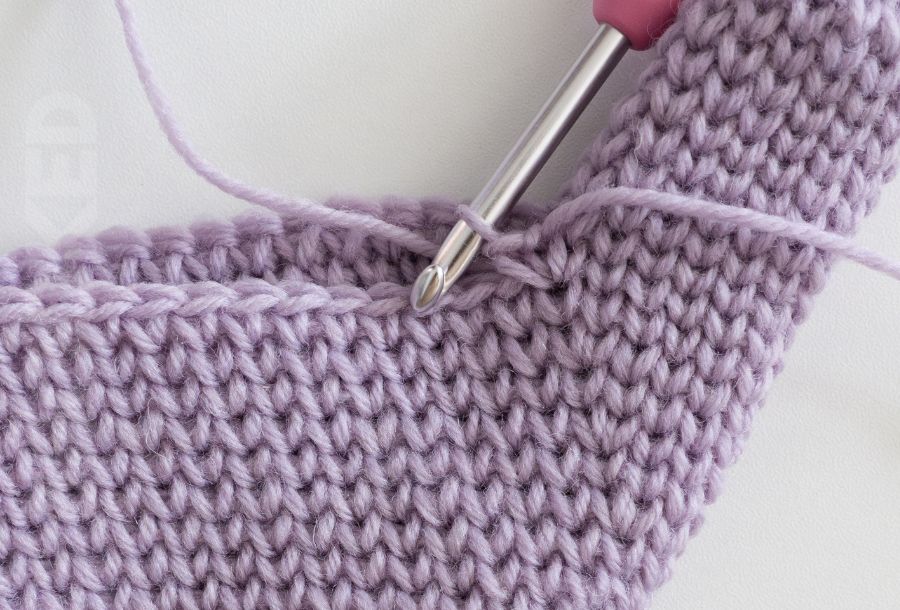
When you finish crocheting the length of the band, don’t fasten off. Pull up on the working loop, and bring the two ends together. You can slip stitch them together to form a ring, or use the starting tail to seam the two ends together.
Then continue to the wrist instructions.

NOTE: The band will look much too small at first, but it’s incredibly stretchy. If you find that it doesn’t stretch enough to fit around your wrist, you may want to remake the band using a 3.5mm crochet hook, or consider making the next size up.
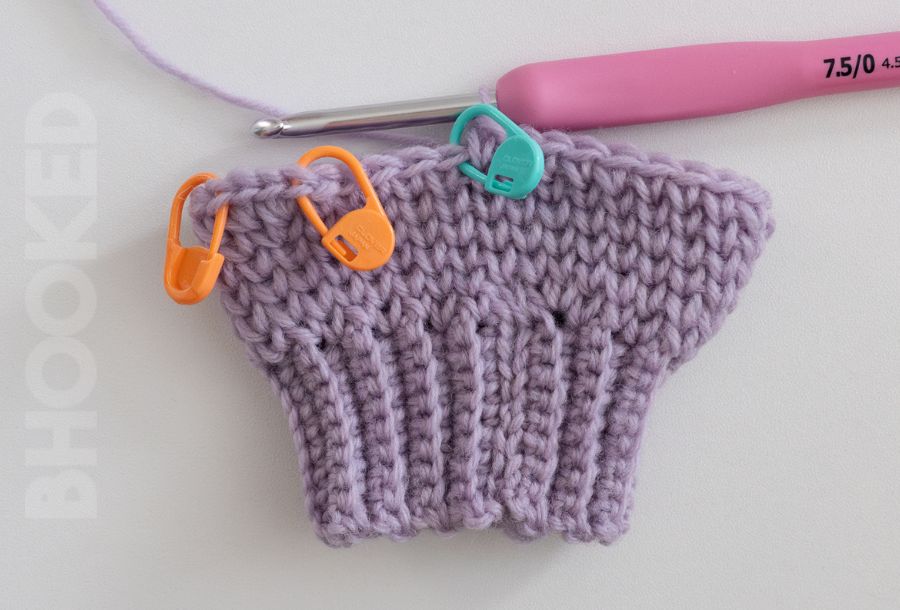
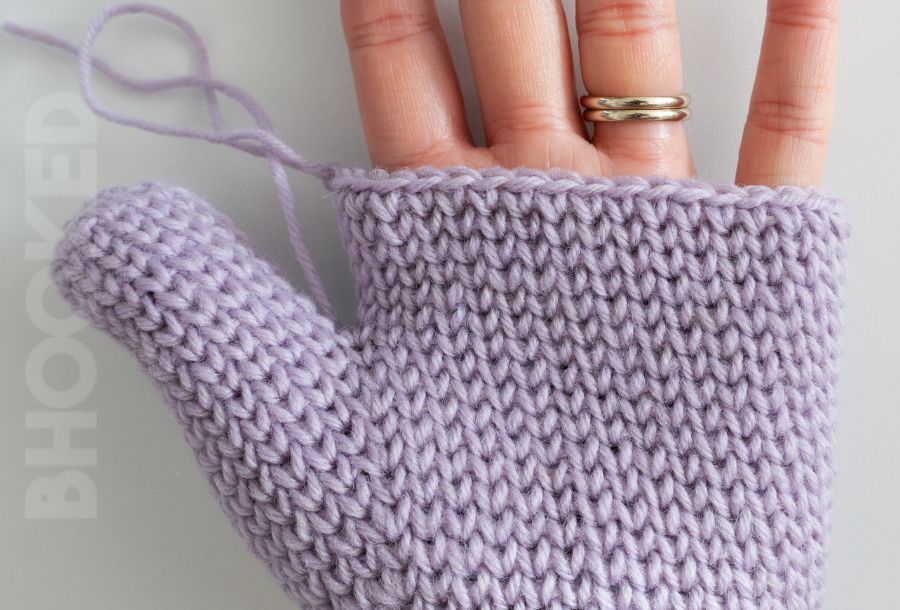
Wrist
Replace the working loop with the larger of the two hook sizes.
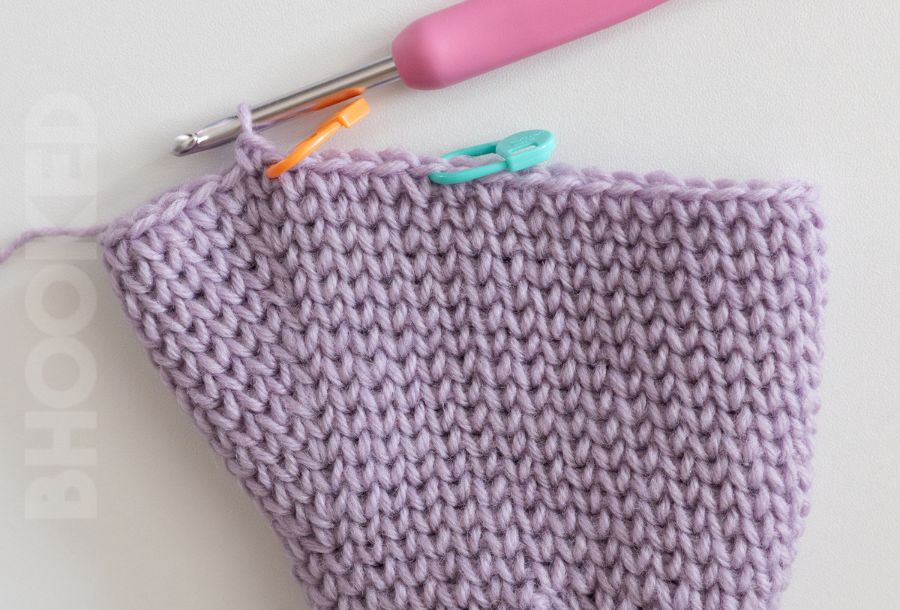
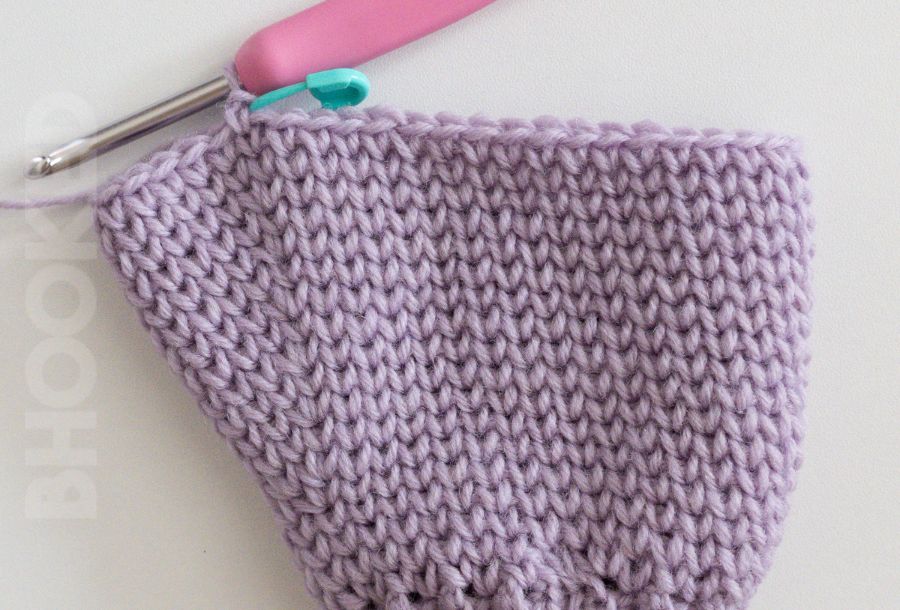
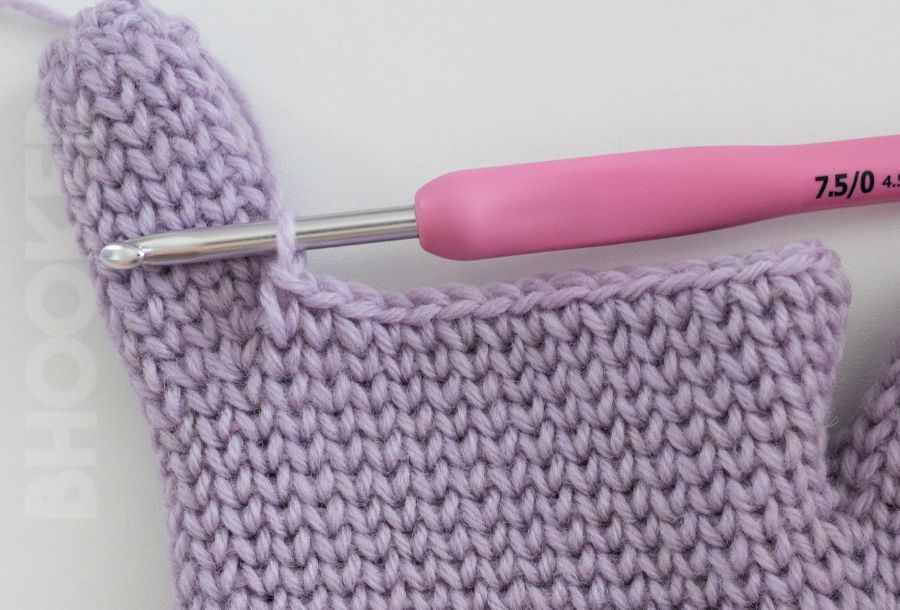
Round 1: Ch 1 (doesn’t count as a st), then evenly space 32(36, 40) sc along side edge of the cuff. Don’t join. Continue crocheting in a spiral using a stitch marker to keep track of the first st of the round, here and throughout the pattern.
*Note: All single crochets from this point on are worked through the middle of the stitch (instead of the traditional location). Work them through the middle of the single crochet from the previous round. This is called the “waistcoat” stitch. See the above pattern notes for more info.

Round 2 (RIGHT GLOVE ONLY): PM in the 7(9, 10). Make 1 sc in each st to the marker. Then make 2 sc in the marked st, replacing the marker in the first of those sc. Make 1 sc in each rem st.
Round 2 (LEFT GLOVE ONLY): PM in the 24(26, 31). Make 1 sc in each st to the marker. Then make 2 sc in the marked st, replacing the marker in the first of those sc. Make 1 sc in each rem st.
Stitch Count: 33(37, 41)
Round 3: Make 1 sc in every st (replace the marker as you come to it).
Round 4: Make 1 sc in each st to the marker. Then make 2 sc in the marked st, replacing the marker in the first of those sc. Make 1 sc in each rem st.
Stitch Count: 34(38, 42)
Repeat: Rep the last two rounds once more. Your stitch count will be 34(38, 42).
Keep the marker in the first stitch of the round, but remove the marker that was used for the previous increases.
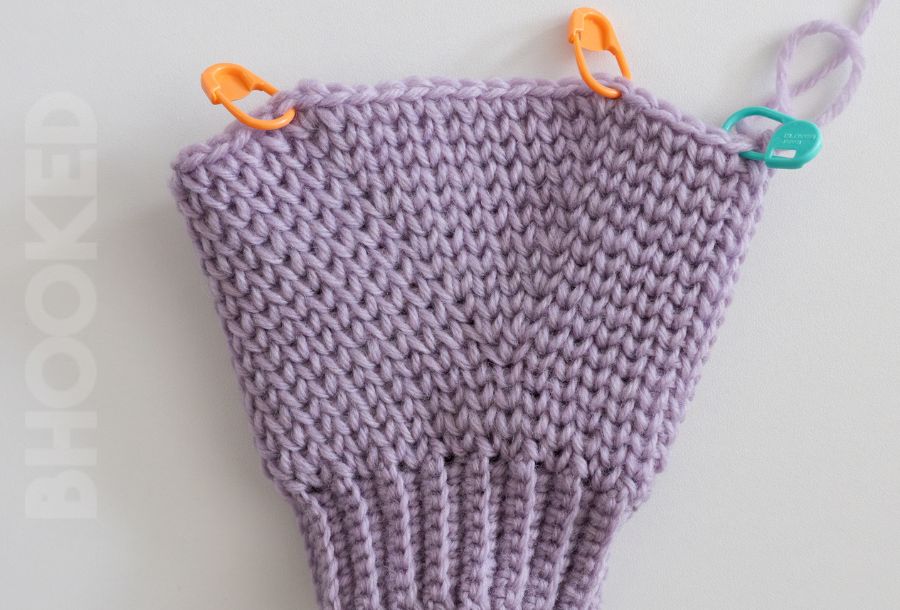
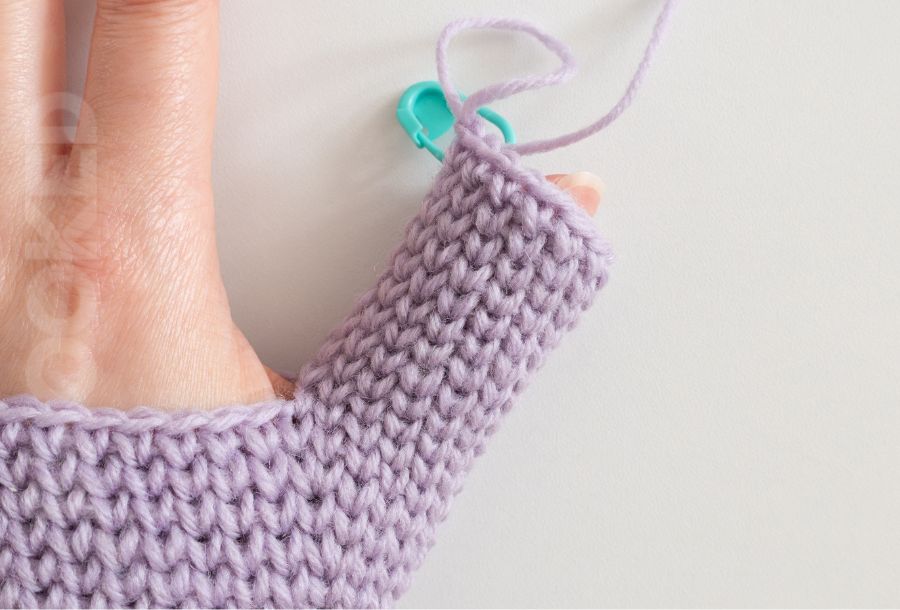
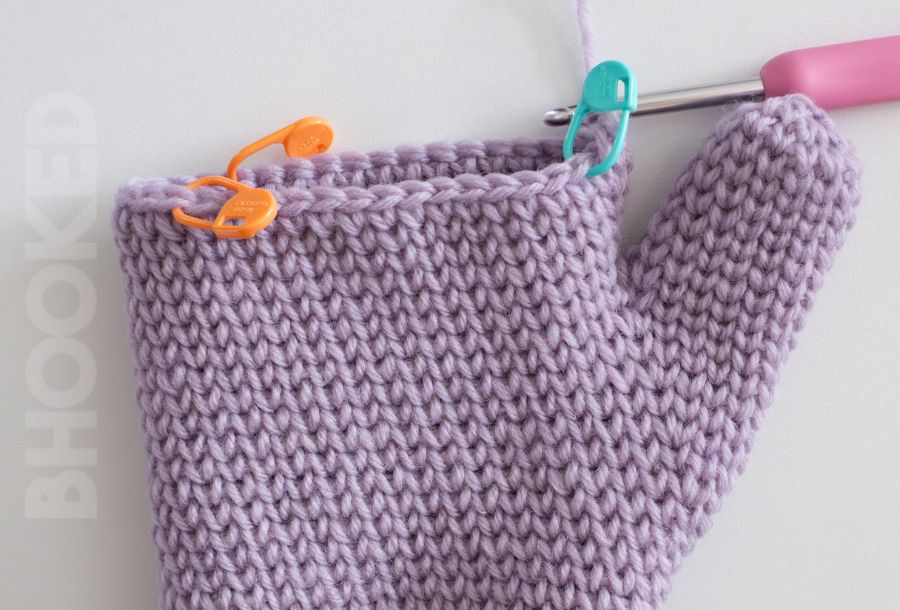
Thumb Gusset
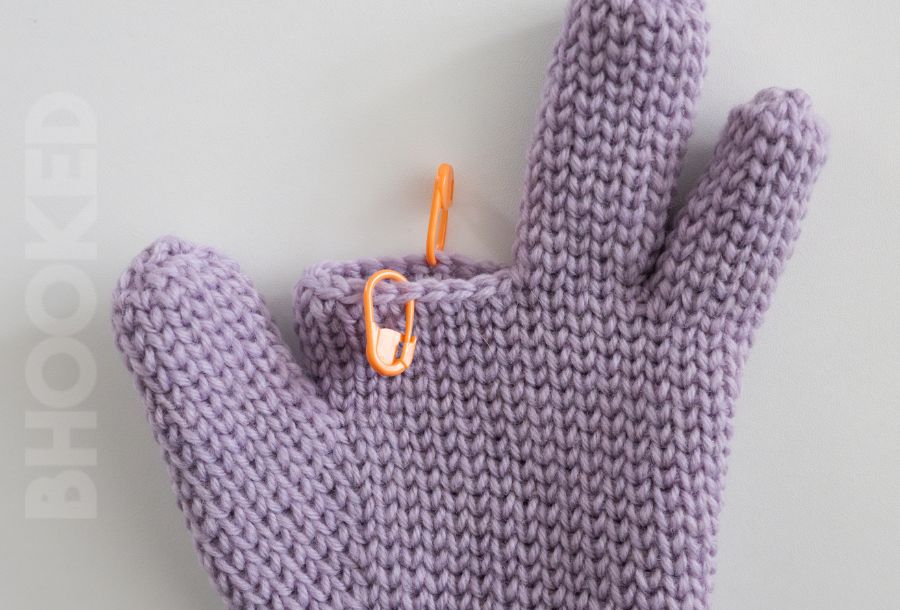
RIGHT GLOVE ONLY: PM in the 33(37, 41) stitch.
LEFT GLOVE ONLY: PM in the 6(7, 8) stitch.
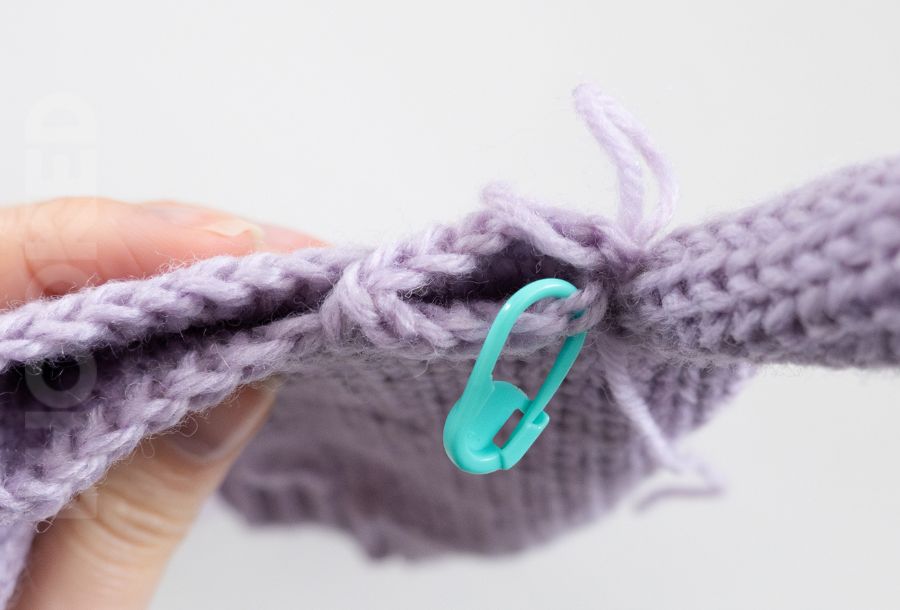
Round 1: Make 1 sc in each st to the marker. Make 2 sc in the marked st, replacing the marker in the first of those sc, and adding another marker to the second of those sc. Make 1 sc in each rem st.
Stitch Count: 35(39, 43)
Tip: It’s best to use two different color markers – one color for the first stitch of the round, and the other color for the gusset increases.
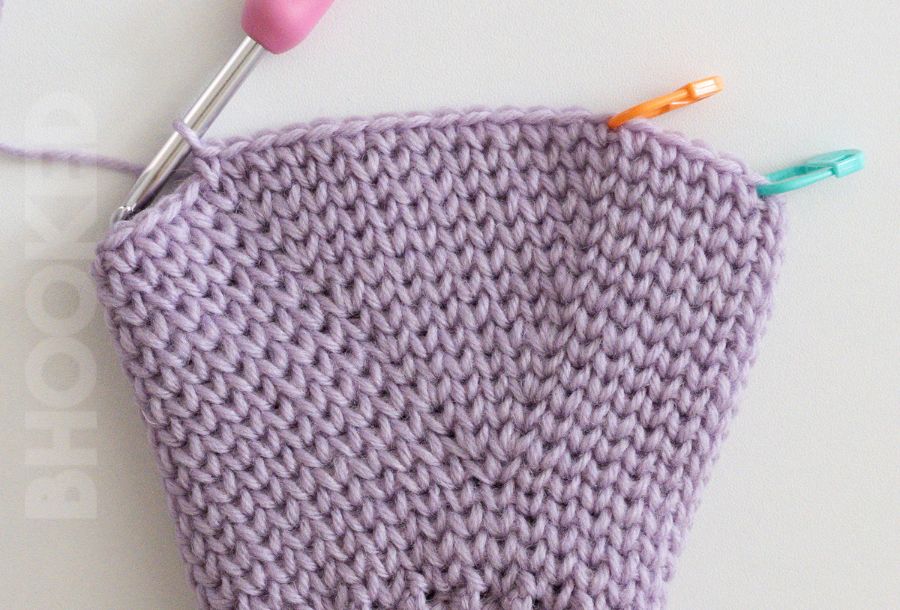
Round 2: Make 1 sc in each st to the first marker. Make 2 sc in the first marked st, replacing the marker in the first of those sc. Then make 2 sc in the next marked stitch, replacing the marker in the second of those sc. Make 1 sc in each rem st.
Stitch Count: 37(41, 45)
Round 3: Make 1 sc in every st (replace the markers as you come to them).
Stitch Count: 37(41, 45)
Round 4: Make 1 sc in each st to the first marker. Make 2 sc in the first marked st, replacing the marker in the first of those sc. Make 1 sc in each st to the next marker. Then make 2 sc in the next marked st, replacing the marker in the second of those sc. Make 1 sc in each rem st.
Stitch Count: 39(43, 47)
Repeat: Repeat the last two rounds 4(5, 5) more times.
After this repeat, your stitch count will be 47(53, 58) and the stitches between the markers in the thumb gusset will be 12(14, 14).
Next Round: Make 1 sc in every st (replace the markers as you come to them).
Stitch Count: 47(53, 58)
Size A ONLY: Continue to the thumb instructions.
Next 2 Rounds Size B ONLY: Make 1 sc in every st (replace the markers as you come to them). After finishing these two rounds, continue to the thumb instructions.
Next Round Size C ONLY: Make 1 sc in each st to the first marker. Make 2 sc in the first marked st, replacing the marker in the first of those sc. Then make 1 sc in each st to the next marker. Make 1 sc in the next marked stitch, and replace the marker in the new sc. Then make 1 sc in each rem st. (59 sts) After finishing this round, continue to the thumb instructions.

TIP: Do a fit check. If the glove doesn’t reach the base of your thumb, you can add an extra round or two if you need to. If you do though, don’t increase your stitch count, or the rest of the pattern will be inaccurate.
A digital pattern is available in our shop so you can print out the pattern

Thumb
Round 1: Make 1 sc in each st to the first marker. Then make 1 sc in the marked st, and replace it. Make 1 sc in each st to the next marker. Then make 1 sc in the next marked st, and remove it. Leave the remaining stitches unworked.
Round 2: Sc in the remaining thumb gusset marker for the first st in this round.
Move the marker previously used as the first stitch of the round to this stitch.
(Round 2 Continued): Sc in each rem st.
Stitch Count: 14(16, 17)
Round 3: Make 1 sc in every st.
Repeat: Repeat the last row 8(12, 14) more times.
TIP: Do a fit check. If it doesn’t reach near the tip of your thumb, add or remove rounds as needed.
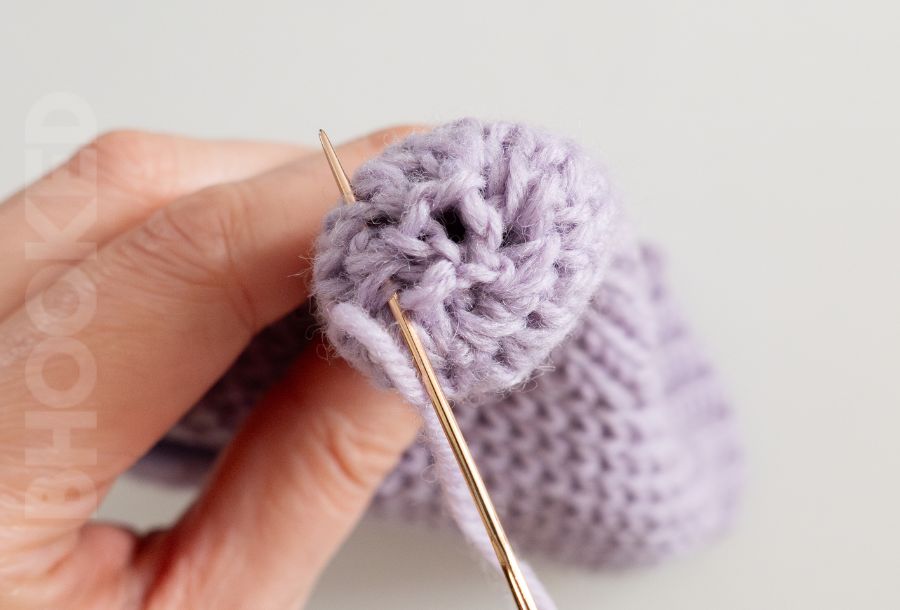
Last Round: Using the same waistcoat stitch placement, Sc2tog 7(8, 8) times. Slst in the first sc2tog (sizes A and B ONLY), OR Slst in the last st (size C ONLY).
Fasten off leaving a tail that’s about 6” long, and use this tail to seam the opening closed.
Remaining Hand Stitch Count: 33(37, 41)

Additional Hand Rounds
Round 1 (RIGHT GLOVE ONLY): with the bottom side of the glove facing up, fasten on in the same stitch as the thumb, and make a sc in this st. Make 1 sc in each remaining st. Then make the last sc of this round in the same stitch as the thumb on the opposite side of the glove.
Stitch Count: 35(39, 43)
Round 1 (LEFT GLOVE ONLY): with the top side of the glove facing up, fasten on in the same stitch as the thumb, and make a sc in this st. Make 1 sc in each remaining st. Then make the last sc of this round in the same stitch as the thumb on the opposite side of the glove.
Stitch Count: 35(39, 43)
Round 2 (RIGHT GLOVE ONLY): Make 2 sc in the first st. Then make 1 sc in each rem st.
Stitch Count: 36(40, 44)
Round 2 (LEFT GLOVE ONLY): Make 1 sc in each st to the last. Make 2 sc in the last st.
Stitch Count: 36(40, 44)
Round 3: Make 1 sc in every st.
Repeat: Rep the last two rounds, two more times. At the end of this repeat, your stitch count will be 38(42, 46).
Size A ONLY: Continue to the pinkie instructions.
Next Round Size B ONLY: Make 1 sc in every st.
Next 2 Rounds Size C ONLY: Make 1 sc in every st.
TIP: Do a fit check. If the glove doesn’t reach the base of your pinkie, you can add an extra round or two if you need to. If you do though, don’t increase your stitch count, or the rest of the pattern will be inaccurate.
Pinkie Finger
Round 1 (RIGHT GLOVE ONLY): Using the first stitch to start, PM in the 12(13, 14) and 19(21, 25) stitches.
Then make 1 sc in each st to the first marker. Make 2 sc in the first marked stitch, replacing the marker in the first of those sc. Make 1 sc in each st to the next marker. Then make 2 sc in the next marked st, and remove that marker. Leave the remaining stitches unworked.
The first st of the next round will be made in the remaining marker.
Round 1 (LEFT GLOVE ONLY): Using the first stitch to start, PM in the 15(16, 17) and 22(24, 28) stitches.
Make 1 sc in each st to the first marker. Then make 2 sc in the first marked stitch, replacing the marker in the first of those sc. Make 1 sc in each st to the next marker. Then make 2 sc in the next marked st, and remove that marker. Leave the remaining stitches unworked.
The first st of the next round will be made in the remaining marker.

Round 2: Make 2 sc in the marked st. Then make 1 sc in each rem st.
Stitch Count: 11(12, 14)
Round 3: Make 1 sc in every st.
Repeat: Rep the last round 8(11, 13) more times.
TIP: Do a fit check. If it doesn’t reach near the tip of your pinkie finger, add or remove rounds as needed.
Last Round: Using the same waistcoat stitch placement, Sc2tog 5(6, 7) times. Slst in the first sc2tog (sizes B and C ONLY), or Slst in the last st (size A ONLY).
Fasten off leaving a tail that’s about 6” long, and use this tail to seam the opening closed.
Remaining Hand Stitch Count: 30(33, 34)
Additional Hand Rounds
SIZES A and B ONLY:
Round 1 (LEFT GLOVE ONLY): With the bottom side of the glove facing you, fasten on in the stitch next to the pinkie, and make a sc in this stitch. Then make 1 sc in every st, ending with the last stitch next to the pinkie on the other side of the glove. Stitch Count: 30(33, N/A)
Round 1 (RIGHT GLOVE ONLY): With the top side of the glove facing you, fasten on in the stitch next to the pinkie, and make a sc in this stitch. Then make 1 sc in every st, ending with the last stitch next to the pinkie on the other side of the glove.
Stitch Count: 30(33, N/A)

SIZE C ONLY:
Round 1 (RIGHT GLOVE ONLY): With the top side of the glove facing you, fasten on in the same stitch as the pinkie finger, and make a sc in this st. Then make 1 sc in every st, ending with the last stitch in the same stitch as the pinkie finger on the other side of the glove. (36 sts)
Round 1 (LEFT GLOVE ONLY): With the bottom side of the glove facing you, fasten on in the same stitch as the pinkie finger, and make a sc in this stitch. Then make 1 sc in every st, ending with the last stitch in the same stitch as the pinkie finger on the other side of the glove. (36 sts)
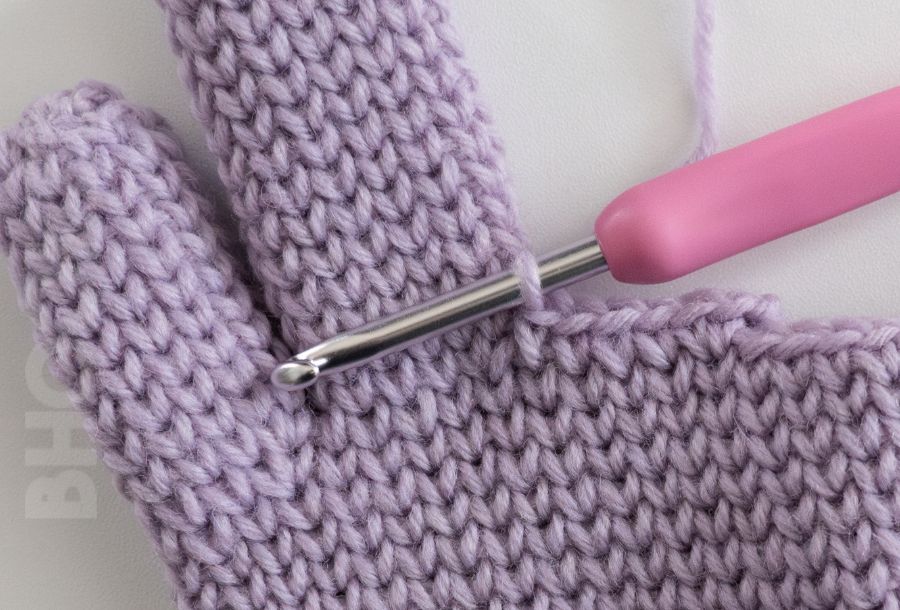
Ring Finger
Round 1: Using the first stitch marker as the first st, PM in the 5(5, 6) and 26(28, 31) stitches.
Then make 1 sc in each st to the first marker. Make 2 sc in the first marked st, and remove this marker. Then make 2 sc in the next marked st on the other side of the glove, and remove this marker as well. Then make 1 sc to the end of the round, ending with the last stitch in the stitch next to the pinkie finger.
Stitch Count: 12(13, 14)
Round 2: Make 2 sc in the first st. Then make 1 sc in each rem st.
Stitch Count: 13(14, 15)
Note: if this extra increase makes the finger too big, you can omit the increase in this round and just make one sc in every st.
Round 3: Make 1 sc in every st.
Stitch Count: 13(14, 15)
Repeat: Rep the last round 11(14, 16) more times.
TIP: Do a fit check. If it doesn’t reach near the tip of your ring finger, add or remove rounds as needed.
Last Round: Using the same waistcoat stitch placement, Sc2tog 6(7, 7) times. Slst in the first sc2tog (size B ONLY), OR Slst in the last st (sizes A and C ONLY).
Fasten off leaving a tail that’s about 6” long, and use this tail to seam the opening closed.
Remaining Hand Stitch Count: 20(22, 24)
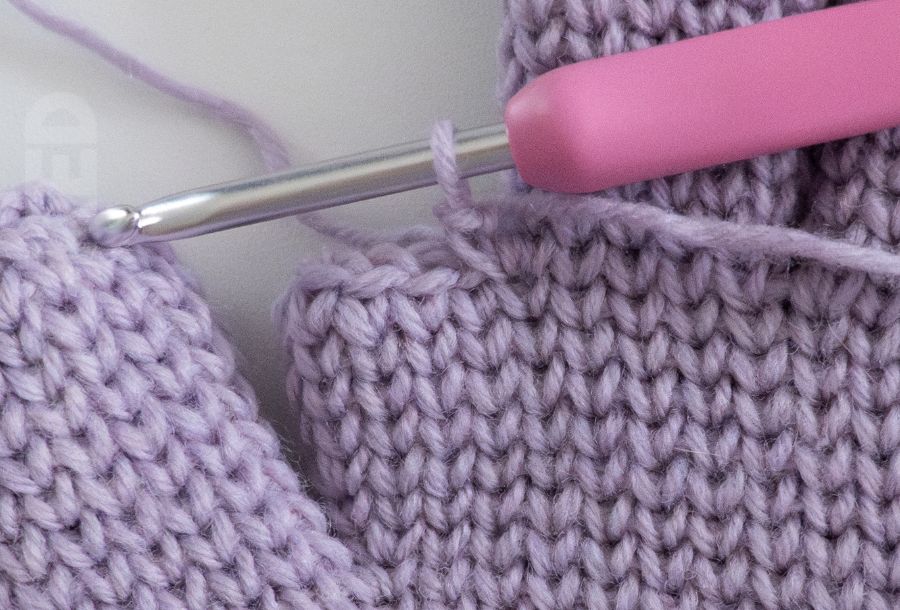
Middle Finger
SET UP FOR BOTH GLOVES:
With the top side of the glove facing you for the right glove only, OR the bottom side of the glove facing you for the left glove only, and starting with the stitch next to the ring finger, PM in 5(5, 6) and 16(17, 19).
Round 1: With the top side of the glove facing you, fasten on in the stitch next to the ring finger, and make a sc in this stitch.
Then make 1 sc in each st to the first marker. Make 2 sc in the first marked st, and remove this marker. Then make 2 sc in the next marked st on the other side of the glove, and remove this marker as well.
Then make 1 sc to the end of the round, ending with the last stitch in the stitch next to the ring finger.
Stitch Count: 12(13, 14)
Round 2: Make 2 sc in the first st. Then make 1 sc in each rem st.
Stitch Count: 13(14, 15)
Note: if this extra increase makes the finger too big, you can omit the increase in this round and just make one sc in every st.
Round 3: Make 1 sc in every st.
Stitch Count: 13(14, 15)
Repeat: Rep the last round 14(16, 18) more times.
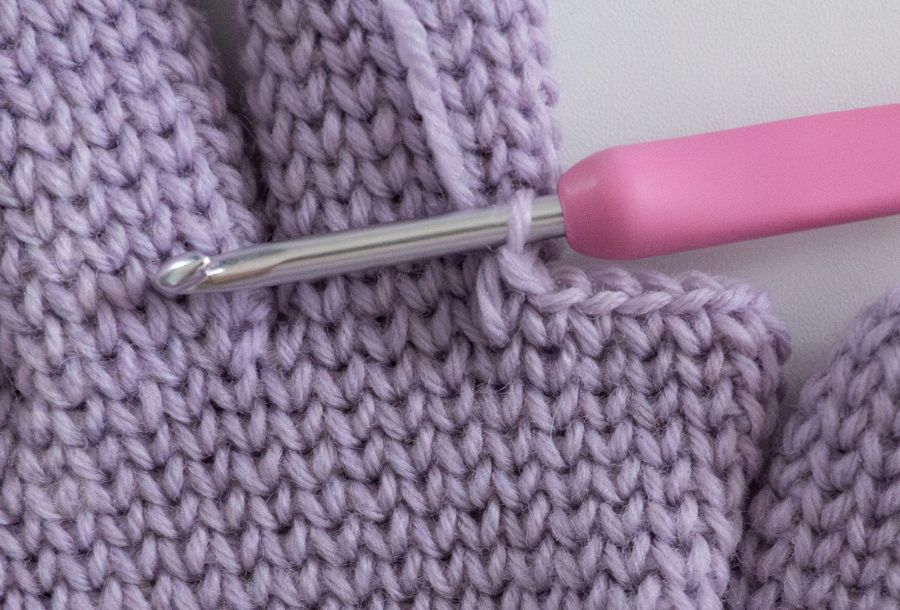
Index Finger
SET UP FOR BOTH GLOVES:
Round 1: With the top side of the glove facing you for the right glove only, OR with the bottom side of the glove facing you for the left glove only, fasten on in the same stitch as the middle finger, and make a sc in this stitch.
Then make 1 sc in each st to the last, and make the last sc of this round in the same st as the middle finger.
Stitch Count 12(13, 14)
Round 2: Make 2 sc in the first st. Then make 1 sc in each rem st.
Stitch Count: 13(14, 15)
Note: if this extra increase makes the finger too big, you can omit the increase in this round and just make one sc in every st.
Round 3: Make 1 sc in every st.
Stitch Count: 13(14, 15)
Repeat: Rep the last round 11(14, 16) more times.
TIP: Do a fit check. If it doesn’t reach near the tip of your index finger, add or remove rounds as needed.
Last Round: Using the same waistcoat stitch placement, Sc2tog 6(7, 7) times. Slst in the first sc2tog (size B ONLY), or Slst in the last st (sizes A and C ONLY).
Fasten off leaving a tail that’s about 6” long, and use this tail to seam the opening closed.
Finishing
You should still have one tail from where you added each finger. Use this tail to seam the small hole between each of the fingers.
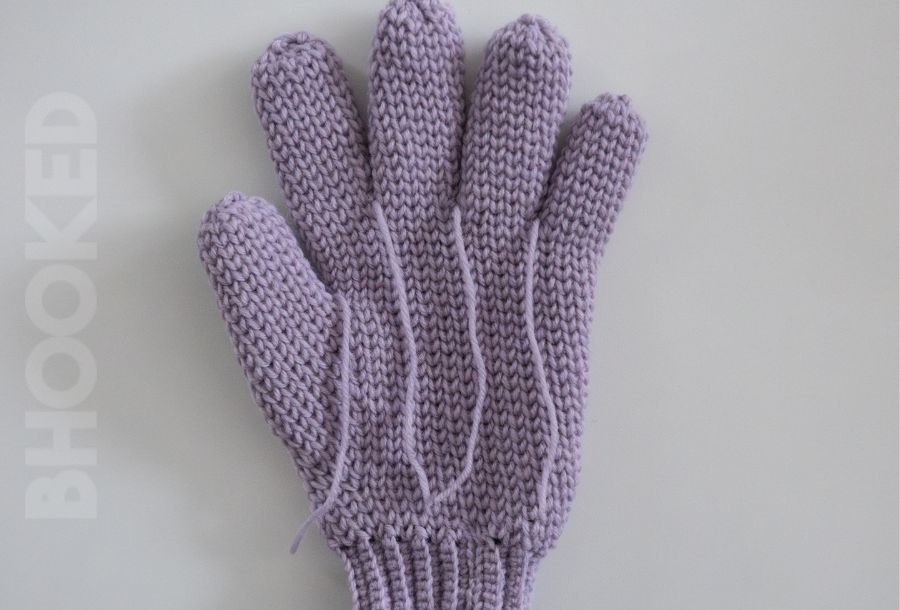
Your gloves should look pretty great right off the hook, and no blocking is required. But if you want to take it a step further, you can wet or steam block them.
TERMS OF USE:
This pattern is for personal use only. You agree not to modify, publish, transmit, sell, create derivative works or in any way exploit any of the content within this page, in whole or in part. If you wish to share this pattern, share a link to this webpage only. You may sell finished items made from this pattern.
Copyright, B.Hooked Crochet, LLC
How to Crochet Gloves: Step-by-Step Tutorial
Video not displaying? Watch this tutorial on YouTube instead.


