Learn how to make the truly unique crochet crocodile stitch pattern the easy (and neatest) way with this step-by-step tutorial. I’ll share the stitch pattern, give you tips for using this stitch in patterns, and share my tips for crocheting it the neatest way so the scales lay perfectly!
UPDATED: MARCH 18, 2025 BY BRITTANY
This post may contain affiliate links. See our Disclosure Policy for more information.

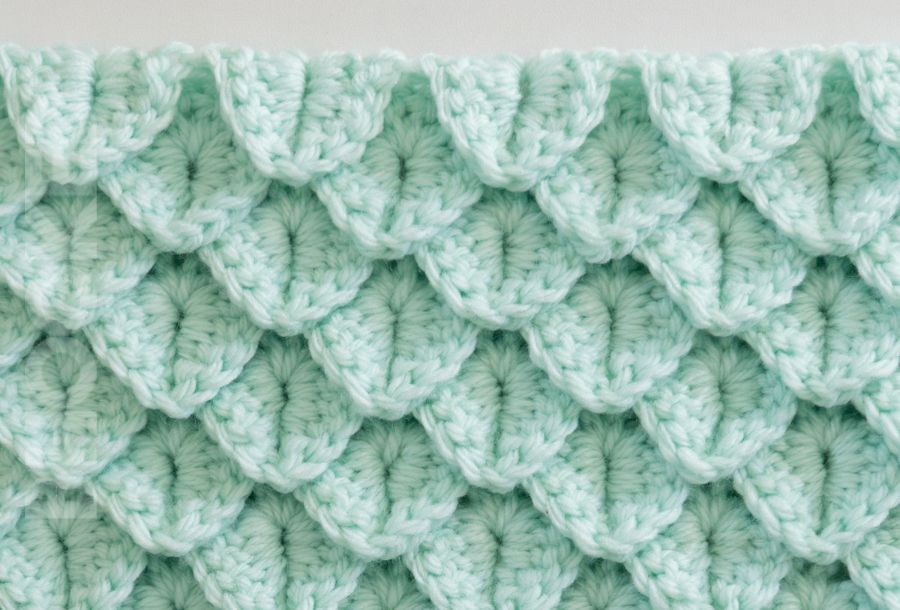
The Crochet Crocodile Stitch is a great starting point for learning unique, textured stitches. It creates a dense fabric with eye-catching, three-dimensional scales—there’s no mistaking it if you’ve ever seen it!
This one-of-a-kind stitch adds amazing texture to any project, making it perfect for blankets, pillows, capes, and hoods. You can even get creative with feather or scale-themed designs. However you use it, the crocodile stitch is sure to be one of the most interesting stitch patterns you’ll ever try!
In the rest of this tutorial, we’ll explore all aspects of the crochet crocodile stitch: what it is, how to crochet it, and what projects it’s best suited for. Plus I’ll answer some frequently asked questions so you don’t have to go searching for the answers you need.
Here’s a quick overview of the topics we’ll cover in this article:
- What is the Crochet Crocodile Stitch?
- Crochet Crocodile Stitch Tutorial
- Pattern Notes
- Stitch Multiple
- Crochet Crocodile Stitch Abbreviations
- Crocodile Stitch Pattern Instructions
- More Interesting Crochet Stitch Tutorials
What is the Crochet Crocodile Stitch?
The crochet crocodile stitch is a textured stitch pattern that creates layered, scale-like shapes, giving projects a three-dimensional look. It’s worked by crocheting a series of stitches around the post of previous stitches, forming overlapping scales. This stitch is commonly used for dragon-scale or feathered designs and works well in blankets, accessories, and decorative pieces. While it may look intricate, once you get the hang of the stitch placement, it’s a fun and rewarding technique to master!
Crochet Crocodile Stitch Tutorial
Are you ready to learn how to crochet one of the most interesting stitches you’ll ever find?

Supplies
Pair the crochet crocodile stitch with a lightweight or medium yarn for best results. Choose a smooth yarn for stitch definition that’ll show off the pattern or pair it with a slightly textured yarn for an even more interesting look.
- Yarn: For practice, use a medium-weight yarn. You’ll only need a small amount to make a practice swatch
- 5 mm Crochet Hook
Pattern Notes
- There is no right or wrong side: the crochet ripple stitch is considered a reversible stitch, which means it looks the same on both sides.
- This crochet pattern is written in US terms.
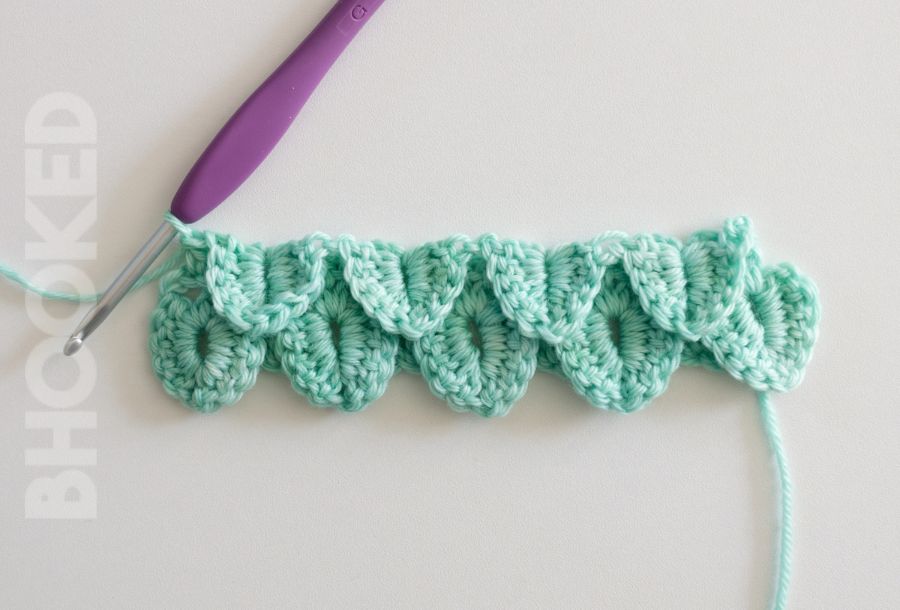
In the pattern instructions below, the chain 3 at the beginning of the row counts as a double crochet stitch. There are two ways to crochet the crocodile stitch, and the method I’m sharing below is what I have found to look the neatest, and require the least amount of blocking.
Take a look at these pictures, and decide which looks the neatest:

Both of these crocodile stitch swatches were crocheted with the same yarn, the same hook, by the same person, and neither was blocked. However, the scales on the light green swatch lay much flatter than those on the yellow one.
The reason for this difference is in how the stitches are worked. In the light green swatch, the back side of the double crochet stitches faces outward on the right side of the work, which is slightly different from what most tutorials recommend.
This method helps control the natural curl of double crochet stitches. Since double crochet tends to curl outward on the front side, the scales can have a slightly lifted look. By positioning the stitches so the back side faces outward, the natural curl works in your favor rather than against you. The scales curl slightly under, allowing them to lay flatter and eliminating the need for blocking.
In the tutorial below, I’ll show you exactly how to use this technique to get the same results!
Stitch Multiple
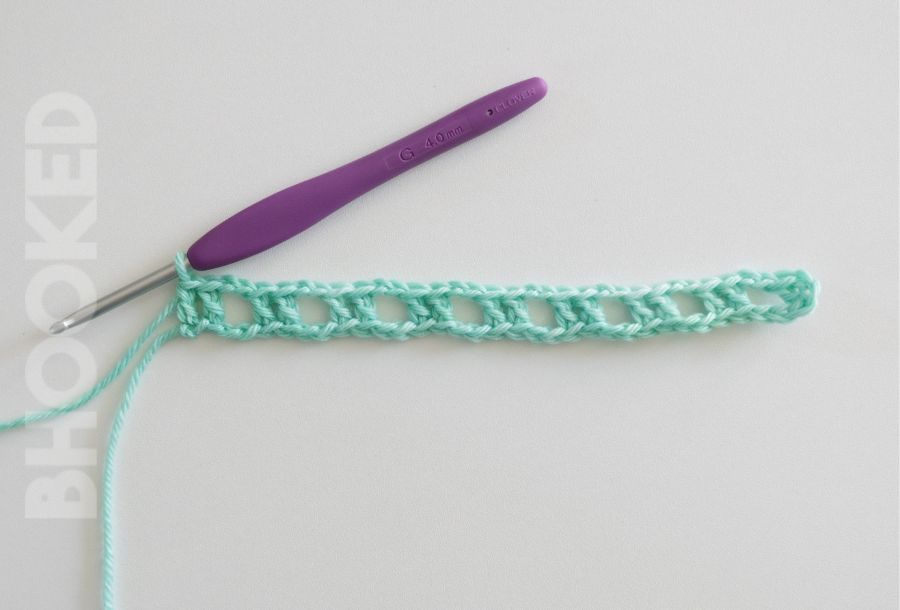
The crochet crocodile stitch multiple is 8 + 3.
This means that you should chain in groups of 8 and add three chains only at the very end when planning your projects. Keep in mind that the scales will pull the chain inward so your swatch won’t be as wide than your initial chain.
This just means you need to do a little extra work to plan the length of your starting chain for ripple stitch projects. When you’re ready for that, or when you want to improvise your own blanket pattern, we have an article that will help you figure out how many starting chains you need for your ripple and chevron stitch projects.
Stitch Abbreviations
This pattern is written using standard US crochet terminology.
- Ch Chain
- Dc Double Crochet
- Hk Hook
- Rem Remaining
- Rep Repeat
- Sk Skip
- Sp Space
- St(s) Stitch(es)
- Slst Slip Stitch
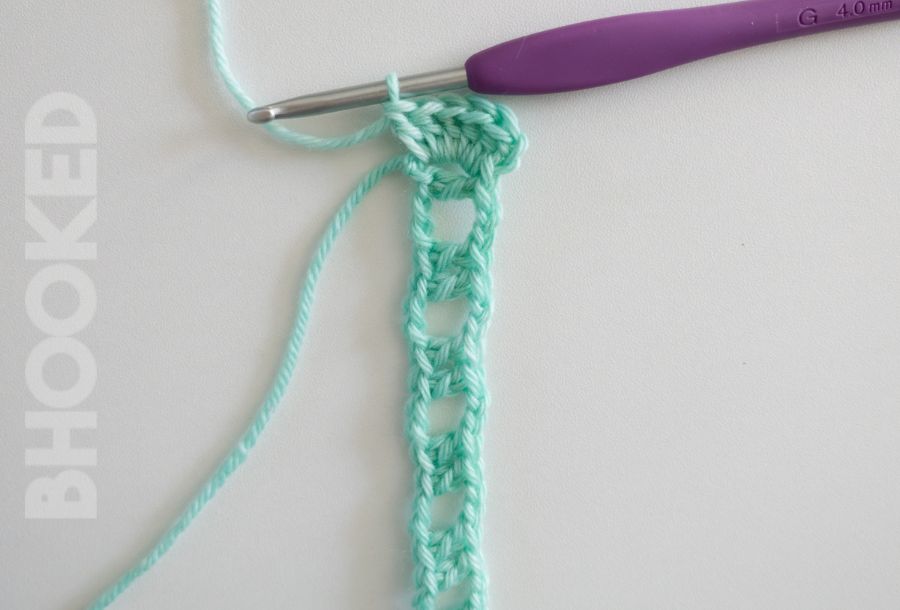
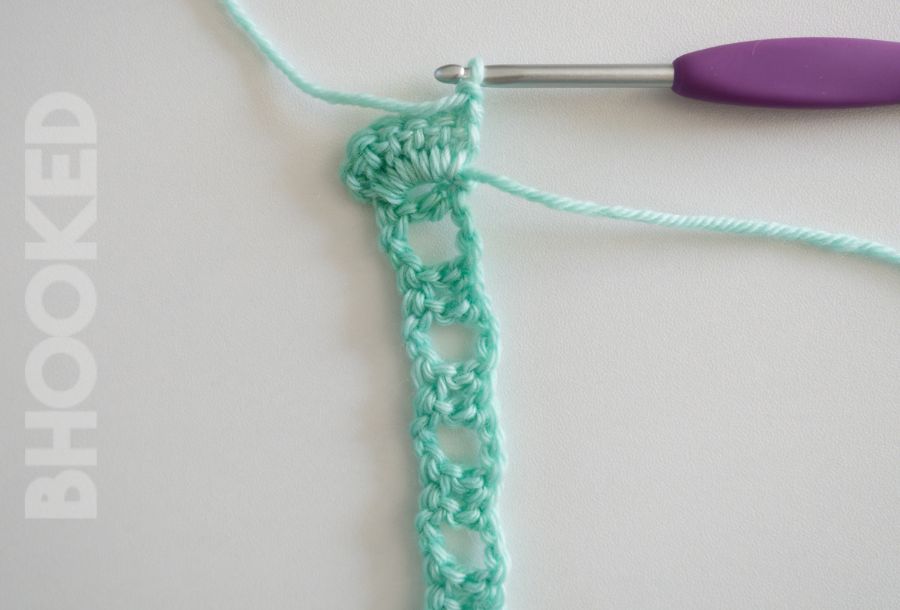
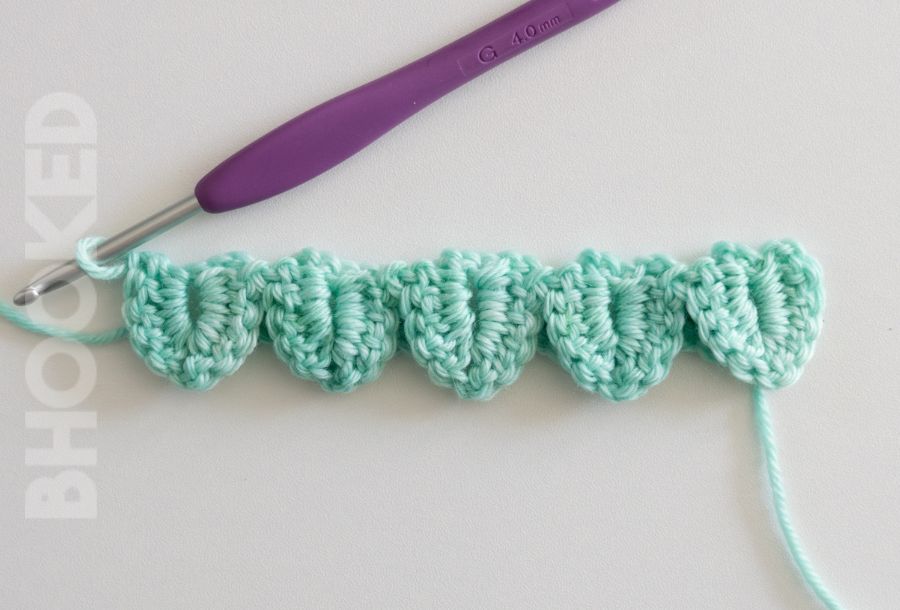
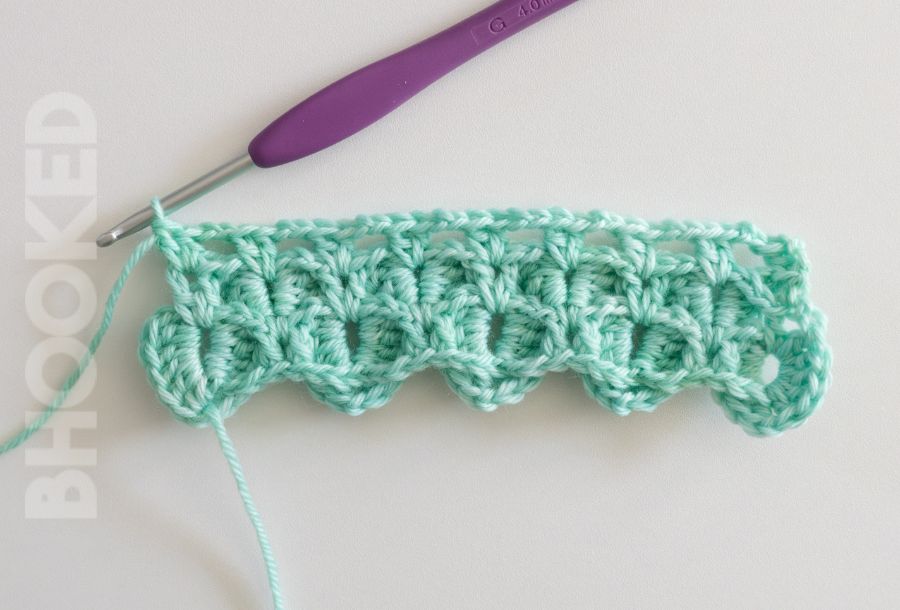
Row 1: Ch any number of sts divisible by 8 and add 3 at the end. Make 1 dc in the 3rd ch from the hk. Then *ch 2, sk 2 chs, and make 1 dc in the next 2 ch. Rep from * to end of row.
As you move trough the instructions below, use the tail end of the yarn in the pictures to reference to help you make better sense of how the worked is turned throughout the stitching process.
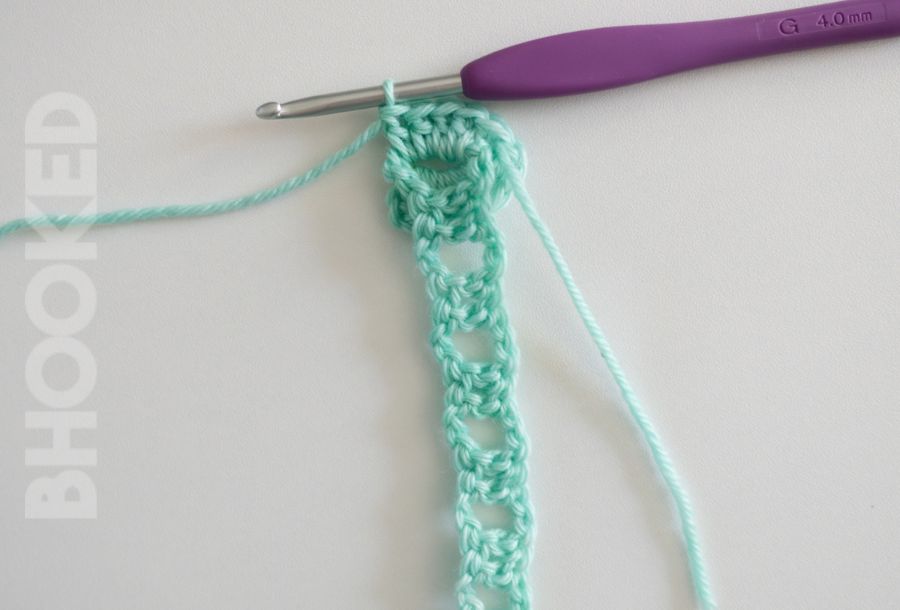
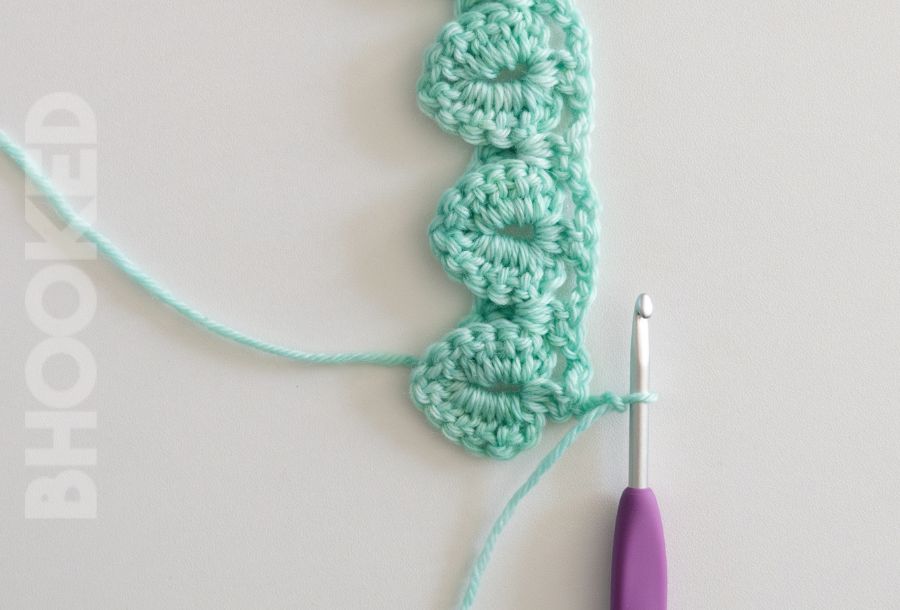
Row 2: Ch 2 and rotate the work 90 degrees clockwise (counter clockwise if you’re left-handed). Then make 5 dc down first dc post.
Ch 1 and turn the work so you’re looking at the back side of the double crochet stitches.
Then make 5 dc along the next dc post (you may need to fold the first 5 dc down to make it easier to work).
*Ch 1 and sk the next 2 dc. Then make 5 dc down first dc of dc post. Ch 1 and rotate just as before.
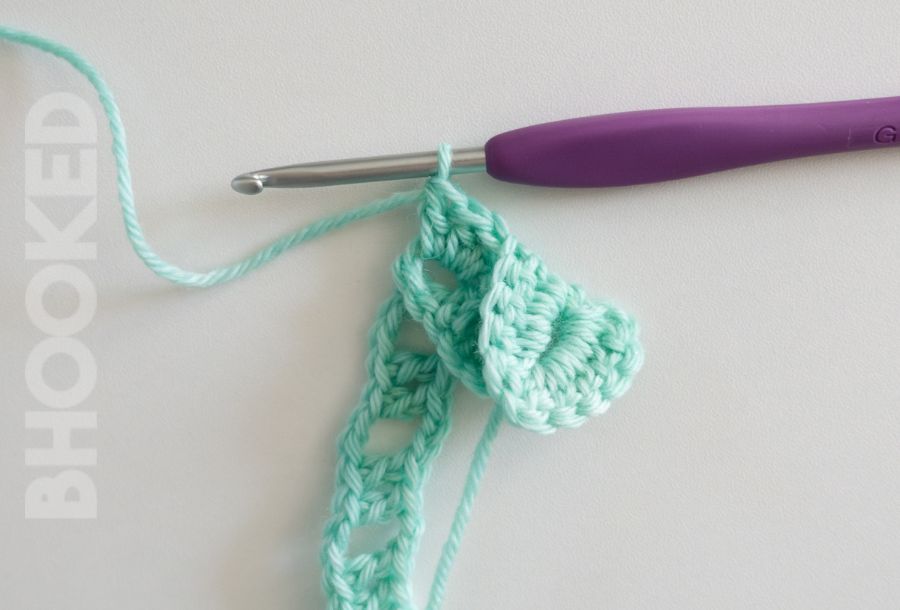
Then make 5 dc up the next dc post.
Rep from * to end of row. Ch 2 and turn.
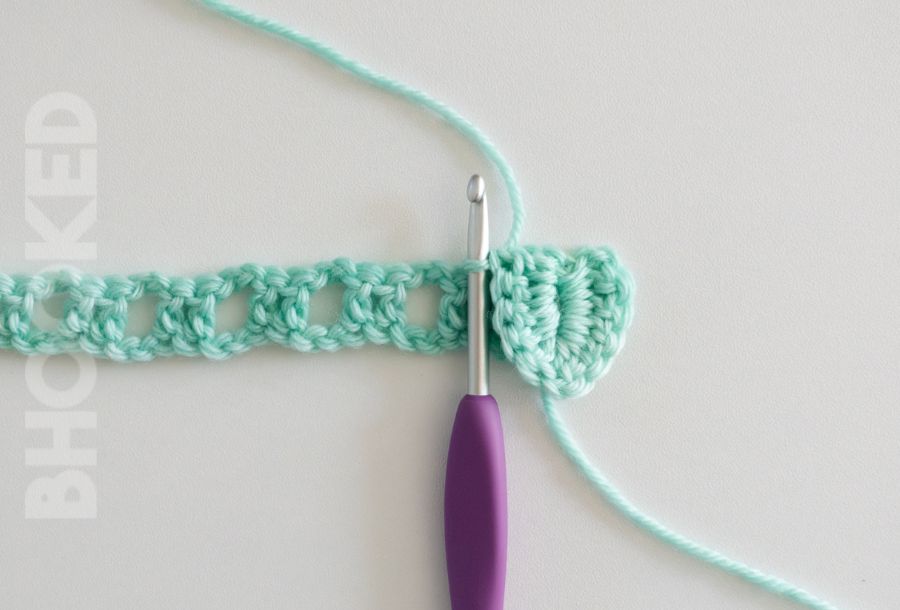
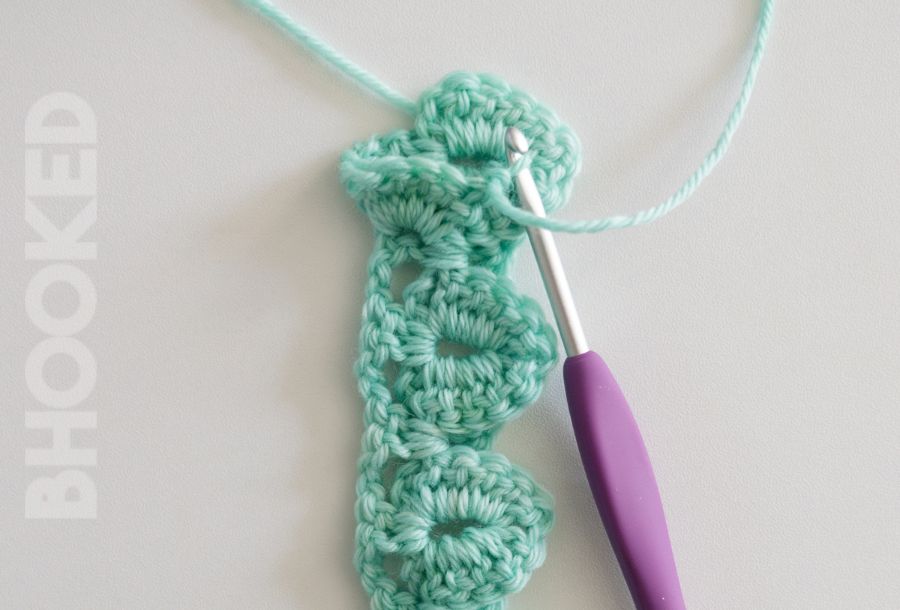
Row 3: Make 1 dc in the center of the next scale. *Ch 2. Working over the ch 1 between the next 2 scales, make 2 dc in the middle of the next dc group. Ch 2, and make 2 dc in the middle of the next scale. Rep from * to end of row. Ch 2 and turn.

Row 4: Rotate the work 90 degrees clockwise (counter clockwise if left-handed).
Sk the first group of 2 dc (that are right under your hook). Then make 5 dc down the next dc post. Ch 1 and rotate the work 180 degrees counter clockwise (clockwise if left-handed).
Then make 5 dc up the next dc post to finish this scale.
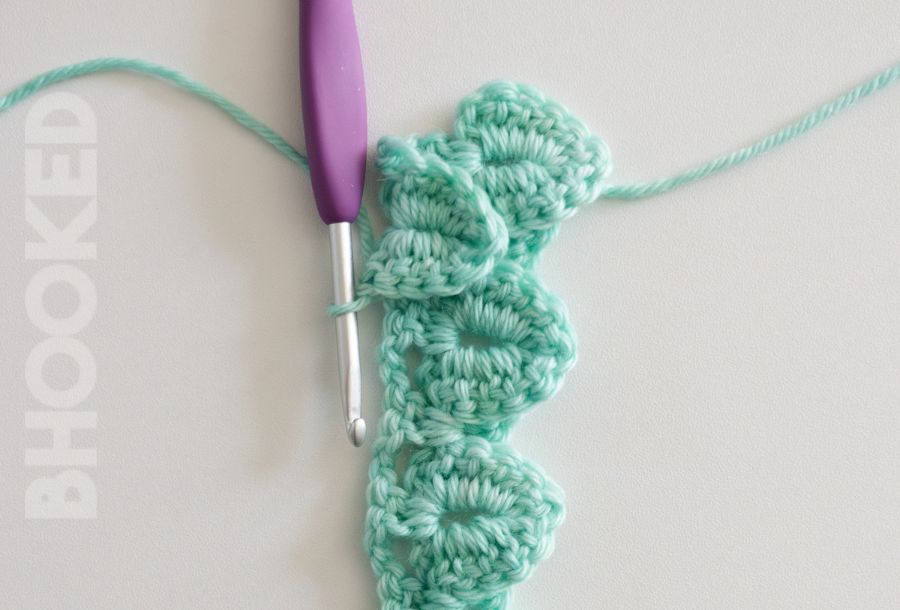
*Ch 1, and rotate the work 180 degrees clockwise (counter clockwise if left-handed). Sk the next 2 dc. Then make 5 dc down the next dc post. Ch 1 and rotate just like before. Make 5 dc up the next dc post. Rep from * to end of row. Ch 1 and dc in the 2nd ch. Ch 2 and turn.
Row 5: Make 1 dc in the same st as the ch 2. *Ch 2, and make 2 dc in the middle of the next scale. Ch 2, and working over the ch 1 between the next 2 scales, make 2 dc in the middle of the next dc group. Rep from * to end of row. Ch 2 and turn.
Repeat: Rep rows 2-5 until your project measures the length you want, ending on a 2nd or 4th row.