This post may contain affiliate links. See our Disclosure Policy for more information.
This challenge has concluded. Thank you to everyone who participated! Together as a community, we sent 201 blankets to Warm Up America as a result of this challenge!
We’ll see you next year!
We’re passionate about using our crochet skills to help others through our annual Crochet Challenge for Warm Up America.
Every year, hundreds of people just like you come together to make a specific handmade gift (the challenge project) for someone in need.
The 2024 Crochet Challenge for Warm Up America starts on February 16, 2024, with the pattern and tutorial coming out at 11:00 am EDT. You have until March 20, 2024, to send your finished challenge project to Warm Up America. That’s how you complete the challenge!
Make sure to read all the details on this page before that date.
This page is like your main hub for the challenge because it has everything you need to know to join and finish the challenge. I’ve tried to make it simple, but there’s a bunch of info I want to share with you!
This page is organized like this:
- What is the Crochet Challenge for Warm Up America?
- How Warm Up America Will Use Your Donation This Year
- Challenge Dates
- The 2024 Challenge Project
- Skills Needed to Complete the Challenge
- Sending Your Finished Projects to Warm Up America
- Challenge Donation Form
- Challenge Facebook Event Page
- Yarn Information
- Color Requirements
- Color Planner
- Where to Buy the Yarn
- Yarn Substitution
- Yardage Requirement
- Hook & Notions Required
- Pattern Notes
- Abbreviations
- Spiral Motif Pattern
- Filler Square Pattern
- Half Square Pattern
- Chevron Panels Instructions
- Adding Filler Squares to Panels
- Adding the Border
- Step-by-Step Tutorial
- Tutorial Time Stamps
- Challenge FAQ’s
What is the Crochet Challenge for Warm Up America?
The Crochet Challenge for Warm Up America is the annual crochet-along at B.Hooked. Each year, we have a new crochet project and a new organization to receive the items made by challenge participants.
Of course, it wouldn’t be a “crochet challenge” without a bit of excitement, right? Participants have a set amount of time to complete and send in their challenge project.
When the challenge kicks off, participants get a free pattern and tutorial to guide them. Their task is to finish the project and mail it to Warm Up America before the challenge deadline.
This deadline adds a cool challenge to our crochet-along, and it also makes sure that Warm Up America can deliver all the challenge projects to the chosen organization at the same time.
If you think this sounds like fun and you want to join in this year, keep reading for all the details about this year’s challenge!
For more information about Warm Up America, check out their website here.
How Warm Up America Will Use Your Donation This Year
The blankets this year are going to children’s foster care organizations.
A portion of the blankets made and sent in from this challenge will be donated to the My Stuff Bags Foundation. This wonderful organization provides bright blue duffels filled with toys, books, clothing, school supplies, and a handmade blanket to children who had to leave everything behind when rescued from abuse, neglect, homelessness, and enter foster care.
Additionally, some of the blankets will be given to Children’s Hospitals across the U.S.
Let’s share one common goal – to provide a handmade gift for as many of these kids as possible. Your handmade gift will signify hope, love, and gratitude in their eyes.
Challenge Dates
We split the challenge into two main parts: the pre-challenge phase and the challenge phase. Let’s talk about what you can look forward to in each one.
February 9th-15th
At this time, people thinking about joining the challenge check out what they need to do, get the yarn they need for their donation, and begin chatting in the Facebook page.
February 16th – March 20th
On February 16th at 11:00 am EDT, you’ll get the free pattern and tutorial right here on this page and the B.Hooked YouTube Channel. Your job during this time is to finish the challenge project and send it to Warm Up America (use the address below) by March 20th, 2024.
Once the challenge is done, Warm Up America will let us know how many challenge projects they received. Keep up by following them on Facebook and staying connected on the challenge Facebook Event page so you don’t miss these updates!
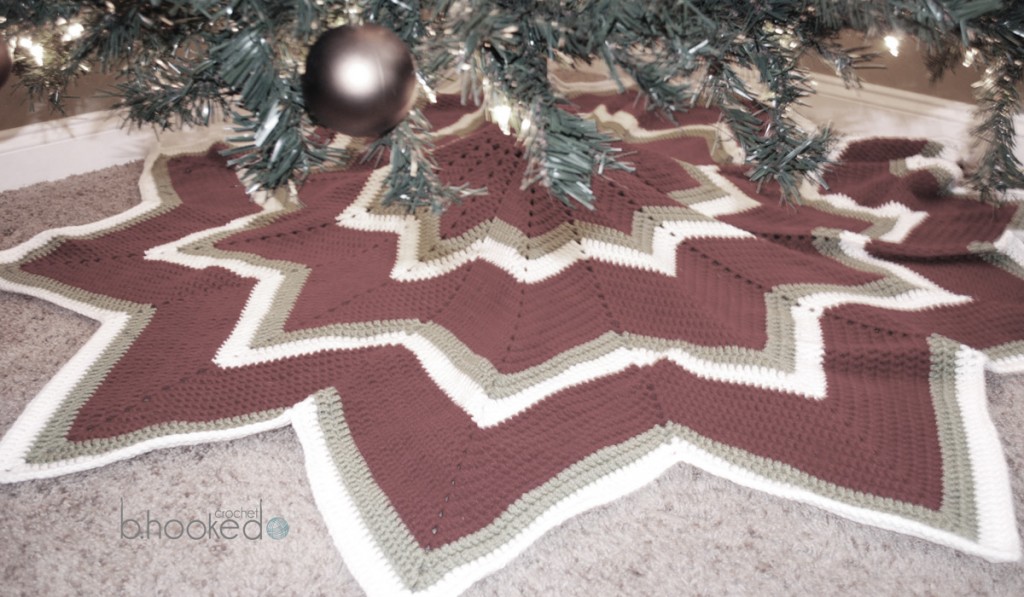
The 2024 Challenge Project

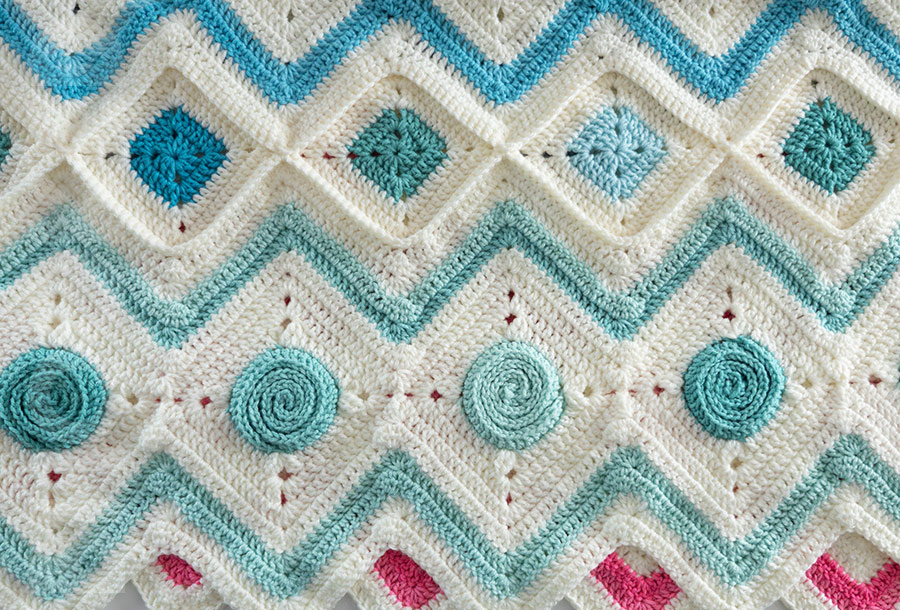
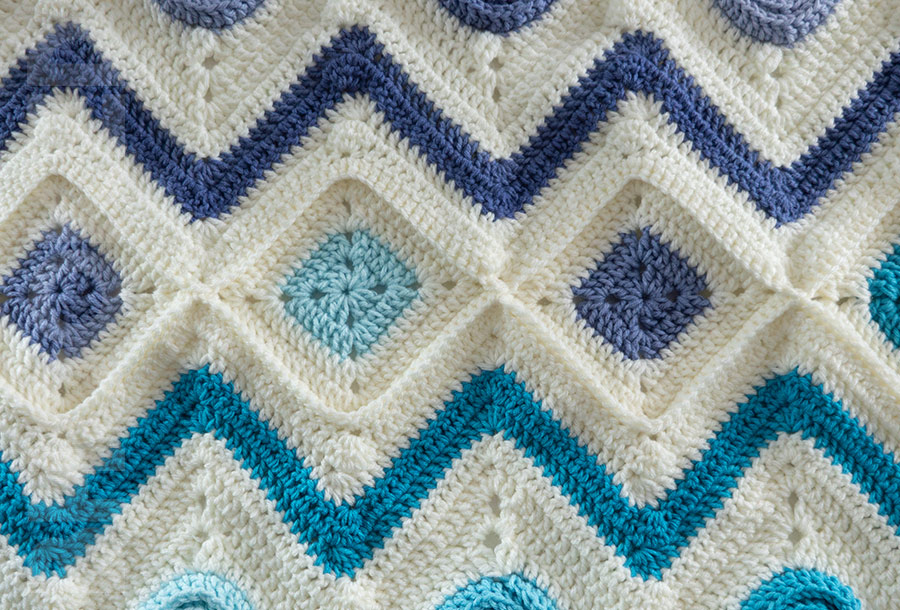
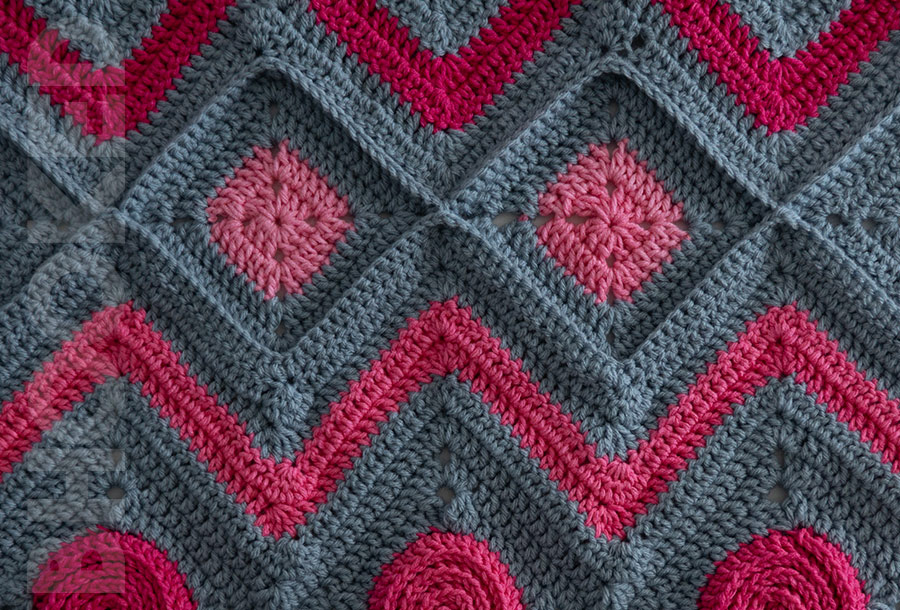
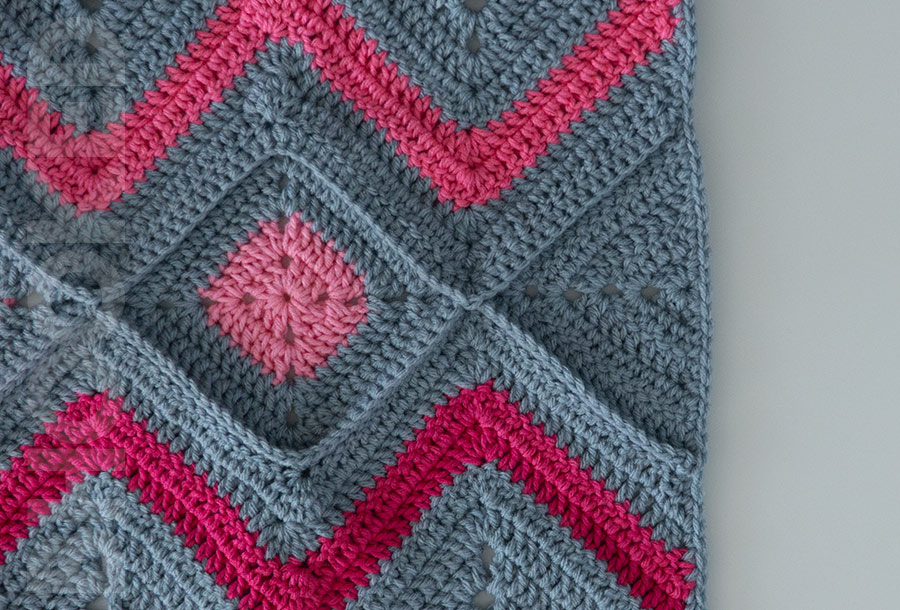
This year, challenge participants will create this lovely blanket over the challenge weeks and need to send it to Warm Up America by the deadline.
Putting this blanket together is quite fascinating! It involves making squares and chevron rows that form four panels, which are later joined to finish it.
I think projects like this are great for challenges because they mix various techniques, making it fun and interesting from start to finish.
Skills Needed to Complete the Challenge
Don’t be intimidated by the look of this pattern. It’s actually easier than it looks! All you need are some basic crochet skills, and a little determination to complete this challenge.
Just knowing how to hold the hook and yarn, and keeping a steady tension will take you a long way.
The project involves single crochets, half double crochets, double crochets, and a few specialty decreasing stitches. While it’s helpful to be familiar with these stitches, it’s not a must. The tutorial will guide you through each step.
I’ll tell you more about this beautiful blanket, including the yarn and supplies you’ll need for the challenge start date, after clearing up some important details below.
Sending Your Finished Projects to Warm Up America
To complete the challenge, you must ship your completed challenge blanket to Warm Up America at the address below, postmarked on or before March 20th 2023.
Warm Up America/BHooked
3740 N. Josey Lane
Suite 126
Carrollton, TX 75007
**Please do not send your donations to the address you see at the bottom of the B.Hooked newsletter. Your donations must go to Warm Up America to complete the challenge, not to the B.Hooked Studio. We will not be able to forward your package to Warm Up America if you ship it to us in error. Please, please only use the Warm Up America shipping address you see here.
Instructions for Packaging Your Challenge Blanket
Include a fully filled-out WUA! donation form (find it just below) in the shipping box with your completed challenge blanket. Make sure to write “Brittany B.Hooked” in the campaign section.
Fill out this form so Warm Up America can know who made and sent in a donation, and they’ll use this info for the final count of blankets received.
You can wash your blanket before sending it in, but it’s not necessary. If you decide to wash it before shipping, use a fragrance-free detergent (to avoid potential allergies), and wait until it’s completely dry before packaging it up.
Multiple Donations
To finish the challenge, you just have to send in one blanket, but if you can make more, Warm Up America would love to receive them! Also, if you want to include any extra hats or scarves with your challenge blanket, they are always welcome and very much appreciated!
Challenge Donation Form
Each box you send to Warm Up America needs to have one fully filled-out WUA! donation form. You can either print and complete the form or handwrite the information on a piece of paper. Make sure to write “Brittany B.Hooked” in the campaign section of the form. This helps the WUA team count the total number of blankets received from this challenge.
Challenge Facebook Page
You don’t have to, but we suggest you join the Facebook event to share photos of your progress, ask questions, and connect with others in the challenge. The page will be open during the whole challenge.
Remember, it’s not necessary to be part of the Facebook group to finish the challenge, but it’s definitely a fun way to be involved!
Yarn Information
The pattern was created and tested using Red Heart With Love and Super Saver Ombre yarn. For the most dependable results, it’s recommended to use this yarn if you can.

Why These Yarns?
This yarn was chosen for a few reasons. It’s easy to find because it’s available in many places, so participants can get it no matter where they are. It’s also a great value when you think about the cost per yard, making it more doable to create a big project. The colors are really nice, and it’s simple to work with too.
Color Requirements
For the blanket I made to Warm Up America, I used four contrast colors (Spearmint, Baja Blue, Jazzy, and Scuba), along with a light main color (Eggshell) which really makes it pup!
You can use the same colors, but you don’t have to unless that’s the blanket you want to create!
I just want this to be a fun and creative opportunity for you, so feel free to add your own style and creativity with the colors you pick.
There are no color requirements – use one color, two colors, ten colors….follow the same color pattern as mine, or come up with something completely different…. whatever you want to do!
Our only requirement is that you follow the rest of the pattern so every blanket is the same size, and uses the same pattern.
Color Planner
If you’d like to organize your colors and how they go together in advance, you can use this color planning sheet! The shaded parts show where I suggest using a contrast color. The areas with no color are where you should use your main color.
Where to Buy Red Heart With Love & Super Saver Ombre
I ended up ordering all of my yarn directly from Amazon which meant shipping was incredibly fast. Other online retailers can take a week or more for shipping so it’s important that if you plan to order yarn online, you get your order in as quickly as possible.
If you want to order from Amazon, here are the links.
- Order Red Heart With Love on Amazon (affiliate link)
- Order Super Saver Ombre on Amazon (affiliate link)
Order from Red Heart
You can also order directly from Red Heart, and they gave me a coupon code to share with you!
Use the code RedHeart15 for 15% off your entire order of regularly priced Red Heart collection (doesn’t include new launches such as Granny Square or Amigurumi).
There’s no minimum purchase requirement, and this coupon code will work until March 1st. It can only be used once per customer, and can’t be combined with other discounts.
Buying In Stores
With Love and Super Saver Ombre are often available in craft stores like Joann and Michaels, so you might have some good luck finding them there too!
Yarn Substitution
As much as we think With Love and Super Saver Ombre are a great fit, I understand that a project this big might mean you want to use up the yarn you already have. That’s totally fine! Even if you don’t have these specific yarns, feel free to substitute with a different one.
For the best results, choose a worsted weight (#4) yarn that’s similar to With Love and Super Saver Ombre. Pound of Love, One Pound, Super Value…are a few good substitute options that come to mind. Warm Up America also asks that the yarn be 100% acrylic (to avoid any potential allergies) and washable (so the recipients can easily care for their gift).
Although it’s perfectly acceptable to use a different medium-weight yarn to complete your challenge blanket, keep in mind that substituting yarn might mean you use a bit more or a bit less. Consider that when checking the yardage requirements below. If you substitute, you might need a little more or a little less yarn.
Yardage Required
This blanket requires 1,670 yards of main color yarn and 960 yards of contrast color yarn. So, you’ll require 5 skeins of Red Heart With Love and at least two skeins of Red Heart Super Saver Ombre.
It’s a pretty precise amount of yarn, but keep in mind that it might be a little more or less if you use a different yarn. Variations in yarn weight and thickness, and even subtle differences in tension can cause you to need more or less yarn.
If you want to replicate my color pattern you will need the following:
- Color A (main color) = Red Heart With Love Eggshell = 1,670 yds (5 skeins)
- Color B = Super Saver Ombre Spearmint = 240 yds (1 skein)
- Color C = Super Saver Ombre Baja Blue = 240 yds (1 skein)
- Color D = Super Saver Ombre Jazzy = 240 yds (1 skein)
- Color E = Super Saver Ombre Scuba = 240 yds (1 skein)
Please note that yardage requirements are dependent on you matching the pattern gauge. Yarn substitutions may also result in using more or less yarn.
Hook & Notions
- 4.5 mm Crochet Hook (or size needed to obtain gauge)
- A Few Stich Markers
- Yarn Needle
- Scissors
#wuachallenge
to share your blanket and it’s progress on social!
Pattern Notes
This blanket is worked in several square motifs that are joined to form four panels. These panels are then joined using granny squares to complete the blanket.
It’s important to check your gauge so your blanket doesn’t end up too big or too small. Adjust the hook size if you need, to obtain gauge.
Finished Size: 45″ wide by 59″ long
Gauge:
Spiral: First 4 rounds diameter measures = 3.25”
Chevron: 12 stitches and 6.5 rows = 3” worked in chevron stitch pattern.

Abbreviations
This pattern is written using standard US crochet terminology.
- BLO Back Loop Only
- Ch Chain
- CL Cluster
- Cont Continue
- Dc Double Crochet
- Dc2tog Double Crochet Two Together**
- Dc3tog Double Crochet Three Together**
- Hdc Half Double Crochet
- Hk Hook
- Rem Remaining
- Rep Repeat
- Sc Single Crochet
- Sk Skip
- Slst Slip Stitch
- Sp Space
- St(s) Stitch(es)
- Tc Treble Crochet
- YO Yarn Over
**Double Crochet Two Together (Dc2tog): YO and insert hook in the first designated stitch. YO and pull up a loop. YO and pull through two loops. YO and insert hook in next designated stitch. YO and pull up a loop. YO and pull through two loops. YO and pull through rem 3 loops on hook.
**Double Crochet Three Together (Dc3tog): YO and insert hook in the first designated stitch. YO and pull up a loop. YO and pull through two loops. [YO and insert hook in next designated stitch. YO and pull up a loop. YO and pull through two loops] twice. YO and pull through rem 4 loops on hook.
**Double Crochet Five Together (Dc5tog): YO and insert hook in the first designated stitch. YO and pull up a loop. YO and pull through two loops. [YO and insert hook into the next designated stitch. YO and pull up a loop. YO and pull through two loops] four times. YO and pull through rem 6 loops on hook.
**Treble Crochet Cluster (Tc CL): YO twice and insert the hook in the first designated stitch. YO and pull up a loop. [YO and pull through two loops] twice. YO twice and insert the hook in the same stitch. YO and pull up a loop. [YO and pull through two loops] twice. YO and pull through rem 3 loops on hook.
Written Instructions
Spiral Motif (Make 28)
Round 1: Using any contrast color, make a magic ring with 8 hdc. Don’t join. Cont working in a spiral. (If you prefer not to use the magic ring, start by making 2 chains and create 8 hdc in the first chain).
Round 2: 2 Hdc in the BLO of the next st. 2 hdc in the BLO of rem 7 sts. (16 sts)
Round 3: 2 Hdc in the BLO of the first st. *Hdc in the BLO of the next st. 2 hdc in the BLO of the next st. Rep from * to the last st. Hdc in the BLO of the last st. (24 sts)
Round 4: 2 Hdc in the BLO of the first st. *Hdc in the BLO of the next 2 sts. 2 hdc in the BLO of the next st. Rep from * to last 2 sts. Hdc in the BLO of the last 2 sts. (32 sts)
Double-check to make sure you have 32 stitches.
Don’t fasten off. Ch 1 (doesn’t count as stitch). Rotate the circle so you can crochet in the opposite
direction in the remaining loops of the spiral stitches.
Skip the first st (next to the ch 1), but mark the front loop of that stitch with a stitch marker.
Sc in the BLO of the next st. Dc in the BLO of the next 30 sts.
Cont with a dc in the remaining loop of each st, spiraling to the
center of the circle.
Fasten off with a tail that’s about 4” long.
Run the tail through the center of the circle, and weave in the ends on the backside.
Turning the Spiral into a Square
Insert the hook through the marked loop, and through the loop that’s right next to it on the previous round. Join main color with these two loops, and chain 3.
The stitches of round one are worked in the remaining loops of the outer rounds of the spiral.

Round 1: Tc in same 2 loops as join. Ch 2. Tc CL using same 2 loops. *Dc in the next 7 sts. In next st, (Tc CL, ch 2, Tc CL). Rep from * to the last 6 sts. Dc in the last 6 sts. Dc in the same loops as the starting chain 3. Join with a slst to first tc. Slst in next ch 2-sp.
Round 2: Ch 5 (counts as a dc and ch 2). 3 dc in same ch 2-sp. Dc in next Tc CL. *Dc in the next 7 dc. Dc in the next Tc CL. In next ch 2-sp (3 dc, ch 2, 3 dc). Dc in the next Tc CL. Rep from * to the last 8 sts. Dc in the next 7 dc. Dc in the last TcCL. 2 dc in the ch 2-sp of the prev round. Join with a slst in the ch 5-sp.
Make sure you have 15 dc per side of the square.

You need 28 spiral squares to make your blanket. You can make them all at once, or break them up for each panel.
At any point, you can crochet the filler squares (pattern on the next page), or if you need a break from squares, you can move on to the chevron section of the panels on page 8 once you have 7 completed spiral squares.
Filler Square (Make 18)
Round 1: With a contrast color, ch 3. Join with a slst to the first ch to form a ring. Ch 5. In the center of the ring, [3 dc. Ch 2] three times. 2 dc in the center of the ring. Join with a slst in ch-5 sp. Cont with contrast color. (12 dc)
Round 2: Ch 5. 2 dc in the ch-2 sp. [1 dc in each st to the next ch-2 sp. In the next ch-2 sp, (2 dc, ch 2, 2 dc)] three times. Dc in the last 3 sts. Dc in the ch-2 sp. Join with a slst in ch 5-sp. (28 dc)
In the last st of this round, break the contrast color and join the main color to complete the last two rounds.
Round 3: Ch 5. 2 dc in the ch-2 sp. [1 dc in each st to the next ch 2-sp. In the next ch 2-sp, (2 dc, ch 2, 2 dc)] three times. Dc in the last 7 sts. Dc in the ch 2-sp. Join with a slst in ch 5-sp. (44 dc)
Round 4: Ch 5. 2 dc in the ch 2-sp. [1 dc in each st to the next ch 2-sp. In the next ch 2-sp, (2 dc, ch 2, 2 dc)] three times. Dc in the last 11 sts. Dc in the ch 2-sp. Join with a slst in the ch 5-sp. (60 dc)
Fasten off and weave in the ends.
You will use 6 filler squares and 2 half squares to join two chevron panels. If you want to break up the time you spend crocheting squares, make 6 filler squares and 2 half squares. Then you can join two chevron
panels.
Half Square (Make 6)
Row 1: With the main color, ch 3. Join with a slst to the first ch. Ch 3 (counts as a dc). In the center of the ring, (3 dc, ch 2, 4 dc). Ch 3 and turn. (8 dc)
Row 2: Dc in the same st as the ch 3. Dc in the next 3 sts. In the ch 2-sp, (2 dc, ch 2, 2 dc). Dc in the next 3 sts. 2 dc in the third ch. Ch 3 and turn. (14 dc)
Row 3: Dc in the same st as ch 3. Dc in the next 6 sts. In the ch 2-sp, (2 dc, ch 2, 2 dc). Dc in the next 6 sts. 2 dc in the third ch. Ch 3 and turn. (20 dc)
Row 4: Dc in the same st as ch 3. Dc in the next 9 sts. In the ch 2-sp, (2 dc, ch 2, 2 dc). Dc in the next 9 sts. 2 dc in the third ch. Ch 3 and turn. (26 dc)
Row 5: Dc in the same st as ch 3. Dc in the next 12 sts. In the ch 2-sp, (2 dc, ch 2, 2 dc). Dc in the next 12 sts. 2 dc in the third ch. (32 dc)
Fasten off and weave in the ends.
Chevron Panels (Make 4)
Each chevron panel is made up of 7 spiral squares, and a chevron stitch pattern on the top and bottom, framing the squares.
Choose the seven spiral squares you want to use in the first panel. For example, in our blanket, the first panel consists of all spearmint-colored spiral squares. Then proceed with the chevron pattern.
Chevron Stitch Pattern
Row 1: With your main color, fasten on in any ch 2-sp of a spiral square. Ch 2 and dc2tog next two sts. *Dc in the next 13 sts. In the next ch 2-sp, make 5 dc. Dc in the next 13 sts. Dc5tog using the next 2 dc, the ch 2-sp of the current square and next spiral square, and the next 2 dc of the new spiral square.


Rep from *, adding new spiral squares until you have 7 joined. When you finish the dc5tog to join the 7th spiral square, cont with a dc in the next 13 sts. In the next ch 2-sp, make 5 dc. Dc in the next 13 sts. Dc3tog using the last 2 dc and the ch 2-sp. Ch 2 and turn.
Cont with the main color for the next row.
Row 2: Dc2tog next two sts. Dc in the next 13 sts. *5 dc in the next st. Dc in the next 13 sts. Dc5tog. Dc in the next 13 sts.
Rep from * to the last 17 sts. 5 dc in the next st. Dc in the next 13 sts. Dc3tog. Break the main color and join the contrast
color. Ch 2 and turn.
Repeat: Rep row 2, two more times with contrast color. Then break the contrast color and join the main color. Ch 2 and turn.
Rep row 2, two more times with the main color.
Fasten off and weave in the ends.
Rotate the panel 180 degrees so you can continue to work along the opposite edge of the chevron rows you just made.
Row 1: With your main color, fasten on in the ch 2-sp of the first spiral square.
Ch 2 and dc2tog next two sts. *Dc in the next 13 sts. In the next ch 2-sp, make 5 dc. Dc in the next 13 sts.
Dc5tog using the next 2 dc, the ch 2-sp of the current square and next spiral square, and the next 2 dc of the new spiral square.
Rep from * adding new spiral squares until you have worked through all 7 squares.
When you finish the dc5tog of the 7th spiral square, cont with a dc in the next 13 sts. In the next ch 2-sp, make 5 dc. Dc in the next 13 sts. Dc3tog using the last 2 dc and the ch 2-sp. Ch 2 and turn.
Repeat: Rep row 2, once more with the main color.
Break the main color and crochet row 2, two more times with the contrast color.
Then break the contrast color and crochet row 2, two more times with the main color.
Fasten off and weave in the ends.
Adding Filler Squares to the Chevron Panels
Step 1: Lay out all four panels, filler squares, and half squares on a flat surface in the arrangement that you want to join them. Use the color diagram for reference.
Step 2: Insert hook through both loops of the first stitch in your bottom panel (the dc3tog), and through the first dc of the half square.
Join main color yarn, and ch 1 (doesn’t count as a st). Sc in the same place. Using both loops of the panel stitches and half square, sc in every stitch until you reach the ch 2-sp of the half square. The next sc placement will be the middle stitch of your group of 5 dc, and the ch 2-sp of the half square.
Step 3: Insert your hook through the same middle stitch of the group of 5 dc, and through any ch 2-sp of a filler square. Then sc.
Using both loops of the panel stitches and filler square, sc in every stitch until you reach the dc5tog. The next sc placement is the dc5tog and the next ch 2-sp of the filler square.
Cont with a sc using both loops of each of the panel stitches and filler square stitches until you reach the ch 2-sp of the filler square. The next stitch placement will be the middle stitch of your group of 5 dc, and the ch 2-sp of the filler square.
Repeat step 3 for the remaining 6 filler squares.
Step 4: Insert your hook through the same middle stitch of the group of 5 dc, and through the ch 2-sp of a half square, and sc.
Using both loops of the panel stitches and half square, sc in every stitch until you reach the last st of the panel and half square. Sc in those stitches as well.
Fasten off and weave in the ends.
Adding the Border
The top and bottom edges in the chevron pattern are clean and don’t require a border to tidy it up. The sides, however, need a simple clean-up row.
Step 1: Lay the blanket out with the right side facing up.
Step 2: With your main color, fasten on in furthest corner of the long side of the blanket.
Step 3: Single crochet along the edge of the blanket.
You don’t have to crochet a specific number of single crochets for this side border row.
Instead, focus on spacing them in such a way that the sides don’t pull in (spacing them too far apart), or bubble up (putting them too close together).
Repeat these border steps on both long edges of the blanket.
Fasten off and weave in the ends.

Step-by-Step Tutorial
SUBSCRIBE TO B.HOOKED ON YOUTUBE
Tutorial Time Stamps
- Spiral: 2:02
- Turning Spiral into Square: 11:00
- Chevron Panels Stitch Pattern: 19:18
- Filler Square: 32:09
- Half Square: 42:16
- Adding Filler Squares: 47:45
- Border: 55:46
As straightforward as I try to keep these challenges, I understand you may have some questions. Especially if this is your first year!
Here are the answers to a few frequently asked questions. If you don’t find the answer you need here, please don’t hesitate to ask on the Challenge Event page!
Frequently Asked Questions
- When does the challenge begin? The challenge officially kicks off on February 16th at 11:00 am EDT with the release of the blanket pattern and tutorials. You will have until March 20th to complete and send your donation to Warm Up America at the address provided on this page.
- What do I do to join? You do not need to sign up to join the challenge. Simply make the blanket and send it to Warm Up America before the deadline.
- When is my blanket supposed to be finished? The challenge comes to a close on March 20th, 2024. You should finish your blanket by this day, and ship it to Warm Up America before the end of the business day in your area.
- Can I use a different yarn? The patterns were written and tested for Red Heart With Love and Super Saver Ombre yarns. I encourage you to use this yarn if possible, but if you’re comfortable making yarn substitutions, you may do so. Substitutions must be medium weight, and achieve the same gauge and size. Warm Up America asks that you select an acrylic yarn that is easy to care for.
- Can I donate my blanket to another organization? Absolutely. If you live outside the US and would like to participate, I encourage you to find your local foster care, or Children’s hospital and donate your items.
- What do I do now? Order the yarn, get your supplies, and sit tight for the pattern release on February 16th 2023. Join the Facebook Event Page, and strike up a conversation with your fellow yarn heroes!
- Who is Warm Up America? Warm Up America is a non-profit organization founded in 1992 by a courageous yarn hero named Evie. When her vision expanded beyond her capabilities, the Craft Yarn Council stepped in to continue her mission. I encourage you to read more about WUA! Foundation here.
- What if I can’t get the blanket finished before the deadline? Making a blanket is a big commitment, and life happens! I completely understand. If you’re not able to finish your challenge blanket and mail it in by the deadline, that’s perfectly okay. There are no sign-ups or commitments, and it’s not our intent for you to feel like you have to finish it if you simply can’t. You can always finish it on your own terms, and send it to Warm Up America at a later date.