Have you always wanted to make a crochet cardigan? You’re in the right place! With this simple crochet cardigan free pattern, I’ll show you how to get started and finish crocheting your simple, but elegant V-neck cardigan. You can view the entire pattern here on this page or get the ad-free, printable PDF in our shop. Plus there’s a video to walk you through it step-by-step.
UPDATED: OCTOBER 11, 2023 BY BRITTANY
This post may contain affiliate links. See our Disclosure Policy for more information.

Skill Level | Intermediate
Available Sizes | XS, S, M, LG, XL, 2XL, 3XL, 4XL, 5XL
There’s nothing quite like starting and finishing your first crochet cardigan. It’s one of the most rewarding projects you can wear and enjoy for years.
No matter if you’ve made a cardigan before or not, I’ll guide you through each step to make your very first (or tenth) crochet cardigan!
Here is a quick overview of the topics we’ll cover in this article:
- About this V-Neck Crochet Cardigan Pattern
- Buy the ad-free, printable pattern
- Supplies
- Yarn Requirements
- Pattern Notes
- Gauge and Sizing Details
- Crochet Cardigan Pattern Instructions
- Crochet Cardigan Assembly & Finishing Instructions
- How to Crochet a Cardigan Step-by-Step (Video)
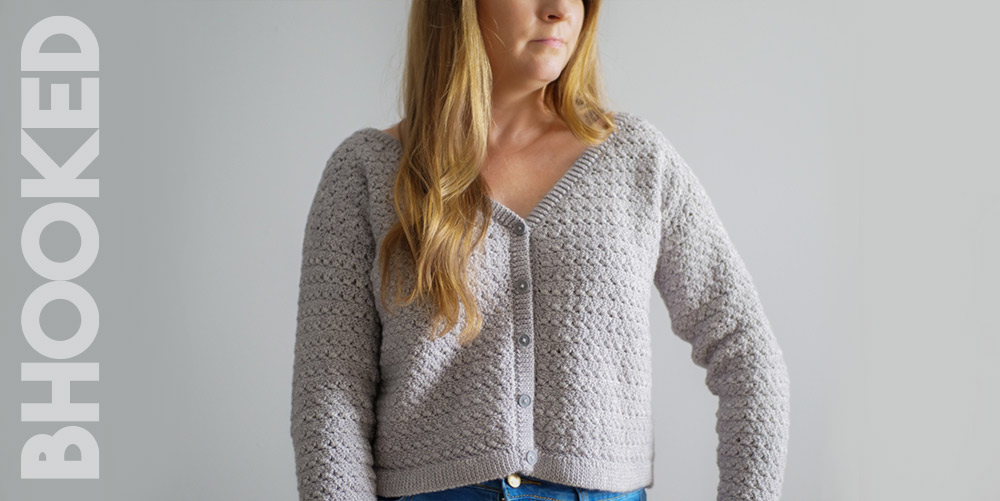
About this V-Neck Cardigan Crochet Pattern
Ease into the world of garment making with this simple yet elegant V-Neck crochet cardigan. If you’re looking for a simple crochet cardigan to ease into the world of garment making, this is a great place to start! Constructed of 5 basic panels, this cardigan is straightforward to crochet and assemble.
With this project you’ll get to practice the beautiful primrose stitch both in flat rows as well as increasing and decreasing. Each of the five panels are crochet separately, and assembled by seaming them together.

You can view the pattern completely free on this page. But, if you prefer having a digital copy that you can save or print, we’ve got you covered with that option as well.
If you’d like to support our work here at B.Hooked, purchasing the digital pattern is a wonderful way to do so!
Recommended Supplies
- Knitpal Cotton To The Core DK Yarn
- 3.5 mm Crochet Hook
- 5 1/2″ buttons
- Yarn Needle
- Stitch Markers
- Scissors
Yarn Requirements by Size
| XS | 1,230 yds (9 skeins) |
| S | 1,365 yds (10 skeins) |
| M | 1,500 yds (11 skeins) |
| L | 1,640 yds (12 skeins) |
| XL | 1,775 yds (13 skeins) |
| 2XL | 1,915 yds (14 skeins) |
| 3XL | 2,048 yds (15 skeins) |
| 4XL | 2,185 yds (16 skeins) |
| 5XL | 2,322 yds (17 skeins) |
I really enjoyed crocheting this cardigan with Knitpal Cotton to the Core DK yarn. It’s very soft, easy on the hands, and comes in a variety of pretty colors (the color I used is called dolphin grey). But if you can’t find this yarn, or want to use what you already have, that’s okay! Just make sure whatever yarn you choose is a DK weight yarn, and that it’s something that’ll be easy to launder/care for.
Abbreviations
This pattern is written using standard US crochet terminology.
- BLO Back Loop Only
- Ch Chain
- Cont Continue
- Hdc Half Double Crochet
- Hk Hook
- Rem Remaining
- Rep Repeat
- Sk Skip
- Slst Slip Stitch
- St(s) Stitch(es)

Pattern Notes
This cardigan is made up of a back panel, two front panels, and two sleeves which are sewn together in the finishing steps. Since the front panels are crocheted a little differently to get the v-neck shape, you’ll see “Front left panel” which is the left panel as you wear it, and “front-right panel” , which is the right panel as you wear it.
Before you start crocheting your cardigan, be sure to check your gauge, especially if you used a different yarn than Cotton to the Core DK. Since sizing is really important for something like a cardigan, the only way you can be certain it’ll fit when you’re done is to match the gauge below.
If you prefer to crochet and measure a small swatch, follow the instructions for the primrose stitch to make a swatch that’s about 5″ x 5″. That way you can measure a 4″ square.
But if you’ve followed my patterns before, and you don’t typically have to adjust your hook size to match gauge, you can start on the back panel and measure a 4″ section to double check.
Gauge: 8 groups of 3 dc = 4″ worked in primrose stitch.
If you need to adjust your hook size to match the gauge, it’s best if you do so that way the cardigan will turn out the size you expect.
Not sure what gauge is? Check out our comprehensive guide to learn all about it here.
Before you get started measure the widest part of your abdomen (whether its around your bust or around your belly), and use this chart to determine which size to make for the best fit. For example, if your measurement is 41″, the large is the best size for you to make.
To Fit Bust Sizes
| XS | 28-30″ |
| S | 32-34″ |
| M | 36-38″ |
| L | 40-42″ |
| XL | 44-46″ |
| 2XL | 48-50″ |
| 3XL | 52-54″ |
| 4XL | 56-58″ |
| 5XL | 60-62″ |
Once you figure out which size to make, you’ll need to follow those set of instructions in the pattern. When instructions differ from one size to the next, you’ll see a set of parenthesis with each size’s instructions. Take note of where your size is in the pattern, and only use that number while working through the pattern.
Pattern for sizes are listed as follows:
XS (SM, MD, LG, XL, 2XL, 3XL, 4XL, 5XL)
V-Neck Crochet Cardigan Written Instructions
Back Panel
Row 1: Ch 98 (104, 122, 137, 152, 161, 179, 191, 200). In 3rd ch from hook, (sc, ch 2, sc). *Sk next 2 ch, (sc, ch 2, sc) in next ch; repeat from * to last 2 ch. Sk 1 ch, hdc in last ch. Ch 3 and turn.
Measurement after Row 1: 13.5 (14.5, 17.5, 19.5, 21.5, 22.5, 25.5, 27.5, 29.5)”.
Row 2 (WS): *3 dc in next ch-2 sp (shell made); repeat from * to end of row. Dc in last st. Ch 1 and turn.
Row 3: Hdc in first st, sk next st. *(sc, ch 2, sc) in 2nd dc of next shell, sk next 2 sts; repeat from * to end of row, ending with hdc in turning ch. Ch 2 and turn.
Repeat: Repeat Rows 2 and 3 until piece measures 16 (16, 17, 18, 18, 19, 20, 21, 21)” from starting edge. Fasten off after completing a Row 3.
Left Front Panel
Row 1: Ch 44 (47, 56, 65, 71, 77, 86, 95, 101). In 3rd ch from hook, (sc, ch 2, sc). *Sk next 2 ch, (sc, ch 2, sc) in next ch; repeat from * to last 2 ch. Sk 1 ch, hdc in last ch. Ch 3 and turn.
Measurement after Row 1: 6.5 (7, 8.5, 9.5, 10.5, 11, 12.5, 13.5, 14.5)”.
Row 2 (WS): *3 dc in next ch-2 sp (shell made); repeat from * to end of row. Dc in last st. Ch 1 and turn.
Row 3: Hdc in first st, sk next st. *(sc, ch 2, sc) in 2nd dc of next shell, sk next 2 sts; repeat from * to end of row, ending with hdc in turning ch. Ch 2 and turn.
Repeat: Repeat Rows 2 and 3 until piece measures 8.5 (8.5, 9.5, 10.5, 10.5, 11.5, 12.5, 13.5, 13.5)” from starting edge, ending after completing a Row 2.
Next Row: Hdc in first st, sk next st. *(sc, ch 2, sc) in 2nd dc of next shell, sk next 2 sts; repeat from * to last 5 sts. Sk 2 sts, hdc in next st. Leave the last 2 sts unworked.
Next Row (WS): *3 dc in next ch-2 sp (shell made); repeat from * to end of row. Dc in last st. Ch 1 and turn.
Repeat: Repeat the last 2 rows until the piece measures 16 (16, 17, 18, 18, 19, 20, 21, 21)” from starting edge.
Fasten Off: Fasten on in the bottom inner corner. Evenly space 80 (80, 86, 92, 92, 98, 106, 114, 114) sc along the inner side edge of the panel. Fasten off.
A digital pattern is available in our shop so you can print out the pattern

Right Front Panel
Row 1: Ch 44 (47, 56, 65, 71, 77, 86, 95, 101). In 3rd ch from hook, (sc, ch 2, sc). *Sk next 2 ch, (sc, ch 2, sc) in next ch; repeat from * to last 2 ch. Sk 1 ch, hdc in last ch. Ch 3 and turn.
Measurement after Row 1: 6.5 (7, 8.5, 9.5, 10.5, 11, 12.5, 13.5, 14.5)”.
Row 2 (WS): *3 dc in next ch-2 sp (shell made); repeat from * to end of row. Dc in last st. Ch 1 and turn.
Row 3: Hdc in first st, sk next st. *(sc, ch 2, sc) in 2nd dc of next shell, sk next 2 sts; repeat from * to end of row, ending with hdc in turning ch. Ch 2 and turn.
Repeat: Repeat Rows 2 and 3 until piece measures 8.5 (8.5, 9.5, 10.5, 10.5, 11.5, 12.5, 13.5, 13.5)” from starting edge, ending after completing a Row 3. Ch 3 and turn.
Next Row: 3 dc in next ch-2 sp (shell made); repeat from * to last ch-2 sp. Hdc in last ch-2 sp. Leave last 2 sts unworked. Ch 1 and turn.
Next Row: Hdc in first st, sk next st. *(sc, ch 2, sc) in 2nd dc of next shell, sk next 2 sts; repeat from * to last 5 sts. Sk 2 sts, hdc in next st.
Repeat: Repeat the last 2 rows until the piece measures 16 (16, 17, 18, 18, 19, 20, 21, 21)” from starting edge. Fasten off.
Fasten Off: Fasten on in the bottom inner corner. Evenly space 80 (80, 86, 92, 92, 98, 106, 114, 114) sc along the inner side edge of the panel. Fasten off.
Bands: Bottom of Front and Back Panels
Row 1: With the right side facing up, fasten on in the first chain on the bottom edge. Ch 7 (7, 7, 7, 7, 7, 9, 9, 9). Slst in 2nd ch from hook and in each remaining ch. Slst to next foundation ch. Turn.
Row 2: Slst in BLO of each st. Ch 1 and turn.
Row 3: Slst in BLO of each st. Slst to next foundation ch. Turn.
Repeat: Repeat Rows 2 and 3 until you reach the opposite corner of the panel. Fasten off.
Neckline: Front Left Panel
Row 1: With the right side facing up, fasten on in the first neckline sc. Ch 5 (5, 5, 5, 5, 5, 7, 7, 7). Slst in 2nd ch from hook and in each remaining ch. Slst to next sc. Turn.
Row 2: Slst in BLO of each st. Ch 1 and turn.
Row 3: Slst in BLO of each st. Slst to next sc. Turn.
Repeat: Repeat Rows 2 and 3 until you reach the bottom corner of the panel, including the band stitches. Fasten off.
Marking For Buttons and Button Holes
Step 1: Lay the front left panel facing up. Place a marker at the bottom corner and another at the base of the neckline. Measure the distance between these two markers and place a third marker halfway between them.
Step 2: Place a fourth marker midway between the bottom corner and the middle marker, and a fifth marker midway between the middle marker and the neckline (5 markers total).
Step 3: Lay the front right panel facing up, next to the front left panel as they will be sewn together. Using the five stitch markers from the left panel as a guide, place a marker in the corresponding single crochet of the neckline on the right panel, adjacent to each marker.
Neckline: Front Right Panel
Row 1: With the right side facing up, fasten on in the first neckline sc. Ch 5 (5, 5, 5, 5, 5, 7, 7, 7). Slst in 2nd ch from hook and in each remaining ch. Slst to next sc. Turn.
Row 2: Slst in BLO of each st. Ch 1 and turn.
Row 3: Slst in BLO of each st. Slst to next sc. Turn.
Repeat: Repeat Rows 2 and 3 until you reach the marked stitch.
Buttonhole Row: On the row with the marked stitch, slst in BLO of the first st, Ch 2, skip the next 2 sts, then slst in BLO of the last st.
- If the marker falls on a slst row: Join with a slst to the marked stitch and continue the pattern repeat.
- If the marker falls on a buttonhole row: Ch 1 and turn.
Next Row: Slst in BLO of each chain for the buttonhole.
Continue: Repeat the pattern, adding buttonholes at each marked stitch.
Sleeves (Make Two)
Row 1: Ch 38 (41, 41, 44, 50, 50, 53, 53, 56). In 3rd ch from hook, (sc, ch 2, sc). *Skip next 2 ch, (sc, ch 2, sc) in the next ch. Repeat from * to last 2 ch. Skip 1 ch, hdc in the last ch. Ch 2 and turn.
Row 2 (WS): *3 dc in next ch-2 sp (shell made). Repeat from * to end of row. Dc in the last st. Ch 1 and turn.
Row 3: Hdc in the first st. Skip next st, *(sc, ch 2, sc) in 2nd dc of next shell. Skip next 2 sts. Repeat from * to end of row, ending with hdc in turning ch. Ch 2 and turn.
Row 4: Repeat Row 2.
Row 5: (Sc, ch 2, sc) in the first st. Skip next st. *(Sc, ch 2, sc) in the 2nd dc of next shell. Skip next 2 sts. Repeat from * to last st. (Sc, ch 2, sc) in the turning ch. Ch 2 and turn.
Row 6: *3 dc in next ch-2 sp (shell made). Repeat from * to end of row. Ch 1 and turn.
Row 7: Hdc in the first st. (Sc, ch 2, sc) in next st. *Skip next 2 sts. (Sc, ch 2, sc) in next st. Repeat from * to end of row, ending with hdc in turning ch. Ch 2 and turn.
Row 8: Repeat Row 2.
Row 9: Repeat Row 3.
Row 10: Repeat Row 2.
Repeat: Repeat Rows 5-10 a total of 4 (5, 5, 6, 6, 7, 7, 8, 8) more times.
Wrap the widest part of the sleeve around the upper part of your arm (just below your armpit). If it wraps around with about an inch to spare, continue to the next step. If not, repeat the increase steps once more and test the fit again. Repeat this as many times as needed for a comfortable-fitting sleeve.
Continue: Repeat Rows 3 and 2 until the sleeve measures approximately 15.5 (16, 16, 16.5, 16.5, 17, 17, 17.5, 17.5)” from the starting edge. Fasten off, ending after a 2nd row.
Wrist Bands
Row 1: With the right side facing up, fasten on in the first chain on the bottom edge. Ch 7 (7, 7, 7, 7, 7, 9, 9, 9). Slst in 2nd ch from hook and in each remaining ch. Slst to the next foundation ch. Turn.
Row 2: Slst in BLO of each st. Ch 1 and turn.
Row 3: Slst in BLO of each st. Slst to the next foundation ch. Turn.
Repeat: Repeat the last two rows to the opposite corner of the panel. Fasten off.
Assembly & Finishing
Step 1: Start with the front and back panels with the right side facing in, and seam the shoulders.
Step 2: Open the shoulder seams of the cardigan so it lies flat, with the wrong side facing up. Mark the middle of the sleeves by folding them in half. Align the marker with the shoulder seam, also with the wrong side facing up. Seam the arms to the front and back panels.
Step 3: Fold the cardigan at the shoulder seam with the right side facing in. Seam the sides and sleeves on both sides.
Step 4: Weave in ends.
By using this pattern, you agree to our terms of use:
This pattern is for personal use only.
You agree not to modify, publish, share, sell, or create derivative works from the content on this page, in whole or in part. If you’d like to share this pattern, please share the link to this webpage only. You may sell finished items made from this pattern.
How to Crochet a Cardigan Step-by-Step (Video)
Video not displaying? Watch this tutorial on YouTube instead.