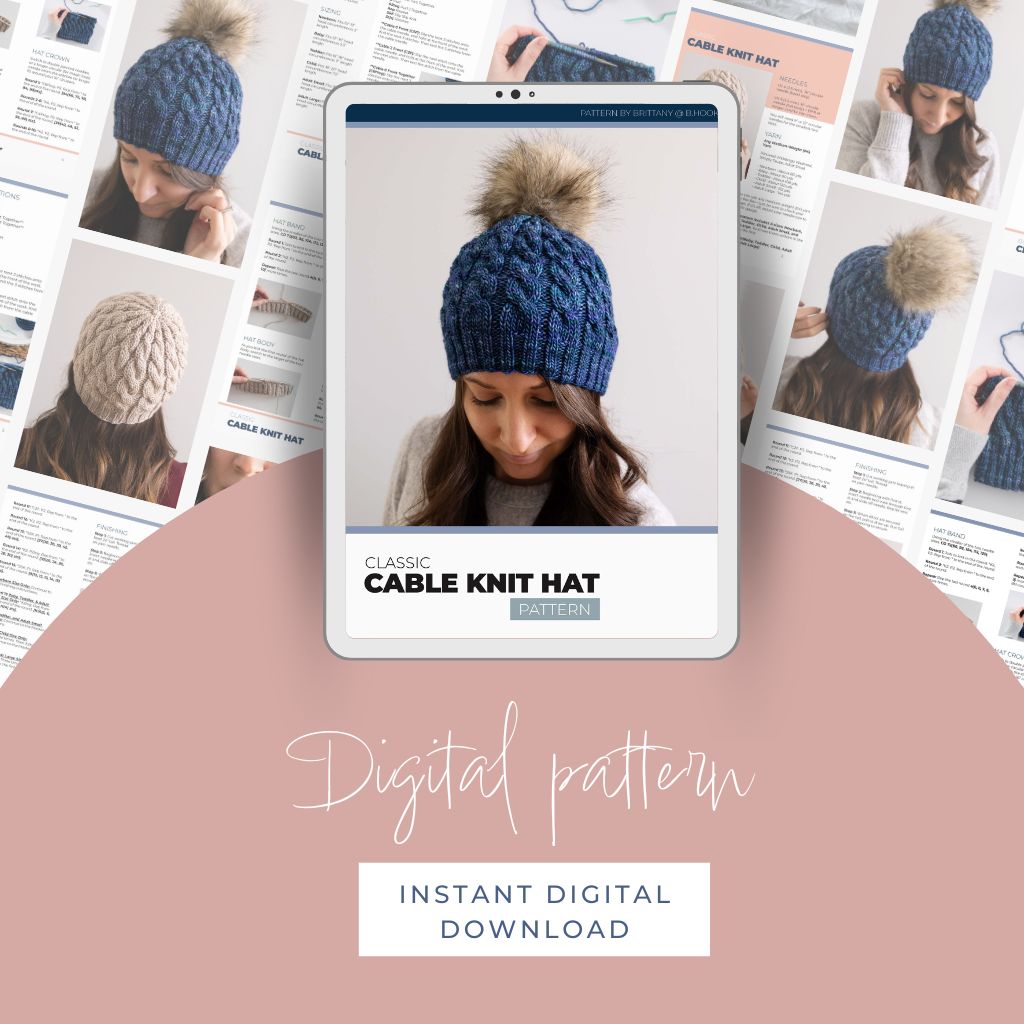
Learn how to make a classic cable knit hat with this free pattern and step-by-step tutorial. It’s one of the easiest cable knit hat patterns, making it perfect for your first cable knitting project. You can view the pattern completely free on this page, or you can buy the ad-free, printable PDF from our shop.
UPDATED: FEBRUARY 24, 2025 BY BRITTANY
This post may contain affiliate links. See our Disclosure Policy for more information.

Skill Level | Intermediate
Finished Size | Newborn, Baby, Toddler, Child, Adult Small, Adult Large
This has been my go-to cable knit hat pattern for years. It’s incredibly stretchy so the fit is perfect every time. Add a pom for a little extra something, incorporate colorful yarn, or keep it a solid color that’ll go with just about anything.
Either way, this beautiful cable hat pattern can easily become your new go-to, everyday knit hat pattern for making gifts, donating to charity, or keeping it for yourself!
About this Pattern
If you’re eager to try cable knitting for one of your first projects, this is a great place to begin. Cables might seem tricky at first, but they get easier as you go. This pattern has a six-stitch twist, a classic cable that’s simple to learn.
You’ll see how easy cable knitting can be with this hat! The twist happens in just one row where you change the stitch order a bit—that’s all! The other rows are just basic knit and purl stitches, things you might already know. You’ll also learn how to decrease in a cable, a neat skill many cable knit hats use to shape the top.
Try either of the yarns we recommend or choose your favorite medium weight to substitute. This one is flexible enough to use just about any medium-weight yarn you want. Just be sure to check the gauge first!
Keep reading for more frequently asked questions, and pattern details, or jump down to the free pattern.
Pattern Overview:
- Supplies
- Yarn Requirements
- Buy the ad-free, printable pattern
- Abbreviations
- Pattern Notes
- Size Chart & Gauge
- Finished Hat Sizing Chart
- Easy Cable Knit Hat Pattern Instructions
- More Knit Hats and Beanies

You can view our classic cable knit hat pattern completely free on this page. But, if you prefer having a digital copy that you can save or print, we’ve got you covered with that option as well.
If you’d like to support our work here at B.Hooked, purchasing the digital pattern is a wonderful way to do so!
Recommended Supplies
- Any Medium-Weight (#4) Yarn
- US 4 (3.5mm) 16″ Circular Needles (Band Only
- US 9 (5.5mm) 16″ Circular Needles ((hat body) + DPN or longer cord for hat crown.
- You will need 9” or 12” circular needles for the smallest two sizes.
- Cable Needle
- Yarn Needle
- Stitch Marker
- Scissors
- Faux Fur Pompom (optional)
Yarn Requirements
| Size | Yardage Required |
| Newborn | 80 yds |
| Baby | 90 yds |
| Toddler | 108 yds |
| Child | 120 yds |
| Adult Small | 132 yds |
| Adult Large | 144 yds |
For the blue hat you see in the pictures, I used Malabrigo Washted yarn in the color called “azules”, and the tan hat is Malabrigo Worsted “simply taupe”. This yarn has a wonderful feel, and its smooth stitch definition makes it perfect for showing off the beautiful cables.
This pattern works well with lots of medium-weight yarns. For the best look, pick a yarn that’s smooth or just a little textured so the cables stand out. You’ve got plenty of options to make it your own! Just be sure you use a medium-weight (#4) yarn you like—just be sure to check your gauge. If it’s off, adjust your needle size to match gauge.
Abbreviations
- C2F Cable 2 Front**
- C6F Cable 6 Front**
- C6Ftog Cable 6 Front Together**
- C4Ftog Cab le 4 Front Together**
- K2tog Knit 2 Together
- K Knit
- K2tog Knit Two Together
- P Purl
- P2tog Purl 2 Together
- Rep Repeat
- St(s) Stitches

**Cable 2 Front (C2F): Slip the next stitch onto the cable needle, and hold at the front of the work. Knit the next stitch. Then knit the stitch from the cable needle.
**Cable 6 Front (C6F): Slip next 3 stitches onto cable needle and hold at front of work. Knit next 3 stitches. Knit 3 stitches from cable needle.
**Cable 6 Front Together (C6Ftog): Slip next 3 stitches onto cable needle and hold at front of work. Knit next st. K2tog. From cable needle stitches, SSK. K last.
**Cable 4 Front Together (C4Ftog): Slip next 2 stitches onto cable needle and hold at front of work. K2tog. From cable needle stitches, SSK.
Pattern Notes
This hat is worked from the band up to the crown. You’ll start with the smaller circular needles to knit the band, then switch to the larger circular needles to knit the hat sides and crown to ensure a comfortable and stretchy fit.
When the crown stitches are too few to knit comfortably on the 16” circular needles, switch to the same size double-pointed needles (evenly distributing the stitches among them), or switch to a 32” or larger circular needle of the same size to knit magic loop.
This pattern includes 6 sizes: Newborn, Baby, Toddler, Child, Adult Small, and. Adult Large. You’ll see them written in the
pattern like this: Newborn(Baby, Toddler, Child, Adult Small, Adult Large)
To determine which size to make: measure the circumference of your head with a tape measure resting in the center of your forehead. Then use the sizing chart below to determine which size to make.
For more details on hat sizing, and making a hat that fits perfectly, check out our hat sizing guide here.
Easy Cable Knit Hat Sizing Chart
| Size | To Fit Circumference |
| Newborn | Fits 10”-13” |
| Baby | Fits 13”-16” |
| Toddler | Fits 16”-18” |
| Child | Fits 18”-20” |
| Adult Small | Fits 19”-22” |
| Adult Large | Fits 21”-23” |
Gauge: 10 stitches and 14 rounds = 2″ worked stockinette stitch in the round.
Pattern Update 2025: I updated this pattern completely in February 2025. If you’ve got the old version or followed the earlier tutorial, no worries—it’ll still turn out great. The new design makes the hat fit and look even better, with a few smart changes. I added two needle sizes, which means the stitch counts are a little different now.
Easy Cable Knit Hat Pattern Instructions
Hat Band
Using the smaller of the two needle sizes, CO 72(80, 96, 104, 112, 120).
Round 1: Join to knit in the round. *K2, P2. Rep from * to the end of the round.
Round 2: *K2, P2. Rep from * to the end of the round.
Repeat: Rep the last round 4(6, 6, 7, 8, 10) more times.

Hat Sides
As you knit the first round of the hat body, switch to the larger of the two needle sizes.

Rounds 1-7: *K6, P2. Rep from * to the end of the round.
Round 8: *C6F. P2. Rep from * to the end of the round.
Repeat: Rep last 8 rounds 1(1, 2, 2, 3, 3) more times, but do not work the 8th round of just the last repeat.

Crown Decreases
Switch to double pointed needles, or a longer circular (for magic loop) needle when the stitches no longer fit around your 16” circulars.
Round 1: *C6Ftog. P2. Rep from * to the end of the round. [54(60, 72, 78, 84, 90)sts].
Rounds 2-6: *K4, P2. Rep from * to the end of the round.
Round 7: *C4Ftog. P2. Rep from * to the end of the round. [36(40, 48, 52, 56, 60) sts].
Rounds 8-10: *K2. P2. Rep from * to the end of the round.
Round 11: *C2F. P2. Rep from * to the end of the round.
A digital pattern is available in our shop so you can print out the pattern
Round 12: *K2. P2. Rep from * to the end of the round.
Round 13: *K2. P2tog. Rep from * to the end of the round. [27(30, 36, 39, 42, 45) sts].
Round 14: *SSK. P1. Rep from * to the end of the round. [18(20, 24, 26, 28, 30) sts].
Round 15: *SSK. P1. Rep from * to the end of the round. [9(10, 12, 13, 14, 15) sts].
Newborn Size Only: Continue to the finishing instructions.
Round 16 Baby, Toddler, & Adult Small Size Only: *K2tog. Rep from * to the end of the round. [N/A(5, 6, N/A, 7, N/A) sts].
Baby, Toddler, and Adult Small Size Only: Continue to the finishing instructions.
Round 16 Child Size Only: [K3tog] three times. Then K2tog. (7 sts) Continue to the finishing instructions.
Round 16 Adult Large Size Only: [K3tog. K2tog] Three times. (9 sts) Continue to the finishing instructions.
Finishing
Step 1: Cut working yarn leaving at least 24” tail. Thread on yarn needle.
Step 2: Beginning with first st, insert needle knit-wise through first st and slide off needle. Rep for rem sts.
Step 3: When all sts are secured on the tail, pull to draw up. Run tail around opening to secure.
TERMS OF USE:
This pattern is for personal use only. You agree not to modify, publish, transmit, sell, create derivative works or in any way exploit any of the content within this page, in whole or in part. If you wish to share this pattern, share a link to this webpage only. You may sell finished items made from this pattern.
Copyright, B.Hooked Crochet, LLC
More Knit Hats and Beanies
Hats are one of the most satisfying things to crochet! Here at B.Hooked we love designing them too. Here are some of our favorite free hat patterns with tutorials if you need a little help along the way.