This post may contain affiliate links. See our Disclosure Policy for more information.
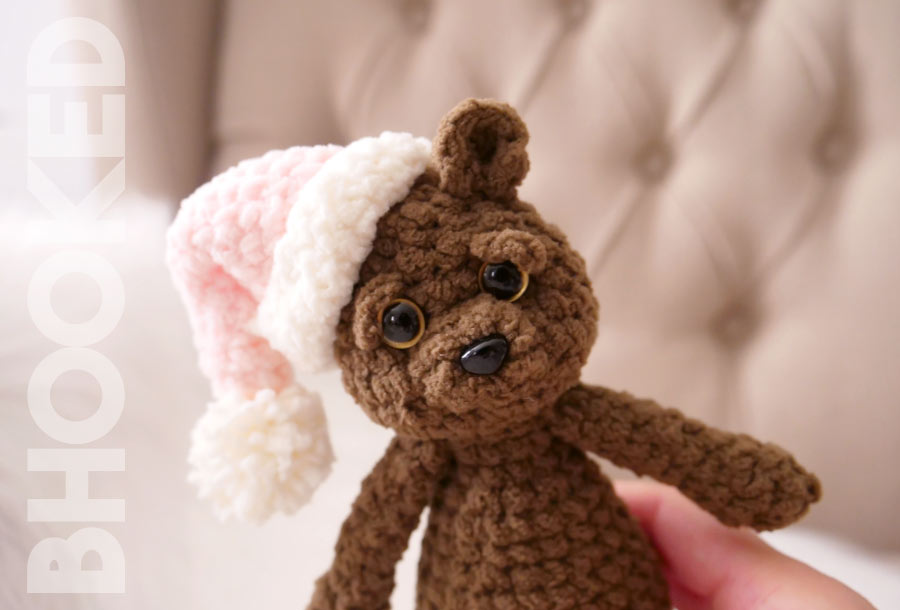
A Little Crochet Bear for any occasion.
Skill Level | Intermediate
Finished Size | About 7″ tall


About this Pattern
If you love amigurumi and enjoy making them for the holidays, you’re in for a real treat here. This cute little crochet bear comes together with basically no seaming and you can customize the hat color for any holiday occasion.
With this project you’ll learn clever ways of incorporating amigurumi pieces into a project so you don’t have to seam them in place. Every major body piece is crocheted in place so the only seaming you’ll do here is within some of the facial features.
Before you begin, review this page entirely so you understand the full scope of the project. We’ve prepared a list of recommended supplies, abbreviations and instructions to walk you through our little crochet bear, step-by-step.
Recommended Supplies
- Lion Brand Feels Like Butta Yarn
- Color A: approx 150 yds
- Color B: approx 20 yds
- Color C: approx 20 yds
- 3.5 mm Crochet Hook
- Yarn Needle
- Scissors
- Stitch Marker
- Polyfil Stuffing
- 6 mm Safety Eyes
- 9 mm Safety Nose
This little crochet bear was originally created with Bernat Baby Blanket Tiny yarn. Unfortunately, this yarn has been discontinued.
Though I couldn’t locate a perfect match for Blanket Tiny, I’ve discovered that Lion Brand Feels Like Butta comes closest to serving as a suitable alternative!
Abbreviations
This pattern is written using standard US crochet terminology.
- Ch Chain
- Cont Continue
- Hk Hook
- Rem Remaining
- Rep Repeat
- Sc Single Crochet
- Sc2tog Single Crochet Two Together
- Sk Skip
- Slst Slip Stitch
- St(s) Stitch(es)

Additional Notes
Finished Size
About 7″ tall
Gauge
Use finished size to measure gauge.
This bear comes together primarily with your crochet hook so if you aren’t a fan of seaming amigurumi pieces in place, you’ll love this project. Having prior amigurumi experience, knowing basic increases and decreases and experience working with low stitch definition will really help.
Need to print this pattern?
You’ll find the full pattern for free here on this page. However, if you’d like to have a PDF version to print or save for offline use, you can purchase it from our shop.
Written Instructions
Arms (Make Two)
Round 1: With color A, make a magic ring with 6 sc. Join with a slst to first sc.(6 sts)
Round 2: 2 sc in first st. 1 sc in next 2 sts. 2 sc in next st. 1 sc in last 2 sts. (8 sts)
Round 3: 1 sc in every st. (8 sts)
Round 4: Sc2tog. 1 sc in the next 2 sts. Sc2tog. 1 sc in last 2 sts. (6 sts)
Rounds 5-12: 1 sc in every st. (6 sts)
At the end of round 12, slst in marked st. Fasten off.
Legs (Make Two)
Round 1: With color A, make a magic ring with 6 sc. Join with a slst to first sc.(6 sts)
Round 2: 2 sc in first st. *1 sc in next st. 2 sc in next st. Rep from * to last st. 1 sc in last st. Do not join. Continue to work in a spiral. (9 sts)
Rounds 3-4: 1 sc in every st. (9 sts)
Round 5: Sc2tog. *1 sc in next st. Sc2tog. Rep from * to last st. 1 sc last st. (6 sts)
Rounds 6-10: 1 sc in every st. (6 sts)
When you complete round 10 of the first leg, slst in the first st and fasten off.
Repeat rounds 1 through 10 for the second leg. When you complete round 10 of the second leg, do not fasten off. Continue to body.
Body
Round 1: (Continuing with color A) Make 1 sc in the first 3 sts of leg currently on hk. Pick up the other leg and continue to work in sts of last round – 1 sc in every st. Continue to other legs – 1 sc in last 3 sts. (12 sts)
Round 2: 2 sc in every st. (24 sts)
Round 3: 2 sc in first st. *1 sc in next st. 2 sc in next st. Rep from * to last st. 1 sc in last st. Do not join. Continue working in a spiral. (36 sts)
Rounds 4-5: 1 sc in every st. (36 sts)
Round 6: Sc2tog. *1 sc in next st. Sc2tog. Rep from * to last st. 1 sc last st. (24 sts)
Rounds 7-9: 1 sc in every st. (24 sts)
Round 10: Sc2tog. *1 sc in next 2 sts. Sc2tog. Rep from * to last 2 sts. 1 sc last 2 sts. (18 sts)
Rounds 11-12: 1 sc in every st. (18 sts)
Round 13: Sc2tog. *1 sc in next st. Sc2tog. Rep from * to last st. 1 sc last st. (12 sts)
Rounds 14-15: 1 sc in every st. (12 sts)
Round 16: [Insert hk through both layers of the first arm and in the next st of the body and sc] three times. 1 sc in next 3 sts. [Insert hk through both layers of the second arm and in the next st of the body and sc] three times. 1 sc in last 3 sts.
Don’t fasten off. Continue to the head instructions.
Head
Round 1: (Continuing with color A) Make 2 sc in every st. (24 sts)
Round 2: 2 sc in first st. *1 sc in next st. 2 sc in next st. Rep from * to last st. 1 sc in last st. Do not join. Continue to work in a spiral.(36 sts)
Rounds 3-4: 1 sc in every st. (36 sts)
Round 5: Sc2tog. *1 sc in next st. Sc2tog. Rep from * to last st. 1 sc last st. (24 sts)
Rounds 6-7: 1 sc in every st. (24 sts)
Round 8: *Sc2tog. Rep from * to end of round. (12 sts)
Rounds 9-10: 1 sc in every st. (12 sts)
Stop working on the head to add the facial features. Do not fasten off. Pull up on the working loop.
Nose
Round 1: Make a magic ring with the following: 3 sc, 3 dc, 3 sc, 3 dc. Close the ring and join with a slst to the first sc. Fasten off.
Add a safety nose to the center of the nose piece.
Seam the nose piece to the head. Situate it near the bottom of the head, centered between the arms.
Eyes
Add the safety eyes in the row just above the nose piece, at each end, roughly two stitches apart.
Eyelids
With a scrap piece of color A yarn, make a slip knot and two chains. Fasten off.
Thread one of the ends on a yarn needle and run it through at the inner corner of the eye. Thread the opposite end through the outer corner of the eye. Tie the two ends off on the inside. Repeat for the other eye.
Stuff the head.
Continue to the last round of head:
*Sc2tog. Rep from * to end of round. (6 sts)
Slst in marked stitch to correct the jog. Fasten off with a long tail. With yarn needle and tail, close up the opening.
Ears
Step 1: Poke the hk through head stitches where you want the ear to be.
Step 2: Fasten on with color A and ch 3. Make 7 more dc in the same sp. Fasten off.
Step 3: Use yarn tails and a yarn needle to secure the corners of the ear to the head.
Repeat steps 1 through 3 for the second ear.
Hat
Round 1: With color C, make a magic ring with 6 sc. Do not join. Cont to work in a spiral. (6 sts)
Round 2: 2 sc in first st. 1 sc in next 2 sts. 2 sc in next st. 1 sc in last 2 sts. (8 sts)
Rounds 3-6: 1 sc in every st. (8 sts)
Round 7: 2 sc in first st. 1 sc in next 3 sts. 2 sc in next st. 1 sc in last 3 sts. (10 sts)
Round 8: 1 sc in every st. (10 sts)
Round 9: 2 sc in first st. 1 sc in next 4 sts. 2 sc in next st. 1 sc in last 4 sts. (12 sts)
Round 10: 1 sc in every st. (12 sts)
Round 11: 2 sc in first st. 1 sc in next 5 sts. 2 sc in next st. 1 sc in last 5 sts. (14 sts)
Round 12: 2 sc in first st. 1 sc in next 6 sts. 2 sc in next st. 1 sc in last 6 sts. (16 sts)
Round 13: 2 sc in first st. 1 sc in next 7 sts. 2 sc in next st. 1 sc in last 7 sts. (18 sts)
Round 14: 2 sc in first st. 1 sc in next 8 sts. 2 sc in next st. 1 sc in last 8 sts. (20 sts)
Round 15: 2 sc in first st. 1 sc in next 9 sts. 2 sc in next st. 1 sc in last 9 sts. (22 sts)
Round 16: 2 sc in first st. 1 sc in next 10 sts. 2 sc in next st. 1 sc in last 10 sts. Break C and add color B in last st. (24 sts)
Rounds 17-20: 1 sc in every st. (12 sts)
Slst in marked stitch to correct the jog. Fasten off. Fold the white section up for the band. Use the tail to tack in place. Weave in any remaining ends.
By using this pattern, you agree to our terms of use:
This pattern is for personal use only. You agree not to modify, publish, transmit, sell, create derivative works or in any way exploit any of the content within this page, in whole or in part. If you wish to share this pattern, share a link to this webpage only. You may sell finished items made from this pattern.
Copyright, B.Hooked Crochet, LLC
Step-by-Step Tutorial
Video not displaying? Watch this tutorial on YouTube instead.
Left-Handed Tutorial on YouTube