The crochet ripple stitch is easier than it looks, and this beginner-friendly tutorial will guide you step by step through the wavy pattern. You’ll learn how to create even peaks and valleys, troubleshoot common mistakes, and explore ways to use this versatile stitch in blankets, scarves, cowls, and more. Whether you’re new to crochet or just new to ripple stitches, this guide makes it simple to master this classic pattern.
UPDATED: JANUARY 27, 2026 BY BRITTANY
This post may contain affiliate links. See our Disclosure Policy for more information.

The crochet ripple stitch is a timeless favorite for blankets, but its versatility makes it perfect for so much more. From cozy scarves and wearable pieces to eye-catching home decor, this stitch adds movement and texture to any project.
It’s one of my favorite stitches to work with!
You can pair it with your favorite yarn and let your creativity take the lead. While there are many ways to crochet a ripple stitch, this beginner-friendly version is one of the easiest to learn. Its simple, soothing repeat makes it ideal for relaxing stitch sessions when you just want to unwind and crochet.
In the rest of this tutorial, we’ll explore all aspects of the crochet ripple stitch: what it is, how to crochet it, and what projects it’s best suited for. Plus I’ll answer some frequently asked questions so you don’t have to go searching for the answers you need.
- What is the Ripple Stitch?
- Crochet Ripple Stitch Tutorial
- Crochet Ripple Stitch Step-by-Step Video
- Ripple Stitch vs. Chevrons and Other Wave Stitches
- Common Crochet Ripple Stitch Mistakes (And How to Fix Them)
- Crochet Ripple Stitch Project Ideas
- Frequently Asked Questions
- More Beginner-Friendly Stitch Tutorials + Free Patterns
What is the Ripple Stitch?
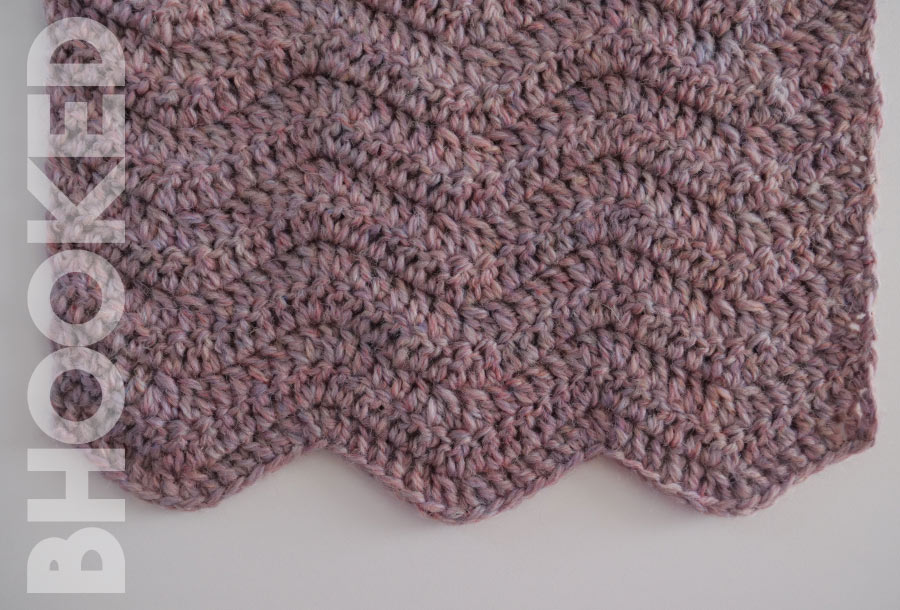
The ripple stitch is a beginner-friendly crochet stitch that has a subtle wave look to it. Since the ripple stitch is made primarily with double crochet stitches, projects using this stitch will finish faster than other ripple or chevron stitch pattern varieties.
Strategically placed increases and decreases shape the “peaks and valleys” of a crochet ripple stitch pattern. While still easy to learn, these increases and decreases are a great next step for new crocheters who have mastered basic stitches.
Crochet Ripple Stitch Tutorial
The crochet ripple stitch is incredibly versatile so you can pair it with just about any yarn in your stash from lightweight to super bulky. In order to see the stitch pattern best, choose a smooth yarn that’ll highlight and show off the pattern. Alternatively, you can pair it with a slightly textured yarn for an even more interesting look to your project.
Supplies
- Yarn: For practice, use medium-weight yarn. You’ll only need a small amount to make a practice swatch.
- 6 mm Crochet Hook
Pattern Notes
- There is no right or wrong side: the crochet ripple stitch is considered a reversible stitch, which means it looks the same on both sides.
- This crochet pattern is written in US terms.
In the pattern instructions below, the chain 3 at the beginning of every row counts as a double crochet stitch. So the first stitch of every row will be a chain 3. And the last stitch of every row after the first, will be a chain 3.
To avoid dropping stitches at the beginning and end of the row, your first stitch is worked in the same stitch where the chain three is coming from. The last two stitches of the row should be worked in the third chain.
Stitch Multiple
The crochet ripple stitch multiple is 14 + 3.
This means that there are 14 stitches from peak to peak. When planning a project that uses the ripple stitch, chain in groups of 14 and add three chains only at the very end.
While chaining until it’s as wide as you need is a fine strategy for basic stitches, it doesn’t work for ripple or chevron stitches. Since the chain is condensed into peaks and valleys, the length will seemingly “shrink” after finishing the first row.
This just means you need to do a little extra work to plan the length of your starting chain for ripple stitch projects. When you’re ready for that, or when you want to improvise your own blanket pattern, we have an article that will help you figure out how many starting chains you need for your ripple and chevron stitch projects.

Stitch Abbreviations
- Ch Chain
- Dc Double Crochet
- Dc2tog Double Crochet Two Together
- Hk Hook
- Rem Remaining
- Rep Repeat
- St(s) Stitch(es)
Row 1: Ch any number of sts divisible by 14 and add 3 at the end. 1 dc in 4th ch from hk. 1 dc in next 4 sts. Dc2tog twice. *1 dc in next 4 sts. 2 dc in next 2 sts. 1 dc in next 4 sts. Dc2tog twice. Rep from * to last 5 sts. 1 dc next 4 sts. 2 dc in last st. Turn.
Row 2: Ch 3. 1 dc in same st as ch 3. 1 dc in next 4 sts. Dc2tog twice. *1 dc in next 4 sts. 2 dc in next 2 sts. 1 dc in next 4 sts. Dc2tog twice. Rep from * to last 5 sts. 1 dc in next 4 sts. 2 dc in last st. Turn.
Repeat: Rep the last row until your project measures the length you want.
Crochet Ripple Stitch Step-by-Step Video
Video not displaying? Watch this tutorial on YouTube instead.
Left-Handed Tutorial on YouTube
Ripple Stitch vs. Chevrons and Other Wave Stitches
If you’re exploring wavy crochet patterns, you might be wondering how the ripple stitch compares to similar stitches like chevron or other wave patterns. Here’s a quick guide:
- Ripple Stitch: Features gentle peaks and valleys created by increases and decreases, usually in a repeating V-shaped pattern. Perfect for blankets, scarves, cowls, and project accents.
- Chevron Stitch: Similar to ripple, but usually has sharper points and a more dramatic zig-zag effect. Works well for bold patterns and color changes. I have a tutorial for that stitch here.
- Wave Stitches: These can vary in height and shape but generally create a flowing, undulating effect. Often used for textured blankets or decorative trims.
The ripple stitch is a great choice for beginners because it’s easy to follow and produces a soft, wavy look without sharp points. You can experiment with colors and yarn weights to make your ripple pattern unique.
Common Crochet Ripple Stitch Mistakes (And How to Fix Them)
The crochet ripple stitch has a simple rhythm, but it’s easy to get off track if you’re not paying attention. Here are a few common mistakes that crocheters run into—and how to fix them:
1. Losing the “peaks and valleys”
Ripple stitches are built on increases (peaks) and decreases (valleys). If your edges start to slope or your ripple pattern looks uneven, double-check that you’re consistently adding stitches in the same place and skipping or decreasing in the right spots.
Fix it: Mark the peaks and valleys with stitch markers as you go to stay on track. It makes counting easier and helps catch mistakes early.
2. Adding or losing stitches at the ends
If your rows keep getting longer or shorter, you might be accidentally adding or skipping stitches at the ends of your rows.
Fix it: Count your stitches at the end of each row until you get into the rhythm. Ripple stitch patterns don’t usually straighten out uneven edges on their own—so catching this early is key!
3. Confusing stitch placement
Because ripple stitches often involve working multiple stitches into one space or skipping stitches entirely, it’s easy to misread where your hook should go.
Fix it: Use a stitch diagram or watch a tutorial video (like the one included in this post!) to visualize where to place your stitches. Seeing it in action can make all the difference.
4. Curled or puckered fabric
If your fabric starts curling or puckering, it could be from tension that’s too tight—or a stitch count that’s off.
Fix it: Try going up a hook size to loosen your stitches, and double-check your stitch counts on each row to make sure your ripple pattern is balanced.
Crochet Ripple Stitch Project Ideas
The crochet ripple stitch creates a light, reversible fabric with no holes or gaps. These qualities make it an excellent choice for projects where drape is important (clothing), where both sides will show (scarves), and projects where you don’t want a lacey look (blankets).
Here is a quick beginner-friendly ripple stitch cowl to put your new skills to use. The color-changing yarn does all the interesting work for you so you can just focus on mastering the ripple stitch pattern.

Frequently Asked Questions
More Beginner-Friendly Stitch Tutorials + Free Patterns
When you’ve mastered the four basic stitches: single crochet, half double crochet, double crochet, and treble crochet, the next step is to use these stitches together to make up more interesting stitch patterns. Here are some more stitches for you to try next: