An oval might not be the first shape that comes to mind when you’re expanding your skills, but a simple crochet oval is much more useful than you’d expect! You can use it to make bags, rugs, the base for stuffed toys, slippers, and more—it’s a handy shape that can add something special to your projects. In this guide, I’ll walk you through everything you need to know to master crochet ovals, no matter which basic stitch you’re using.
Crocheting an oval might seem tricky at first, but once you learn a few simple rules, it’s easy.
UPDATED: SEPTEMBER 11, 2023 BY BRITTANY
This post may contain affiliate links. See our Disclosure Policy for more information.

This guide is here to answer all your questions, like how many stitches to use and how to adjust the size. I’ll show you step-by-step how to crochet a flat oval and cover all the basics!
Here’s a quick overview of the topics we will cover in this article:
- A Few Things to Know Before You Get Started
- Basic Crochet Oval Pattern
- How to Add More Rounds to the Crochet Oval
- Crochet Oval Increase Chart
- What is the First and Last Stitch of the Round?
- What Happens if You Stop Increasing?
A Few Things to Know Before You Get Started
Even though you don’t turn the work as you crochet an oval, “turning chains” are still used in some instances. While given the name “turning chain” because you use them to turn and start another row, a turning chain is best understood as a way to match the height of your stitch.
You may already be familiar with how each basic stitch has a specific number of chains “assigned” to it based on how tall it is. Here’s a table with the basic stitches and the number of chains that equal the height of the stitch.
| Stitch | Chains Needed |
| Single Crochet | 1 |
| Half Double Crochet | 2 |
| Double Crochet | 3 |
| Treble Crochet | 4 |
| Double Treble Crochet | 5 |
While some crocheters modify this number to suit their own crochet style, it’s generally accepted as an industry standard. Keep these numbers in mind as you continue reading.
Basic Crochet Oval Pattern
Crocheting an oval is interesting because although you crochet in rounds, the shape begins with a foundation chain – much like you’d use for crocheting a flat piece. This chain is used to jumpstart the elongated foundation for the oval.

The good news is that no matter how big or small, or which hook and yarn you use to crochet a oval, the basic pattern is the same: start with a chain, crochet the first round, and follow the increasing pattern for each additional round you want.
Unlike the circle with increases evenly spaced to make a perfect round shape, a crochet oval has increases situated at each end of the shape.
So what is an increase you ask?
An increase in the world of crochet is to simply make two stitches into the same stitch. By putting two stitches in one, you increase your stitch count by one.
With this information in mind, let’s look at an example pattern for the first four rounds of a crocheted oval.
Supplies
- Yarn: For practice, use medium-weight yarn. You’ll only need a small amount to make a few rounds.
- 5.5 mm Crochet Hook
Pattern Notes
- The side facing you as you crochet the circle is considered the right side.
- This crochet pattern is written in US terms.
In the example pattern below, I’ll use double crochet stitches. But the same basic pattern will apply to the single crochet, half double crochet, and treble crochet stitches. The only difference is the number of chains you start with in the first round.
Use the chart below to determine how many chains to start with based on the stitch you want to use.
| Stitch | Starting Chain # in Round 1 | Where to Crochet First Stitch |
| Single Crochet | 9 | 2nd ch from hk |
| Half Double Crochet | 10 | 3rd ch from hk |
| Double Crochet | 11 | 4th ch from hk |
| Treble Crochet | 12 | 5th ch from hk |
Abbreviations
- Ch Chain
- Dc Double Crochet
- Hk Hook
- Inc Increase
- Slst Slip Stitch
- St(s) Stitch(es)
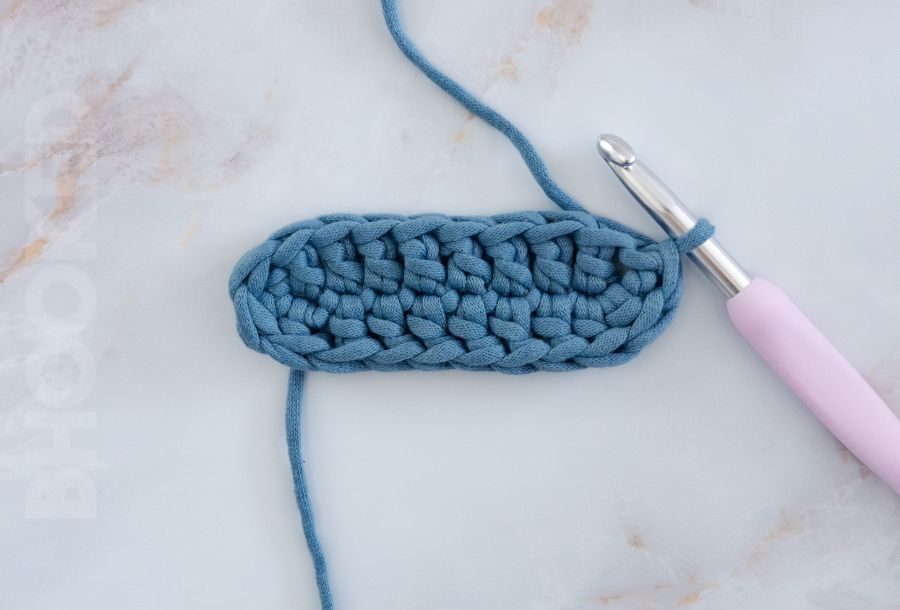
Round 1: Make a slip knot and ch 11. Dc in the 4th ch from the hk, and in the next 6 ch to the last. Make 4 dc in the last ch, rotating the work around so you can see the underside of the ch.

Now looking at the other side of your turning chain, make a dc in the next 6 ch.

Then make 2 dc in the last ch, and slst to the 3rd ch to finish the round. (20 sts)
Round 2: Ch 3 (counts as a dc), and dc in the same place as the ch 3 (inc made). Make 2 dc in the next st. 1 dc in the next 6 sts. Then make 2 dc in each of the next 4 sts. 1 dc in the next 6 sts. Then make 2 dc in each of the last 2 sts. Slst in the 3rd ch to finish the round (28 sts)

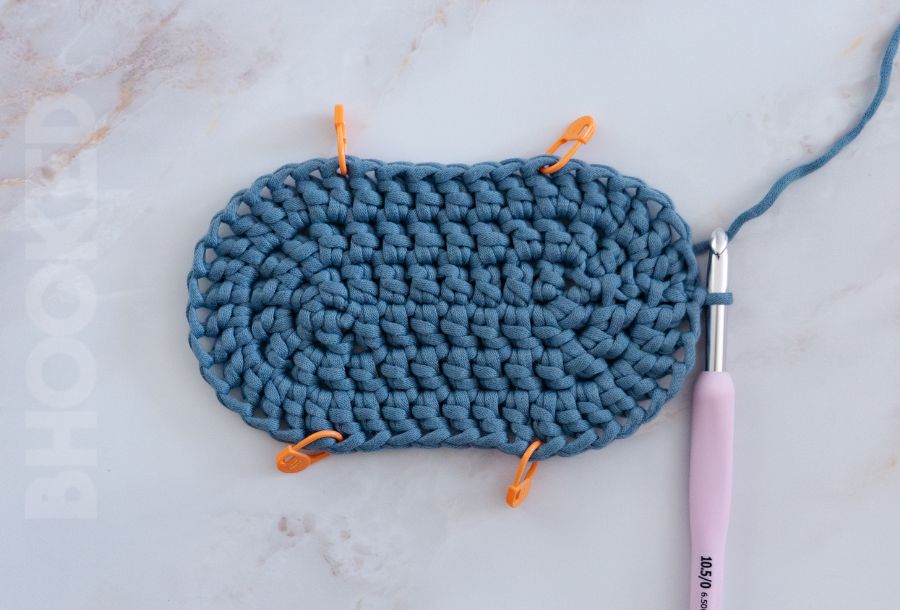
Round 3: Ch 3 (counts as a dc), and dc in the same place as the ch 3 (inc made). Make 2 dc in the next 3 sts. 1 dc in the next 6 sts. Then make 2 dc in each of the next 8 sts. 1 dc in the next 6 sts. Then make 2 dc in each of the last 4 sts. Slst in the 3rd ch to finish the round. (44 sts)

Place a marker in the 6th, 14th, 28th, and 36th stitches. This will help you know when to make increases as you add more rounds.
Round 4: Ch 3 (counts as a dc). *Make 2 dc in the next st. 1 dc in the next st. Rep from * to the next marked st. Make 1 dc in the next marked st, replacing the marker in the new st. 1 dc in each st to the next marked st. Make 1 dc in the next marked st, replacing the marker in the new st. **Make 2 dc in the next st. 1 dc in the next st. Rep from ** to the next marked st. Make 1 dc in the next marked st, replacing the marker in the new st. Make 1 dc in each st to the next marker. 1 dc in the next marked st, replacing the marker in the new st. ***Make 2 dc in the next st. 1 dc in the next st. Rep from *** to the last st. Make 2 dc in the last st. Slst in the 3rd ch to finish the round. (58 sts)

Round 5: Ch 3 (counts as a dc). Make 1 dc in the next st. *2 dc in the next st. Make 1 dc in the next 2 sts. Rep from * to the st before the next marker. Make 2 dc in the st before the next marker. Make 1 dc in the next marked st, replacing the marker in the new st. 1 dc in each st to the next marked st. Make 1 dc in the next marked st, replacing the marker in the new st. **Make 2 dc in the next st. 1 dc in the next 2 sts. Rep from ** to 2 sts before the next marker. Make 2 dc in the next st, and 1 dc in the st before the marker. Make 1 dc in the next marked st, replacing the marker in the new st. 1 dc in each st to the next marker. Make 1 dc in the next marked st, replacing the marker in the new st. 1 dc in the next st. ***2 dc in the next st. Make 1 dc in the next 2 sts. Rep from *** to the last st. Make 2 dc in the last st. Slst in the 3rd ch to finish the round. (72 sts)

How to Add More Rounds to the Oval
Now let’s dive into adding more rounds to the initial five in the pattern above. As you progress to later rounds, you’ll need to make slight adjustments in the pattern instructions. But it’s pretty straightforward!
In order for the crochet oval to lay flat, you must evenly space the increases at each end between the stitch markers. And there’s an easy was to remember this. For each round after 5, the number of stitches between each increase increases by one.

Use this list to tell you where to increase in each round (at each end, between the stitch markers):
- Round 6 → 3 stitches between increases
- Round 7 → 4 stitches between increases
- Round 8 → 5 stitches between increases
- Round 9 → 6 stitches between increases
- Round 10 → 7 stitches between increases
- Round 11 → 8 stitches between increases
- Round 12 → 9 stitches between increases
- Round 13 → 10 stitches between increases
- Round 14 → 11 stitches between increases
- Round 15 → 12 stitches between increases
The biggest takeaway from this list is that the number of stitches between the increases is one more than the previous round. So if you plan to crochet an oval that’s more than 15 rounds, add one more stitch in between the increases for every additional round.
When you evenly space increases on either side of the oval, something very important is going on. This even distribution keeps the flat, oval shape but it also increases the stitch count by 14 every round.
Crochet Oval Increase Chart
Once you finish the first three rounds of the oval, the number of stitches increased each round is the same for each subsequent round. This simple chart breaks down stitch count by round.
| Number of Stitches | |
| Round 4 | 58 |
| Round 5 | 72 |
| Round 6 | 86 |
| Round 7 | 100 |
| Round 8 | 114 |
| Round 9 | 128 |
| Round 10 | 142 |
| Round 11 | 156 |
| Round 12 | 170 |
| Round 13 | 184 |
| Round 14 | 198 |
| Round 15 | 212 |
What is the First and Last Stitch of the Round?
When following a pattern there is a very important clue that’ll tell you whether the starting chain at the beginning of the round counts as a stitch or not.
If your pattern says…
“Slst to the (first/second/third) chain”, then the chain counts as a stitch and the chain is the first stitch of the round.
Or if your pattern says…
“Slst to the first stitch”, the chain does NOT count as a stitch and your first stitch of the round will be the first one you crochet.
For ovals that are made with double crochets, it’s a lot less common for the chain to not count as a stitch. However, for single crochet ovals, it’s more common for the chain to not count as a stitch. Just follow the cues in your pattern.
The easiest way to figure out which stitch is the last is to count the stitches. For example, in our third round double crochet oval example, we know there will be 44 stitches total so the 44th stitch will be the last.
What Happens If You Stop Increasing?
As long as you follow the magic increasing formula for how to crochet an oval, it will continue to grow. But what happens if you stop increasing or better yet, change where you increase within each round?
When you stop increasing, your oval will transform from a flat circle to a tube. An example of this is how a basic crochet bag like this one is made.
It’s important to note though, that just because you stop increasing doesn’t mean you’ll see immediate results. The shorter the stitch, the more rounds it will take to notice this change in shape.
You won’t have to worry about any of this when following a pattern. But it’s worth exploring a little further if you like to improvise your own patterns.
The stitch and gauge have the biggest influence on when you see a change in shape after you stop increasing. But when planning a project, you can generalize when this change in shape will occur:
- With single crochet stitches, stop increasing approximately 6 rounds before you want the shape to change.
- With half double crochet stitches, stop increasing approximately 3 rounds before you want the shape to change.
- With double crochet stitches, stop increasing about 1 round before you want the shape to change.


