This post may contain affiliate links. See our Disclosure Policy for more information.

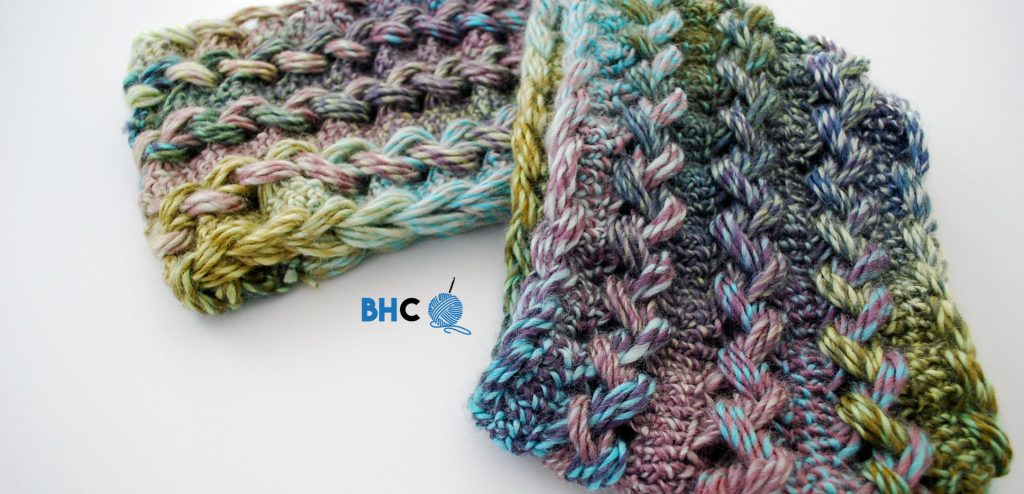
Woven Crochet Mittens
Crochet Pattern by B. Hooked Crochet, Copyright 2016.
Please do not copy, sell, redistribute or republish this pattern. If you wish to share this pattern, link to this page only. You may sell items produced using this pattern. Do NOT use the copyrighted photos for your product listing.
This pattern is written in US crochet terms
![]()
[divider]
Gather Your Supplies
- 2 Skeins Patons Colorwul (Ocean shown)
- 5.5 mm Crochet Hook
- Locking Stitch Markers (optional)
- Darning Needle
- Scissors
Disclosure: Please note that the links below are affiliate links, and at no additional cost to you, I will earn a small commission if you decide to purchase your supplies online. Please understand that I have experience with these products and I recommend them because they are optimal for this pattern, not because of the small commissions I make if you decide to buy them online. If you have received valuable information from me at any point, this is one easy way to pay it forward and say thank you for a job well done!
[divider]
Don’t have Amazon Prime? Don’t pay for shipping, start your free 30-day trial on me!
My husband and I have been Amazon Prime members for years. We order all of our household supplies, gifts, crochet supplies and even some food items from Amazon. We wouldn’t be able to save money if we had to pay for shipping. Amazon Prime members get free two day shipping on eligible Prime items plus a ton of other perks such as free movie and TV show streaming and free music streaming.
If you’ve been thinking about getting an Amazon Prime membership, how about you start with a free 30-day trial on me? It’s the least I can do for your support!
[divider]
Gauge and Sizing
The finished mittens measure approximately 10″ long and 4.5″ wide (at the hand). The thumb measures approximately 3″ long.
These fit me slightly lose and I typically wear an adult small glove or mitten. If you wear a medium-large glove or mitten, I recommend going up to a size 6 mm hook to make the gauge a little larger.
Abbreviations
- Ch – Chain
- Sc – Single Crochet
- Slst – Slip Stitch
- Ws – Woven Stitch** See stitch description
- YO – Yarn Over
To print a list of all crochet abbreviations to keep in your crochet notebook, check out my quick guide here:
Crochet Abbreviations Quick Guide
Stitch Description:
Ws – YO and insert hook into designated stitch, YO and pull up a loop (three loops on hook). Pull the last loop through the middle loop on your hook, YO and pull through the remaining two loops. YO and insert hook into the same stitch (three loops on hook). Pull the last loop through the remaining two loops on your hook. Skip one stitch and repeat.
Pattern Notes
This pattern is worked in rows not rounds. To obtain the proper gauge and overall size, I highly recommend using Patons Colorwul. You could potentially substitute with Bernat roving yarn. Please note that both Colorwul and Roving yarn are 100% wool. You may also substitute with Lion Brand Landscapes if you need a non-wool option, but please know that this pattern has only been tested using Patons Colorwul.
If you need to increase the sizing a little bit, I recommend going up to a 6 mm or 6.5 mm hook. This pattern is only available in adult size at this time.
[divider]
Woven Crochet Mittens Tutorial with Brittany
This video is also available in a left handed version. Click here to be directed to the left handed tutorial on YouTube.
[divider]
Written Instructions

Hand: Make two
Row 1: Ch 35. Slst in the second chain from hook and in the next two chains. Sc in the next two chains. *Ws in the next chain. Skip next chain. Repeat from * 9 more times (total of 10 ws made). Sc in the last 10 chains.
Row 2: Ch 1 (counts as sc). In the back loop only, make a sc in the next 9 stitches. Skip one stitch. *Ws in the next stitch. Skip one stitch. Repeat from * 9 more times (10 ws made). Sc in the back loop only of the next two stitches. Slst in the back loop only of the last 3 stitches.
Row 3: Ch 1. Slst in the back loop only of the first 3 stitches. Sc in the back loop only of the next two stitches. Skip one stitch. *Ws in the next stitch. Skip one stitch. Repeat from * 9 more times (10 ws made). Sc in the back loop only of the last 10 stitches (including turning chain).
Repeat rows 2 and 3 until the piece measures approximately 9″ at it’s widest part. Bind off leaving a tail that is at least 24″ long. We will use this tail to sew them together later.
[divider]
Thumb: Make two
Work the entire thumb in the back loops only
Row 1: Ch 15. Slst in the second chain from hook and in each chain. (14 sts)
Row 2: Ch 1. Skip first stitch. Slst in each remaining stitch. (13 sts)
Row 3: Ch 1. Slst in the first 12 stitches. Skip the last stitch. (12 sts)
Row 4: Ch 1. Skip the first stitch. Slst in each remaining stitch. (11 sts)
Row 5: Ch 1. Slst in the first 10 stitches. Skip the last stitch. (10 sts)
Row 6: Ch 1. Skip the first stitch. Slst in each remaining stitch. (9 sts)
Row 7: Ch 1. Slst in the first 8 stitches. Skip the last stitch. (8 sts)
Rows 8-12: Ch 1. Slst in every stitch. (8 sts)
Row 13: Ch 1. Slst in the first 7 stitches. Make 2 slst in the last stitch. (9 sts)
Row 14: Ch 1. Make 2 slst in the first stitch. Make one slst in each remaining stitch. (10 sts)
Row 15: Ch 1. Slst in the first 9 stitches. Make 2 slst in the last stitch. (11 sts)
Row 16: Ch 1. Make 2 slst in the first stitch. Slst in each remaining stitch. (12 sts)
Row 17: Ch 1. Slst in the first 11 stitches. Make 2 slst in the last stitch. (13 sts)
Row 18: Ch 1. Make 2 slst in the first stitch. Make one slst in each remaining stitch. (14 sts)
Bind off leaving a tail that is at least 10″ long. Fold the thumb in half and stitch the side closed using a darning needle. Create a drawstring closure to close up the top.
[divider]
Assembly
Place the thumb piece on your thumb. Fold your mitten in half and place your hand inside so the thumb piece sticks out in the proper position. Using stitch markers (or a bobby pin will do), secure the bottom of the thumb with each side of the mitten body. Repeat this for the top of the thumb.
Carefully remove your hand and thumb from the mitten. Thread a scrap piece of yarn that is approximately 20″ long on a darning needle. Begin at the bottom of the mitten and whip stitch the band together. When you reach the thumb, stitch around the thumb, securing it to the proper side of the mitten body (be careful not to stitch it closed). When you have stitched all the way around the thumb, proceed by stitching up the remainder of the mitten body, up to the fingertips.
Weave your darning needle in and out of the stitches at the tip of the mitten body to create a drawstring closure. Once you have gone around the mitten one full revolution, pull on your yarn to draw up the fingers. Secure the closure by working the tail around the center of the closure two to three more times. Once its secure, trim your tail.